233
•
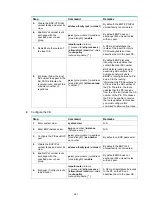
Configure OSPF in the LAN where customer CEs reside.
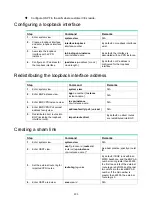
Configuring a loopback interface
Step Command
Remarks
1.
Enter system view.
system-view
N/A
2.
Create a loopback interface
and enter loopback interface
view.
interface loopback
interface-number
By default, no loopback interfaces
exist.
3.
Associate the loopback
interface with a VPN
instance.
ip binding vpn-instance
vpn-instance-name
By default, the interface is
associated with no VPN instance.
4.
Configure an IP address for
the loopback interface.
ip address
ip-address
{
mask
|
mask-length
}
By default, no IP address is
configured for the loopback
interface.
Redistributing the loopback interface address
Step Command
Remarks
1.
Enter system view.
system-view
N/A
2.
Enter BGP instance view.
bgp
as-number
[
instance
instance-name
]
N/A
3.
Enter BGP-VPN instance view.
ip vpn-instance
vpn-instance-name
N/A
4.
Enter BGP-VPN IPv4 unicast
address family view.
address-family ipv4
[
unicast
] N/A
5.
Redistribute direct routes into
BGP (including the loopback
interface route).
import-route direct
By default, no direct routes
are redistributed into BGP.
Creating a sham link
Step Command
Remarks
1.
Enter system view.
system-view
N/A
2.
Enter OSPF view.
ospf
[
process-id
|
router-id
router-id
|
vpn-instance
vpn-instance-name
] *
As a best practice, specify a router
ID.
3.
Set the external route tag for
imported VPN routes.
route-tag
tag-value
By default, if BGP runs within an
MPLS backbone, and the BGP AS
number is not greater than 65535,
the first two octets of the external
route tag are 0xD000 and the last
two octets are the local BGP AS
number. If the AS number is
greater than 65535, the external
route tag is 0.
4.
Enter OSPF area view.
area
area-id
N/A


