Set up and Installation
Note
The same Sidebar shows up in Save and Open dialog boxes of your programs too,
making your server available to you for opening and saving files.
If you don’t see the server in the Finder window’s Shared category,
•
The server may not be connected to the network,
•
The Mac computer may not be connected to the network,
•
Or maybe the check box is turned off for
Connected Servers
and
Bonjour Computers
in
Finder
>
Preferences...
>
Sidebar
.
3.
If you are not automatically connected to the server, click
Connect As...
.
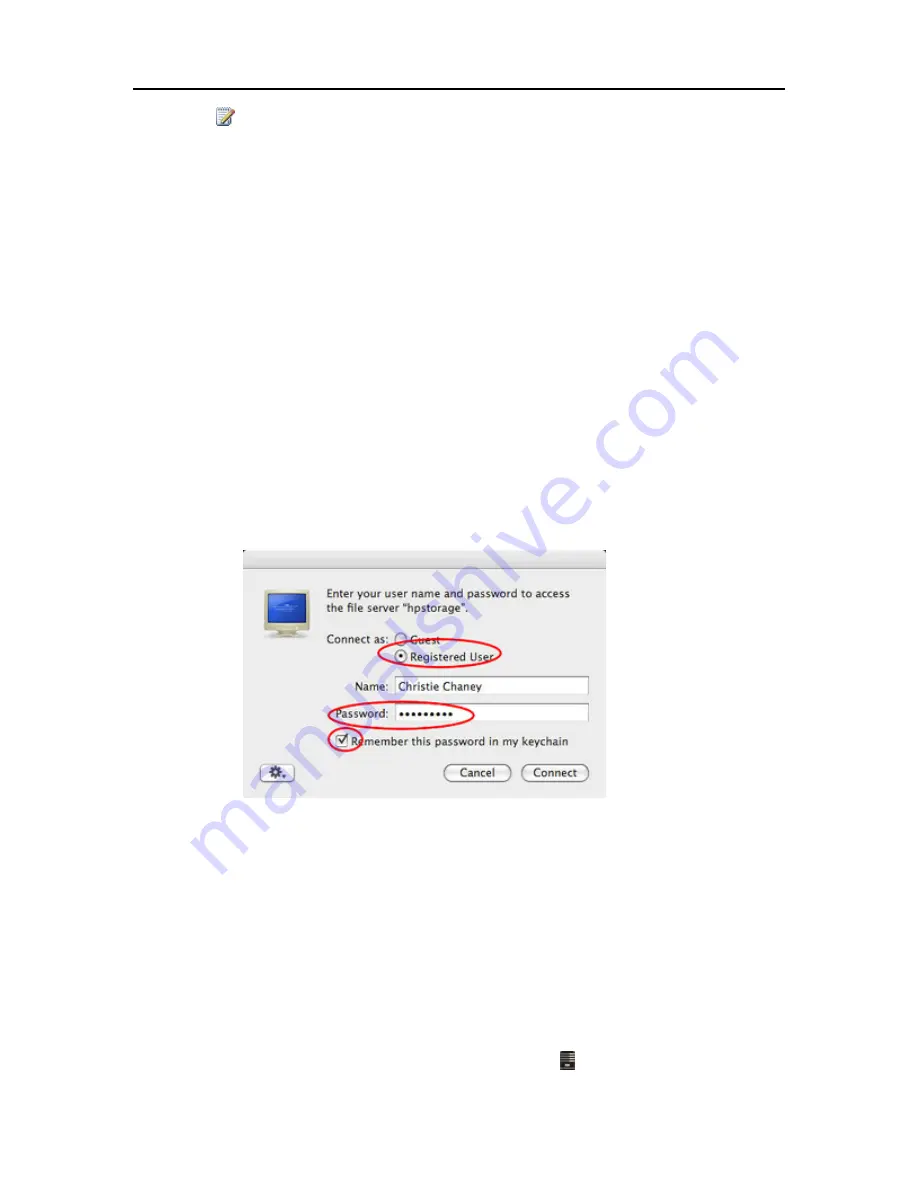
Precisely how you connect to the server depends on what kind of server account you are using:
Guest, User Account, or Administrator.
•
Guest account with no password
—You are automatically connected to the server when
you click the server name in the Finder.
•
Guest account with a password
—In the dialog that opens, select
Registered User
, type
the server's Guest account
Password
, and click
Connect
. You do not need to change the
Name
. Check
Remember this password in my keychain
to remember your settings and
automatically connect to the server in the future.
•
User account
— If you have a User Account on the server, select
Registered User
, type
the
Name
and
Password
that was created in the server's user account in the Windows
Home Server Console, and click
Connect
. Check
Remember this password in my
keychain
to remember your settings and automatically connect to the server in the future.
•
Administrator account
—Alternately, you can connect to the server using the server's
administrator account. Select
Registered User
, type Administrator for the
Name
, and
type the server's
Password
. The server's password was created the first time you installed
the server software on a PC.
4.
Navigate to the folder you want on the server.
The folders that display depend on the
Shared Folder Access
settings for the guest account or
user account that you used to connect to the server. To change
Shared Folder Access
settings,
select
Launch Home Server Console
from the
Server
menu . Click the
User Accounts
tab and
35
Содержание EX490 - MediaSmart Server - 2 GB RAM
Страница 1: ...HP MediaSmart Server User s Guide ...
Страница 2: ......
Страница 24: ...HP MediaSmart Server User s Guide 2 On the Personal Firewall page click Add 18 ...
Страница 60: ......
Страница 108: ......
Страница 143: ...Media Streaming Media Player From the top down the Player shows these features 137 ...
Страница 156: ...HP MediaSmart Server User s Guide 150 ...
Страница 180: ...HP MediaSmart Server User s Guide 174 ...
Страница 185: ...HP Photo Publisher and HP Photo Viewer 6 Choose the album to add photos to 179 ...
Страница 186: ...HP MediaSmart Server User s Guide 7 Select photos and click Finish 180 ...
Страница 187: ...HP Photo Publisher and HP Photo Viewer 8 Select the photo album to view 181 ...
Страница 189: ...HP Photo Publisher and HP Photo Viewer 3 Choose the album to add photos to 183 ...
Страница 190: ...HP MediaSmart Server User s Guide 4 Select photos and click Finish 184 ...
Страница 204: ...HP MediaSmart Server User s Guide 198 ...
Страница 207: ...HP Photo Publisher and HP Photo Viewer 201 ...
Страница 208: ......
Страница 224: ......
Страница 240: ......
Страница 259: ...Network and Firewall 2 On the Personal Firewall page click Add 253 ...
Страница 262: ......
Страница 272: ......
Страница 287: ...Product Information 281 ...
Страница 288: ......
Страница 318: ......


