


7Ć5
Calibrations and Adjustments
C4699Ć90000
# "
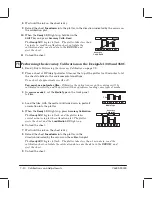
The functions of the frontĆpanel keys change when the plotter goes into service mode. You
usethekeys to perform thevarious servicetests and calibrations. Someof thetests and
calibrations require you to press two keys. For this reason the following keys will act as the
and
keys:
key acts as a
key.
key acts as an
key.
key acts as a
key.
key acts as an
key.
Thefollowing illustrations indicatewhich servicetests and calibrations areassigned to which
frontĆpanel keys. Two frontĆpanel overlays are provided with this manual, one for each
service mode; you can place either over the actual keys on the plotter.
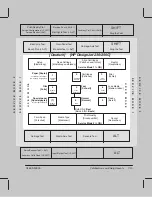
Thedesignation of keys for servicemode2 is also shown on theserviceconfiguration plot.
! "
When you have to press two keys together, first keep the
SHIFT
or
ALT
key pressed, and then
press the second key.
! !
PCĆbased diagnostics for the plotters have been developed and are now available on the HP
Barcelona server. The diagnostics will enable you to perform service tests from a PC
connected to the plotter.
PCĆbased diagnostics for the plotters are being developed at the time of printing of this
manual. The diagnostics will enable you to perform service tests from a PC connected to the
plotter. The program should be available on the HP Barcelona server in the very near future.
It will beannounced in oneof theProduct Line30, Newsletters."
Содержание Designjet 230
Страница 1: ... ...
Страница 3: ... ...
Страница 13: ... ...
Страница 18: ... ...
Страница 19: ... ...
Страница 22: ... ...
Страница 23: ... ...
Страница 25: ... ...
Страница 28: ... ...
Страница 29: ...3Ć7 Installation and Configuration C4699Ć90000 E A0Ćsize plotters only 32Kg 71 lb ...
Страница 31: ... 2 1 ...
Страница 32: ... ...
Страница 33: ... ...
Страница 35: ...CONTINUE PLOTTING Load Media CONTINUE PLOTTING Load Media FORM FEED REPLOT SETUP FORM FEED REPLOT SETUP ...
Страница 39: ... ...
Страница 43: ... ...
Страница 59: ... ...
Страница 63: ... ...
Страница 64: ... Ensure that the cartridge caps are clean the wipers straight and the openings clear ...
Страница 66: ... 2 1 ...
Страница 69: ... ...
Страница 73: ... Clip ...
Страница 76: ... 5 5 mm Torx 15 ...
Страница 78: ... Torx 15 Leave loose 5 5 mm Tighten slightly Torx 15 Tighten slightly ...
Страница 81: ... Torx 20 ...
Страница 93: ... Trailing cable under tabs ...
Страница 96: ... ...
Страница 103: ... the left and right sideĆplates or the lift mechanism will not work ...
Страница 109: ... ...
Страница 121: ... GO NO GO ...
Страница 135: ... ...
Страница 137: ... Flashing Can be On or Off Off On ...
Страница 168: ... ...
Страница 196: ... ...
Страница 197: ... ...
Страница 202: ... ...
Страница 203: ... ...
Страница 207: ... ...
Страница 209: ...10Ć7 Parts and Diagrams C4699Ć90000 Top and Back Covers Electronics Trailing Cable ...
Страница 211: ... ...
Страница 213: ... ...
Страница 215: ...10Ć13 Parts and Diagrams C4699Ć90000 CarriageĆAxis Right End ...
Страница 217: ... ...
Страница 219: ... ...
Страница 221: ... ...
Страница 223: ... ...
Страница 225: ... ...
Страница 227: ... ...
Страница 233: ... ...
Страница 242: ......
Страница 243: ... ...
Страница 249: ... ...


