


2Ć2 Site Planning and Requirements
C4699Ć90000
Power Requirements
HP DesignJet 230 and 330 and HP DesignJet 250C and 350C plotters have selfĆadjusting
power supplies and do not require a voltage selector or switch settings prior to use. The table
below lists the power requirements for the plotters.
Power Requirements
Source Voltage Requirements:
Normal Operating Range:
Frequency:
Voltage
Max current (rms)
100 V ac
1.40 A
120 V ac
1.17 A
220 V ac
0.64 A
240 V ac
0.60 A
90 to 264 V ac
47-63 Hz
Consumption:
140 watts maximum
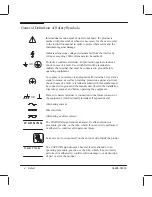
W A R N I N G
# ! ! " "
! ! %
!$ $ !
$ !
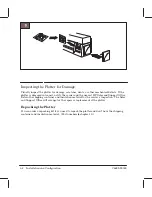
Choosing an Interface Cable
(Instructions
'
User's Guide, chapter 1,
w
Connect the plotter to your computer
.)
&&
A short cable (less than 15 meters or 50 feet) is recommended
for the RSĆ232ĆC interface. A longer cable is permissible, provided the load capacitance does
not exceed 2500 picofarads.
&
Use a short cable (less than 2 meters or 6.6 feet)
for the parallel interface.
(Interface descriptions
'
Service Manual, chapter 5,
w
Input/Output Interfaces
.)
(Pin specifications
'
User's Guide, chapter 5,
w
Interface specifications
.)
(Pin specifications
'
User's Guide, chapter 10,
w
Interface specifications
.)
(Cablepart numbers
'
Service Manual, chapter 10.)
Содержание Designjet 230
Страница 1: ... ...
Страница 3: ... ...
Страница 13: ... ...
Страница 18: ... ...
Страница 19: ... ...
Страница 22: ... ...
Страница 23: ... ...
Страница 25: ... ...
Страница 28: ... ...
Страница 29: ...3Ć7 Installation and Configuration C4699Ć90000 E A0Ćsize plotters only 32Kg 71 lb ...
Страница 31: ... 2 1 ...
Страница 32: ... ...
Страница 33: ... ...
Страница 35: ...CONTINUE PLOTTING Load Media CONTINUE PLOTTING Load Media FORM FEED REPLOT SETUP FORM FEED REPLOT SETUP ...
Страница 39: ... ...
Страница 43: ... ...
Страница 59: ... ...
Страница 63: ... ...
Страница 64: ... Ensure that the cartridge caps are clean the wipers straight and the openings clear ...
Страница 66: ... 2 1 ...
Страница 69: ... ...
Страница 73: ... Clip ...
Страница 76: ... 5 5 mm Torx 15 ...
Страница 78: ... Torx 15 Leave loose 5 5 mm Tighten slightly Torx 15 Tighten slightly ...
Страница 81: ... Torx 20 ...
Страница 93: ... Trailing cable under tabs ...
Страница 96: ... ...
Страница 103: ... the left and right sideĆplates or the lift mechanism will not work ...
Страница 109: ... ...
Страница 121: ... GO NO GO ...
Страница 135: ... ...
Страница 137: ... Flashing Can be On or Off Off On ...
Страница 168: ... ...
Страница 196: ... ...
Страница 197: ... ...
Страница 202: ... ...
Страница 203: ... ...
Страница 207: ... ...
Страница 209: ...10Ć7 Parts and Diagrams C4699Ć90000 Top and Back Covers Electronics Trailing Cable ...
Страница 211: ... ...
Страница 213: ... ...
Страница 215: ...10Ć13 Parts and Diagrams C4699Ć90000 CarriageĆAxis Right End ...
Страница 217: ... ...
Страница 219: ... ...
Страница 221: ... ...
Страница 223: ... ...
Страница 225: ... ...
Страница 227: ... ...
Страница 233: ... ...
Страница 242: ......
Страница 243: ... ...
Страница 249: ... ...


