


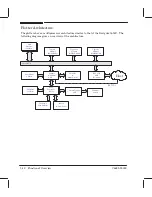


5Ć6 Functional Overview
C4699Ć90000
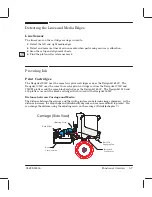
Providing a Force on Top ofthe Media
The bail provides a normal force on top of the media. Unlike on the DesignJet 220, there is
no bail sensor on the DesignJet 230 and 250C and DesignJet 330 and 350C.
The bail features an automatic lift mechanism driven by the media motor using a series of
gears and actuated by the cartridge carriage. The mechanism is different from that used in
the DesignJet 220. The new cableĆbased design eliminates the torque on the axle ofthe
bailĆlift cam and thus improves reliability. The new mechanism is also more accessible.
(Removal
'
page 6Ć29.)
Moving the Carriage
D
The carriage (YĆaxis) drive consists ofa DC motor directly driving a single belt and the
carriage. This replaces the dualĆbelt system ofthe DesignJet 220.
D
The motor assembly itselfprovides the tension needed on the belt, eliminating the need
for a separate pulley tensioner.
D
The belt clamps itselfto the carriage; there are no separate belt clamps.
D
The interface between the motor shaft and belt is friction based.
D
You can remove the belt without having to remove the pulley on the left end of the belt.
The carriage moves along on just one stainless steel slider rod. It is guided by two integrated
bronze bushings, which are selfĆlubricating, and a back wheel.
An encoder strip, similar to that on the DesignJet 650C, provides feedback on the position of
the carriage. The strip does not require adjustment.
Take care not to cut yourself on the encoder strip inside the plotter.
Содержание Designjet 230
Страница 1: ... ...
Страница 3: ... ...
Страница 13: ... ...
Страница 18: ... ...
Страница 19: ... ...
Страница 22: ... ...
Страница 23: ... ...
Страница 25: ... ...
Страница 28: ... ...
Страница 29: ...3Ć7 Installation and Configuration C4699Ć90000 E A0Ćsize plotters only 32Kg 71 lb ...
Страница 31: ... 2 1 ...
Страница 32: ... ...
Страница 33: ... ...
Страница 35: ...CONTINUE PLOTTING Load Media CONTINUE PLOTTING Load Media FORM FEED REPLOT SETUP FORM FEED REPLOT SETUP ...
Страница 39: ... ...
Страница 43: ... ...
Страница 59: ... ...
Страница 63: ... ...
Страница 64: ... Ensure that the cartridge caps are clean the wipers straight and the openings clear ...
Страница 66: ... 2 1 ...
Страница 69: ... ...
Страница 73: ... Clip ...
Страница 76: ... 5 5 mm Torx 15 ...
Страница 78: ... Torx 15 Leave loose 5 5 mm Tighten slightly Torx 15 Tighten slightly ...
Страница 81: ... Torx 20 ...
Страница 93: ... Trailing cable under tabs ...
Страница 96: ... ...
Страница 103: ... the left and right sideĆplates or the lift mechanism will not work ...
Страница 109: ... ...
Страница 121: ... GO NO GO ...
Страница 135: ... ...
Страница 137: ... Flashing Can be On or Off Off On ...
Страница 168: ... ...
Страница 196: ... ...
Страница 197: ... ...
Страница 202: ... ...
Страница 203: ... ...
Страница 207: ... ...
Страница 209: ...10Ć7 Parts and Diagrams C4699Ć90000 Top and Back Covers Electronics Trailing Cable ...
Страница 211: ... ...
Страница 213: ... ...
Страница 215: ...10Ć13 Parts and Diagrams C4699Ć90000 CarriageĆAxis Right End ...
Страница 217: ... ...
Страница 219: ... ...
Страница 221: ... ...
Страница 223: ... ...
Страница 225: ... ...
Страница 227: ... ...
Страница 233: ... ...
Страница 242: ......
Страница 243: ... ...
Страница 249: ... ...


