46
46
E1CG4880210
E1CG4880210
Fig. 39
Fig. 39
[b] REMOVAL
[b] REMOVAL
BRACKET COVER
BRACKET COVER
Push the two Pawls and remove the Bracket
Push the two Pawls and remove the Bracket
Cover.
Cover.
SWITCH
SWITCH
Pull out the Switch, holding the Rubber Leads
Pull out the Switch, holding the Rubber Leads
Cap. Handle with care.
Cap. Handle with care.
SWITCH ACTUATOR
SWITCH ACTUATOR
Insert a flat blade screwdriver and wrench it
Insert a flat blade screwdriver and wrench it
slightly to pull out the Switch Actuator. Handle
slightly to pull out the Switch Actuator. Handle
with care to prevent damage to the cam surface
with care to prevent damage to the cam surface
of the Actuator.
of the Actuator.
DETECTOR
DETECTOR
Push out the Detector, holding the Switch
Push out the Detector, holding the Switch
Actuator.
Actuator.
[c] REASSEMBLING
[c] REASSEMBLING
SWITCH ACTUATOR
SWITCH ACTUATOR
Insert the lower Shaft and push it along the U
Insert the lower Shaft and push it along the U
Notch. Check that the Switch Actuator moves
Notch. Check that the Switch Actuator moves
free.
free.
SWITCH & BRACKET COVER
SWITCH & BRACKET COVER
Place the Switch Lever first, and then attach the
Place the Switch Lever first, and then attach the
Switch in position. Insert the guide and push the
Switch in position. Insert the guide and push the
Bracket Cover to lock.
Bracket Cover to lock.
Содержание IM-240AME
Страница 6: ...2 2 E1CG4880210 E1CG4880210 b IM 240DWME Water cooled b IM 240DWME Water cooled ...
Страница 7: ...3 3 E1CG4880210 E1CG4880210 c IM 240DSME Remote Air cooled c IM 240DSME Remote Air cooled ...
Страница 8: ...4 4 E1CG4880210 E1CG4880210 d IM 240XME Air cooled d IM 240XME Air cooled ...
Страница 9: ...5 5 E1CG4880210 E1CG4880210 e IM 240XWME Water cooled e IM 240XWME Water cooled ...
Страница 10: ...6 6 E1CG4880210 E1CG4880210 f IM 240XSME Remote Air cooled f IM 240XSME Remote Air cooled ...
Страница 11: ...7 7 E1CG4880210 E1CG4880210 g IM 240AME Air cooled g IM 240AME Air cooled ...
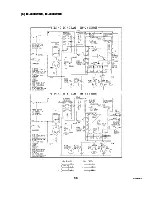
Страница 61: ...57 57 E1CG4880210 E1CG4880210 2 WIRING DIAGRAM 2 WIRING DIAGRAM a IM 240DME IM 240XME a IM 240DME IM 240XME ...
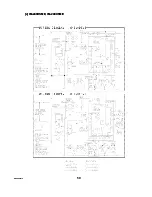
Страница 62: ...58 58 E1CG4880210 E1CG4880210 b IM 240DWME IM 240XWME b IM 240DWME IM 240XWME ...
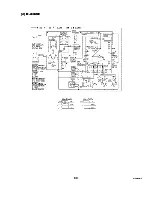
Страница 63: ...59 59 E1CG4880210 E1CG4880210 c IM 240DSME IM 240XSME c IM 240DSME IM 240XSME ...
Страница 64: ...60 60 E1CG4880210 E1CG4880210 d IM 240AME d IM 240AME ...
Страница 93: ...89 89 E1CG4880210 E1CG4880210 Fig 54 Fig 54 ...


