28
The pressure accumulator for emergency brak-
ing must be filled before starting to drive during
initial commissioning or after longer periods of
standstill.
Fully kick down the brake pedal on the tractor for
this purpose. With each braking operation the
pressure is applied to the pressure accumulator
and fills it up as required.
Once this has been done you may drive on the
road.
Unhitching
Parking the machine;
¾
Apply the parking brake with the crank handle
and block the wheels.
¾
Place wheel chocks under the wheels.
¾
Disconnect the brake line and unhitch the
machine.
Unhitching does not trigger the breakaway
brake. Emergency braking is only triggered if
the spring cotter is turned to the front.
Function of the breakaway brake valve
The valve has two positions:
A - operating position
B - emergency braking
Breakaway brake valve
1. Manual brake releasing pump
Manual brake releasing pump
Emergency braking caused by the breakaway
brake valve can also be released without the
tractor.
Turn the spring cotter back to working position
and operate the manual brake releasing pump
until the brake is released.
Hydraulic brake
The hydraulic line controls the brake power to
the brake cylinders.
The brake inlet pressure should not exceed
150 bar.
Hitching
When hitching up connect the hydraulic brake
lines with the brake lines on the tractor.
Fasten the release rope for the breakaway pro-
tection on a suitable point on the tractor.
The rope must under no circumstances
become entangled with other parts of
the machine when e.g. driving curves.
It could otherwise cause full braking
during travel!
Release the parking brake device. The ropes
must be relieved and the wheels must be free
to rotate.
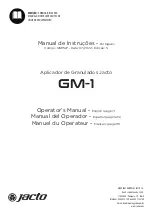
1 Hydr. Kupplung
2 Handlösepumpe
Maschine
Datum
Entworfen
Dateiname
Zeichnung
ed
feb 09
Hydraulische Bremse
3 Notbremsventil
1
2
3
4
5
4 Auslösebetätigung (Federstecker)
5 Druckspeicher
6 Bremszylinder
6
6
Hydraulic brake
1. Hydraulic coupling for brake
2. Manual brake releasing pump
3.
Breakaway brake valve
4. Emergency operation (spring cotter)
5. Pressure accumulator
6. Wheel cylinder
A
B
1
Содержание Terrano 5 FM
Страница 4: ......
Страница 7: ...3...
Страница 38: ...34 Drawbar and cover bolts Stroke arm Front support wheel Adjusting spindle Brake Lubrication points...
Страница 39: ...35 Coulter arrangement The picture shows the assembly direction of deflectors on the tines...
Страница 40: ...36...
Страница 41: ......