


69-0860—1
T7525/T7526 THERMOSTAT TOUCHPAD
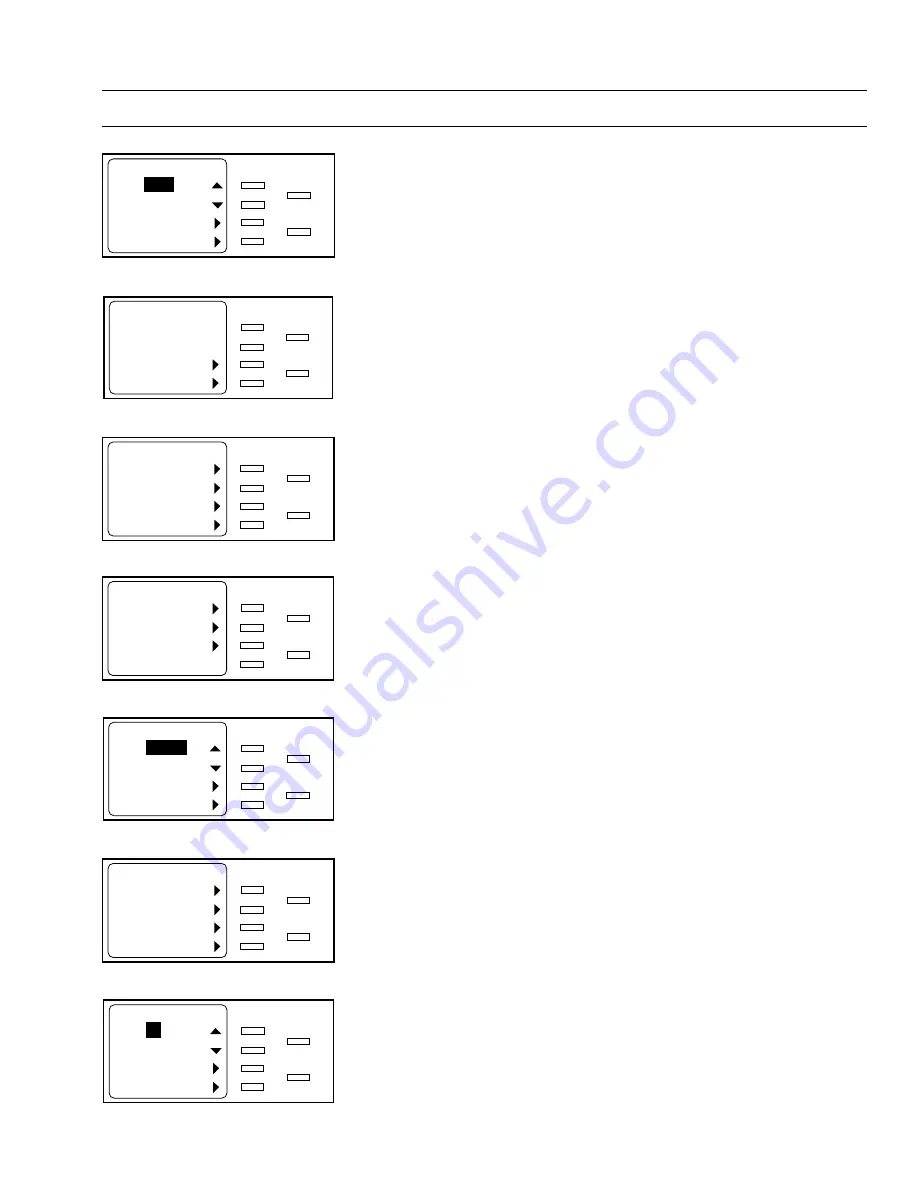
Change the Time a Period Starts
You can change the time a period starts. Follow these steps:
1. From the Base screen, press the Options soft key. The screen displays the first
Options menu.
2. Press the More soft key. The screen displays the second Options menu.
3. Press the Climate Control soft key. The screen displays the Climate Control
menu.
4. Press the Settings and Schedules soft key. The screen displays the Settings
and Schedules menu.
5. Press the
▲
or
▼
soft key repeatedly until the desired selection (Weekday,
Saturday, or Sunday) displays.
6. Press the Day Schedule soft key. The screen displays the schedule for the
selected day.
7. Press the soft key for the period to be changed. The screen displays the start time
for that period with the Hours field highlighted.
8. Press the Next field soft key repeatedly until the desired field (Hours, Minutes, or
AM/PM) is highlighted.
9. Press the
▲
or
▼
soft key repeatedly until the desired time displays (minutes
change in 10 minute increments/decrements).
10. Repeat steps 8 and 9 for each field, as required.
11. Perform one of the following:
a.
To accept the new time, press the Select key or do not press a key for one
minute. The screen displays the current settings for the selected day.
b.
To cancel the time entered in step 9, press the Back key within one
minute. The screen displays the schedule for the selected day.
12. Repeat steps 7 through 10 for any other periods that need to be changed.
13. Press the Select key. The screen displays the Settings and Schedules menu.
14. Repeat steps 4 through 11 for any other days that need to be changed.
15. Press the Select key repeatedly until the Base screen displays.
7
USING THE TOUCHPAD
Base Screen
M8625A
Set:
C: 80
o
Actual: 80
o
Rate: NORMAL
12:25PM Mon
Warmer
Cooler
Options
Next
Select
Back
First Options Menu
M8626A
Options
Hold Temperature
More
Select
Back
Second Options Menu
M8627A
Options
Run Schedule
Climate Control
Present Time/Day
More
Select
Back
Climate Control Menu
M8628A
Climate Control
Settings and Schedules
Heat/Cool Equipment
Ventilation
Select
Back
Settings and Schedules Menu
M8629A
Settings and Schedules
Weekday
Temperature Settings
Day Schedule
Select
Back
Current Schedule Screen
M4473
Weekday Schedule
Wake 6:00 AM
Leave 8:00 AM
Return 5:00 PM
Sleep 10:00 PM
Select
Back
M4474
Weekday-Leave Time
Next Field
Cancel This Period
Select
Back
: 00 AM
8
Current Period Screen
Step 1
Step 2
Step 3
Step 4
Step 5
Steps 6 & 7
Steps 8-11
Содержание T7525
Страница 2: ...69 0860 1 T7525 T7526 THERMOSTAT TOUCHPAD ...
Страница 4: ...69 0860 1 T7525 T7526 THERMOSTAT TOUCHPAD ...
Страница 6: ...69 0860 1 T7525 T7526 THERMOSTAT TOUCHPAD 2 ...
Страница 15: ...69 0860 1 T7525 T7526 THERMOSTAT TOUCHPAD ...


