background image

2


I

  GB

3


I

  F

Charging the batteries

When the level indictor LED flashes red, the 

product needs charging. Connect the charging 

base to a USB power supply using the lead 

provided. Place the unit in the charging 

base. The LED light will flash to indicate that 

charging is taking place. When charging is 

complete green LED will stay on. It takes 2 

hours for a full charge, which will provide 90 

minutes use, dependent on power levels used. 

How to use

1.  Ensure that your feet are clean and dry.

2.  Use the switch to select a power setting; 

   For sensitive skin, or softer skin use the LO 

setting.

  For harder skin use the HI setting.

3.   Using light pressure place the surface of 

roller onto the heel or sole of your foot and 

gradually move the device around to target 

areas of hard skin. Do not use on a single 

area for more than 4 seconds at a time.

4.  Check the results throughout. Once you are happy with the results 

turn the switch to OFF.

5.  Rinse your feet with clean water & dry before applying your 

favourite foot cream.

Cautions

Before use, make sure that the roller is in good condition. Any 

malformation, distortion or damage may cause skin injury.

DO NOT APPLY EXCESS PRESSURE OR CAUSE THE MOTOR TO STOP 

ROTATING. FOR BEST RESULTS, RUN THE UNIT GENTLY OVER THE SKIN. 

THIS WILL ENSURE SOFT, SAFE AND SMOOTH REMOVAL OF DEAD SKIN.

INSTRUCTIONS FOR USE:
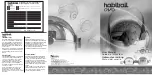
PRODUCT FEATURES 

Main body

Power switch

Changing the rollers

To remove the roller.

1. Ensure the switch is in the OFF position.

2.  With one hand press the release button on 

the side of the device. 

3.  With the other hand lift out the roller.  

TIP: It’s easier to lift the roller out from the 

end closest to the release button.

To insert a new roller.

1.  Loosely position one of the roller pins into the recess on the end 

furthest from the release button. 

2.  Push the other end of the roller into place using the groves to guide 

it into position.

3. The roller will secure into place with a click.

MAINTENANCE AND STORAGE

•  Always turn the device off before cleaning it.

•   Only clean the device with the supplied brush or a dry cloth. Do not 

use chemical agents including benzene, alcohol etc.

•   Batteries (battery pack or batteries installed) shall not be exposed to 

excessive heat such as sunshine, fire or the like.

•   Your PED 1300 includes a rechargeable battery designed to last the 

lifetime of the product. In the unlikely event that you should require 

a replacement battery please contact Customer Services who will 

supply details of the warranty and out-of-warranty replacement 

battery service.

•   If roller surface becomes worn or less abrasive, fit a new roller.

Extra coarse  

roller: white edge

Release button

LIGHT APPEARANCE

MEANING

Red LED On

Device on and battery low

Red LED Flashing

Battery charging

Green LED On

Device fully charged

LED Off

Device not in charging base and is switched off

Fine roller: grey edge  

(where supplied)

Charging station

Storage for 

replacement 

rollers

Coarse roller:  

black edge

Cleaning brush

USB charging 

cable

Содержание Soft as Silk PED-1300-EU

Страница 1: ...3 IN 1 INSTANT PEDI PED 1300 EU i n s t r u c t i o n m a n u a l ...

Страница 2: ...ng the rollers To remove the roller 1 Ensure the switch is in the OFF position 2 With one hand press the release button on the side of the device 3 With the other hand lift out the roller TIP It s easier to lift the roller out from the end closest to the release button To insert a new roller 1 Loosely position one of the roller pins into the recess on the end furthest from the release button 2 Pus...

Страница 3: ...MORTES Remplacement des rouleaux Pour enlever le rouleau 1 Vérifiez que le commutateur est réglé sur la position d arrêt OFF 2 D une main appuyez sur le bouton de déblocage situé sur le côté de l appareil 3 Avec l autre main soulevez le rouleau pour l extraire ASTUCE Il est plus facile d extraire le rouleau du côté le plus proche du bouton de déblocage Pour insérer un nouveau rouleau 1 Placez l un...

Страница 4: ... Auswechseln der Roller Entfernen des Rollers 1 Stellen Sie sicher dass der Schalter sich auf der AUS Position befindet 2 Drücken Sie mit einer Hand auf den Freigabe Knopf an der Seite des Gerätes 3 Ziehen Sie mit der anderen Hand den Roller heraus TIPP Am einfachsten ziehen Sie den Roller an dem Ende heraus dass dem Freigabe Knopf am nächsten liegt Einlegen eines neuen Rollers 1 Setzen Sie ein En...

Страница 5: ...el parpadea en rojo indica que tiene que cargar el producto Conecte la base de carga a una fuente de alimentación USB con el cable suministrado Coloque la unidad en la base de carga Los pilotos LED parpadearán para indicar que se está cargando correctamente Una vez se haya cargado por completo el LED se iluminará en verde Tarda 2 horas en cargarse por completo y podrá utilizarlo durante 90 minutos...

Страница 6: ... fonte di elettricità con presa USB usando il cavo fornito Posizionare l unità nella base di ricarica La luce LED lampeggerà per indicare che la ricarica è in corso Una volta completata la ricarica si accenderà la luce LED verde Una ricarica completa richiede 2 ore e fornirà energia per 90 minuti di utilizzo a seconda del livello di intensità scelto Istruzioni per l uso 1 Assicurarsi di avere i pi...

Страница 7: ... ser carregado Ligue a base de carregamento a uma alimentação USB utilizando o cabo de alimentação fornecido Coloque a unidade na base de carregamento A luz LED irão piscar para indicar que está a carregar Quando a carga estiver completa o LED verde permanecerá aceso Uma carga completa demora 2 horas o que irá proporcionar 90 minutos de utilização dependendo dos níveis de energia utilizados Como u...

Страница 8: ...d Plasser enheten i ladebasen LED lyset blinker for å indikere at enheten lader Grønn LED vil være på når enheten er fulladet Det tar 2 timer å lade ferdig Det gir 90 minutter med bruk avhengig av hvilket effektnivå du bruker Slik bruker du enheten 1 Forsikre deg om at føttene dine er rene og tørre 2 Bruk bryteren for å velge ønsket innstilling For sensitiv hud velger du LO innstilling For hardere...

Страница 9: ...edlamp rood knippert moet het product worden opgeladen Koppel het oplaadstation aan een usb oplader met de bijgeleverde kabel Plaats het apparaat in het oplaadstation Het ledlampje zal knipperen om aan te geven dat de batterij wordt geladen Als het opladen is voltooid blijft de groene led branden Het kan tot wel 2 uur duren voordat het apparaat volledig is geladen Hiermee kunt u het apparaat 90 mi...

Страница 10: ...stelineeseen LED vilkkuu merkiksi siitä että lataus on käynnissä Kun lataus on päättynyt vihreä LED jää palamaan Täyteen lataus kestää 2 tuntia jonka jälkeen laitetta voi käyttää 90 minuuttia riippuen käytetystä tehotasosta Käyttö 1 Varmista että jalkasi ovat puhtaat ja kuivat 2 Valitse tehoasetus painikkeella Herkkä tai pehmeä iho valitse LO asetus Kovempi iho valitse HI asetus 3 Laita rulla kevy...

Страница 11: ...beln Placera enheten i laddningsstativet Lysdioden kommer att blinka för att indikera att laddning pågår När laddningen är slutförd förblir den gröna lysdioden tänd Det tar 2 timmar för en full laddning och den ger cirka 90 minuters användning beroende på de strömnivåer som används Bruksanvisning 1 Se till att dina fötter är rena och torra 2 Använd kontakten för att ställa in effekten För känslig ...

Страница 12: ...ren LED en vil blinke for at indikere at opladningen finder sted Når opladningen er fuldendt vil LED en lyse grønt Det tager 2 timer for en fuld opladning som giver 90 minutters brug alt efter hvilke strømniveauer der anvendes Sådan bruger du apparatet 1 Sørg for at dine fødder er rene og tørre 2 Brug kontakten til at vælge indstilling Til følsom hud eller blød hud skal du bruge LO indstillingen T...

Страница 13: ...rilen kabloyu kullanarak şarj istasyonunu bir USB güç kaynağına bağlayın Üniteyi şarj istasyonuna yerleştirin LED ışığı şarj olduğunu gösterecek şekilde yanıp sönecektir Şarj etme işlemi tamamlandığında yeşil LED ışığı yanar durumda kalacaktır Kullanılan güç seviyelerine bağlı olarak 2 dakika kullanıma imkan sağlayacak tam şarj işlemi 90 saat sürer Nasıl kullanılır 1 Ayaklarınızın temiz ve kuru ol...

Страница 14: ...ρώμα το προϊόν χρειάζεται φόρτιση Συνδέστε τη βάση φόρτισης σε ένα τροφοδοτικό USB με το παρεχόμενο καλώδιο Τοποθετήστε τη συσκευή στη βάση φόρτισης Οι φωτεινή ένδειξη LED θα αναβοσβήσει επισημαίνοντας ότι γίνεται φόρτιση Όταν ολοκληρωθεί η φόρτιση θα παραμείνει αναμμένο το πράσινο LED Χρειάζονται 2 ώρες για μια πλήρη φόρτιση η οποία παρέχει χρήση για 90 λεπτά ανάλογα με τα επίπεδα έντασης που χρη...

Страница 15: ...овода Установите прибор на зарядную подставку Мигающий индикатор указывает на идущую зарядку прибора По завершении зарядки загорается зеленый индикатор Полная зарядка занимает 2 ч и обеспечивает 90 мин работы прибора в зависимости от выбранного уровня мощности Инструкция по использованию 1 Ступни должны быть чистыми и сухими 2 Установите переключатель на требуемый режим по мощности Используйте реж...

Страница 16: ...ukt wymaga ładowania Podłącz podstawę ładującą do zasilacza USB za pomocą załączonego przewodu Umieść urządzenie w podstawie ładującej Kontrolka LED zaświeci się na znak że trwa ładowanie Zielone światło LED będzie się dalej świecić po naładowaniu urządzenia Pełne ładowanie trwa 2 godziny i zapewnia 90 minut użytkowania w zależności od ustawionego poziomu mocy Użytkowanie 1 Należy upewnić się że s...

Страница 17: ... podstavce Po zahájení nabíjení začne indikátor LED blikat Po dokončení nabíjení svítí zelený indikátor LED Plné nabití baterie trvá 2 hodiny a postačuje na 90 minut aplikace v závislosti na používané intenzitě Návod k použití 1 Zkontrolujte zda jsou vaše nohy čisté a suché 2 Přepínačem vyberte nastavení intenzity Pro citlivou nebo měkčí kůži použijte nastavení LO Pro tvrdší kůži použijte nastaven...

Страница 18: ...a készüléket tölteni kell Csatlakoztassa a töltőállomást USB tápellátáshoz a mellékelt kábellel Helyezze az egységet a töltőállomásra A LED villogva jelzi hogy folyamatban van a töltés Ha a töltés befejeződött a LED egyenletesen világít A készülék teljes feltöltése 2 órát vesz igénybe ami 90 perces használatot tesz lehetővé fokozattól függően Használat 1 Ügyeljen arra hogy lábfeje tiszta és száraz...

Страница 19: ...kladňu k napájaciemu zdroju USB Prístroj vložte do nabíjacej základne LED dióda začne blikať čo znamená že prebieha nabíjanie Po ukončení nabíjania ostane zelená LED svietiť Plné nabitie trvá 2 hodiny a v závislosti od úrovne odoberaného výkonu môžete prístroj používať 90 minút Použitie 1 Dbajte na to aby ste mali čisté a suché chodidlá 2 Na nastavenie výkonu použite prepínač Pre citlivú alebo jem...

Страница 20: ...IB PED1300 EU 1118 02 FKA Brands Ltd Somerhill Business Park Tonbridge Kent TN11 0GP UK Customer Support 44 0 1732 378557 support homedics co uk ...

Отзывы: