-29-
Armature Ass’y DC 14.4V
[26] <23>
Damper
[24] <21>
Inner Cover (D)
[25] <22>
Ring Gear (E)
[20] <17>
B
Inner Cover (D)
[25] <22>
Brush Block
[31] <28>
Side Yoke
[27] <24>
Dust Guard Fin (C)
[30] <27>
Adjust the convex portion of Dust Guard Fin (C)
[30] <27>
to the concave portion of the Brush Block
[31] <28>
.
Armature Ass’y
DC 14.4V
[26] <23>
(Pinion)
Armature Ass’y
DC 14.4V
[26]
<23>
Yoke (A)
[29] <26>
O-ring (S-42)
[21] <18>
Magnet (D)
[28] <25>
(8) Removal of the switch assembly
Remove the two Machine Screws (W/Sp. Washer) M3 x 5
[37] <34>
that secure the flag
terminal and then disconnect the internal wires (red and black) of the Brush Block
[31] <28>
from the DC-Speed Control Switch
[45] <42>
.
NOTE: Do not disconnect the three FET internal wires soldered to the DC-Speed
Control Switch [45] <42>.
(9) Removal of Magnet (D)
[28] <25>
, Yoke (A)
[29] <26>
, Dust Guard Fin (C)
[30] <27>
and Side
Yoke
[27] <24>
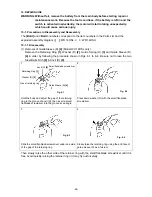
Remove Magnet (D)
[28] <25>
in the "B" direction (see Fig. 9) holding Inner Cover (D)
[25]
<22>
securely because Magnet (D)
[28] <25>
has a strong magnetism. Dust Guard Fin (C)
[30] <27>
and Side Yoke
[27] <24>
can be easily removed from Magnet (D)
[28] <25>
by
holding Magnet (D)
[28] <25>
securely and pulling them in the direction of diameter because
they are mounted to Magnet (D)
[28] <25>
magnetically. Yoke (A)
[29] <26>
can be also
removed in this way.
Fig. 9
B


