


-7-
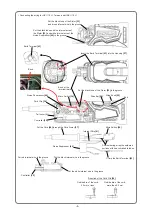
Apply Powerlite WR No. 1 lubricant (Kyodo Yushi Co., Ltd.) to the following parts.
• Swing arm of the Head Case
[3]
················································································ 9 grams
• Ball Bearing-R 607VV
[14]
and O-ring (S-35)
[12]
at the fan side of the Armature Ass’y Set
[10]
• Outer periphery of the Needle Roller
[2]
NOTE: Do not apply lubricant to the Pushing Piece [6].
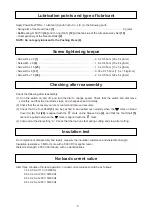
• Screw D4 x 20
[1]
································································· 2.0 ± 0.5 N•m {20 ± 5 kgf•cm}
• Screw M4 x 6
[8]
·································································· 1.8 ± 0.4 N•m {18 ± 4 kgf•cm}
• Screw D3 x 16
[25]
······························································· 1.3 ± 0.3 N•m {13 ± 3 kgf•cm}
• Screw D3 x 8
[31]
································································· 0.74 ± 0.15 N•m {7.5 ± 1.5 kgf•cm}
• Screw D4 x 16
[39]
······························································· 2.0 ± 0.5 N•m {20 ± 5 kgf•cm}
Check the following after reassembly.
(1) Turn the switch on and off, and turn the dial to change speed. Check that the switch and dial move
smoothly, and that the tool starts, stops, and changes speed normally.
(2) Check that the accessory can be mounted and removed securely.
(3) Check that the Tool Shaft
[5]
can be pushed in and pulled out normally when the mark on Head
Cover (A).(B) Set
[24]
is aligned with the mark on the Sleeve Cap
[4]
, and that the Tool Shaft
[5]
cannot be pulled out when the mark is aligned with the mark.
(4) Cut wood at the dial setting “A.” Check that the tool runs fast during cutting and slow after cutting.
On completion of disassembly and repair, measure the insulation resistance and dielectric strength.
Insulation resistance: 7 M
ȍ
or more with a 500 VDC megohm tester
Dielectric strength: 4,000 VAC/minute, with no abnormalities
After three minutes of no-load operation, no-load current values should be as follows:
1.5 ± 0.3 A at 110 V 50/60 Hz
0.9 ± 0.2 A at 220 V 50/60 Hz
0.9 ± 0.2 A at 230 V 50/60 Hz
0.8 ± 0.2 A at 240 V 50/60 Hz
Lubrication points and type of lubricant
Screw tightening torque
Insulation test
No-load current value
Checking after reassembly


