


-2-
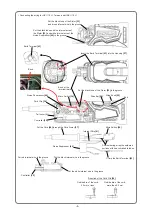
• Mounting the lever
• Mounting the stator
Reassembly can be conducted by reversing the disassembly procedure, but note the following:
1. Mounting the lever
(1) To mount the Lever
[7]
and Pushing Piece
[6]
to the Head Case
[3]
, place the Head Case
[3]
on an
adequate stand and use a hand press to press the Needle Roller
[2]
. Do not reverse the orientation of
the Pushing Piece
[6]
when mounting.
2. Reassembling the armature ass’y set
Press-fit the Ball Bearing 6000VV
[16]
into the Bearing Holder
[11]
until the Ball Bearing 6000VV
[16]
touches the fan of the Armature Ass'y Set
[10]
. Do not push in the Ball Bearing 6000VV
[16]
excessively.
Do not forget to mount the Bearing Cover
[17]
.
3. Mounting the stator
Mount the Slide Knob
[26]
and Slide Bar
[29]
to the Housing
[27]
first. Then mount the Stator
[23]
in the
Housing
[27]
being careful of the orientation of the internal wires.
Reassembly
Thick
Pushing Piece
[6]
Lever Guide
[9]
Head Case
[3]
Needle Roller
[2]
Thin
Lever
[7]
NOTE: Be sure to mount the correct head case.
The Head Case [3] for the Model CV 350V
has a black mark as shown in the figure,
but the head case for the Models
CV 14DBL and CV 18DBL does not.
Stator
[23]
Slide Knob
[26]
Housing
[27]
Slide Bar
[29]
Place the internal wire on the HITACHI logo side.


