


-3-
• Connecting the wiring for Europe, Australia, New Zealand, Turkey, and South Africa
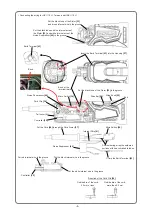
4. Connecting the wiring
(1) Put the Cord
[44]
through the Cord Armor
[37]
and solder it to the Micro Switch
[34]
.
(2) Put the Earth Terminal
[43]
of the Noise Suppressor
[40]
through the hole on the Housing
[27]
and
insert it between the Housing
[27]
and Stator
[23]
.
(3) Put the internal wires in the specified grooves being careful not to be pinched.
Put the Cord
[44]
through the Cord Armor
[37]
.
Micro Switch
[34]
Internal Wire
[41]
After soldering, wrap the soldered
portions with heat-shrinkable tubes.
Put the red internal wire in the groove.
Put the black internal wire in the groove.
Put the blue internal wire in the groove.
Controller
[35]
Noise Suppressor
[40]
Ferrite Core
[36]
Crimp the Earth Terminal
[43]
.
Wind the internal wire twice.
40
Bend at the
terminal joints.
Put two brown internal wires of
the Stator
[23]
in the groove.
Put two blue internal wires of the Stator
[23]
and a white
internal wire of the Noise Suppressor
[40]
in the groove.
Insert the Earth Terminal
[43]
into the Housing
[27]
.
Earth Terminal
[43]
Bend.
Micro Switch
[34]
Put the blue internal wire of the Stator
[23]
in the groove.
Slide Bar
[29]
Slide Knob
[26]
Tab
Tail cover (A)
Controller
[35]
Noise Suppressor
[40]
Ferrite Core
[36]


