


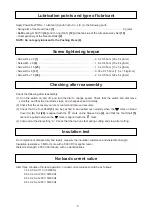


-6-
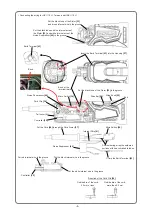
• Mounting the sleeve cap
5. Reassembling the head section
(1) Mount the Armature Ass’y Set
[10]
to the Head Case
[3]
by hand without using any tool such as a
hand press. Otherwise, the fan may be misaligned due to excessive force and abnormal noise or
vibration may occur.
(2) Carefully mount the Armature Ass’y Set
[10]
and Head Case
[3]
reassembled in the above step (1) to
the Housing
[27]
by hand without tilting. Then secure it with four Screws D4 x 20
[1]
.
(3) Secure Head Cover (A).(B) Set
[24]
with four Screws D3 x 16
[25]
.
(4) Mount the Sleeve Cap
[4]
to the Head Case
[3]
in the same manner as the accessory mounting
procedure.
a) Pull up the Lever
[7]
. Pull the guide sleeve down and turn it to remove the Tool Shaft
[5]
.
b) Align the mark on the Sleeve Cap
[4]
with the mark on Head Cover (A).(B) Set
[24]
to mount.
c) Pull the guide sleeve by holding the Sleeve Cap
[4]
and turn it to the opposite side. Check that the
mark on the Sleeve Cap
[4]
is aligned with the mark on Head Cover (A).(B) Set
[24]
.
d) Turn the guide sleeve toward the mark and insert the Tool Shaft
[5]
.
e) Turn the guide sleeve toward the mark and pull the lever down being careful not to pinch your
fingers.
(1) Pull up the lever until it
becomes parallel to
the tool body.
Lever
[7]
Guide sleeve
(2)(3)(4) Pull the guide sleeve down
and turn it in the arrow
direction to remove the
Tool Shaft
[5]
.
(2)
(3)
(5)
(5) Align the mark on the
Sleeve Cap
[4]
with the
mark on Head Cover
(A).(B) Set
[24]
to mount.
(1)
(6)
(7)
(9) Turn the guide sleeve toward the mark
and pull the lever down. Be careful not to
get your fingers pinched.
(8) Turn the guide sleeve toward the
mark and insert the Tool Shaft
[5]
.
(6)(7) Turn the guide sleeve in the opposite direction and
check that the mark is aligned with the mark
on Head Cover (A).(B) Set
[24]
.
Tool Shaft
[5]
Sleeve Cap
[4]
(4)


