background image

Commissioning and first steps

37/166

Note:

The values of the data points in a chart are refreshed according to
the 

Data Publishing Interval

 defined for the sensorEDGE data

messages. The interval can be defined on the 

Device Details

 page

of the 

Device Manager

 in the Portal (see section 

Device Details

page

 [

}

 page 121]). 

Alternatively, the interval can also be set in the 

Local Device

Manager

 under 

netFIELD App IO-Link Configurator

 >

Dashboard

 > 

Payload

 > 

Refresh interval

 (see section 

IO-Link

Configurator Dashboard

 [

}

 page 99]).

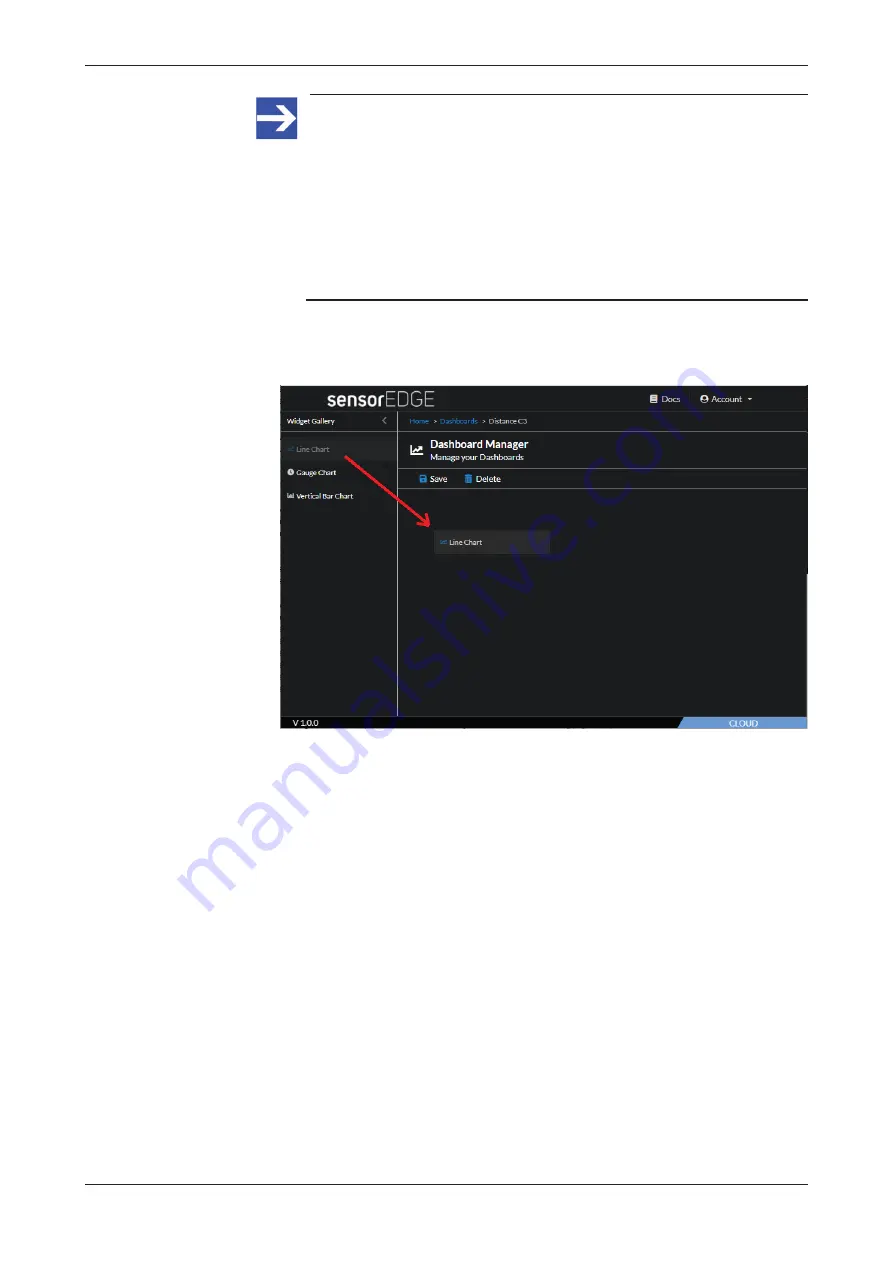
3. Select a chart widget.

Ø

Drag and drop a widget, e.g. the 

Line Chart

, onto the empty space of

your dashboard:

Figure 14: Drag and drop widget

netFIELD sensorEDGE | User manual
DOC200601UM01EN | Revision 1 | English | 2021-09 | Released | Public

© Hilscher 2021

Содержание netFIELD

Страница 1: ...User manual netFIELD sensorEDGE Hilscher Gesellschaft f r Systemautomation mbH www hilscher com DOC200601UM01EN Revision 1 English 2021 09 Released Public...

Страница 2: ...EDG Edge LED 18 4 3 4 Power supply LEDs 18 4 3 5 Ethernet LEDs 19 4 3 6 IO Link Port Status LEDs 19 4 4 Block diagram 20 5 Commissioning and first steps 21 5 1 Overview 21 5 1 1 Quick commissioning 21...

Страница 3: ...igurator Dashboard 99 7 8 3 Connected Device 103 7 8 4 Attachments 110 8 sensorEDGE Portal 115 8 1 Sign In Landing page Account menu User profile 115 8 2 Device Manager 119 8 2 1 Start page 119 8 2 2...

Страница 4: ...s 4 166 12 2 Registered Trademarks 155 12 3 Legal notes 156 List of figures 160 List of tables 164 Contacts 166 netFIELD sensorEDGE User manual DOC200601UM01EN Revision 1 English 2021 09 Released Publ...

Страница 5: ...escriptions of its web based configuration GUI Local Device Manager and of the sensorEDGE Management Internet Portal Instructions on how to visualize and monitor sensor data via the Portal s dashboard...

Страница 6: ...t important note you must follow to avoid malfunction Note general note note on further information Instructions 1 Operational step Instruction Instruction 2 Operational step Instruction Instruction R...

Страница 7: ...a REST API You can easily create the required API key in the API Key Manager of the Portal IP 67 Class protected Device housing suited for cabinet free installations in the field in harsh environments...

Страница 8: ...utputs Note IO Link Class A sensors featuring additional digital inputs outputs channel B at pin 2 can be connected for IO Link communication however the digital I Os are neither evaluated nor support...

Страница 9: ...echnical knowledge is presumed Keep this manual for future reference 3 3 Personnel qualification The device may only be installed configured operated and removed by qualified personnel Job specific te...

Страница 10: ...cuit breaker or fuse For this purpose use a 24 V DC max 16 A fuse or circuit breaker with type B trip characteristics Risk of device destruction by exceeding the allowed supply voltage The device may...

Страница 11: ...h high risk which will have as consequence death or grievous bodily harm if it is not avoided Indicates a possible hazard with medium risk which will have as consequence death or grievous bodily harm...

Страница 12: ...description 12 166 4 Hardware description 4 1 Device overview Figure 1 Device overview with interfaces netFIELD sensorEDGE User manual DOC200601UM01EN Revision 1 English 2021 09 Released Public Hilsc...

Страница 13: ...zed marking of interfaces 12 X1 X8 IO Link port M12 connector A coded female IO Link Master page 16 13 A Status LED of IO Link port IO Link Port Status LEDs page 19 14 B Status LED of digital I O chan...

Страница 14: ...oes not use U2L FE FE Functional earth Table 7 Supply voltage For a description of the LEDs belonging to this interface see section Power supply LEDs page 18 Accessories Use cables featuring an M12 L...

Страница 15: ...ernet For a description of the LEDs belonging to this interface see section Ethernet LEDs page 19 Accessories Use cables featuring an M12 D coded male connector for mating e g one of the following pro...

Страница 16: ...um current of 1 A through pin 1 and pin 3 without additional measures The use of standard cables allows lengths up to 20 m as long as the current remains under 1 A Higher currents are possible and req...

Страница 17: ...low blinking at 1 Hz Ethernet LAN port was successfully initialized Port is operating either in default DCHP client mode or was user configured to static IP settings red Fast blinking at 5 Hz Device t...

Страница 18: ...DG Edge LED 4 3 4 Power supply LEDs The 1L and 2L LEDs see positions 18 and 16 in section Device overview page 12 indicate the state of the supply voltage at X21 1L Standard 24 V DC supply voltage U1L...

Страница 19: ...s not powered green On IO Link communication active green Blinking 1 Hz No IO Link communication or wrong IO Link device red On Overload short circuit pin 4 and pin 3 red Blinking 1 Hz Overload short...

Страница 20: ...Hardware description 20 166 4 4 Block diagram Figure 2 sensorEDGE block diagram netFIELD sensorEDGE User manual DOC200601UM01EN Revision 1 English 2021 09 Released Public Hilscher 2021...

Страница 21: ...ompany s firewall because the sensorEDGE uses AMQP to send data to the Portal 4 Install sensorEDGE device mount the device and connect IO Link sensors Ethernet LAN and power supply Section Installatio...

Страница 22: ...arding Section Pair sensorEDGE device with your sensorEDGE account onboarding page 30 6 Connect your engineering PC to the sensorEDGE device via LAN and login to local Device Manager Section Login to...

Страница 23: ...ting the installation location The device must not be exposed to electromagnetic fields see section Technical data page 148 for EMC details Mount the device so that it is protected from weathering no...

Страница 24: ...at sources Do not mount the device on or near highly inflammable materials Mounting instructions Fasten the device on a flat solid base with two screws each of which is screwed into a threaded hole Pr...

Страница 25: ...24 V DC SELV Safety Extra Low Voltage or PELV Protective Extra Low Voltage systems for the voltage supply of your device Risk of device destruction by exceeding allowed current The current of the powe...

Страница 26: ...al in the cloud It also allows you to access the web based management and configuration GUI of the device local Device Manager Note In its state of delivery the Ethernet interface of the sensorEDGE is...

Страница 27: ...e overview page 12 because you will need the ID to pair onboard your device with your account in the sensorEDGE Portal i e if you have not yet done the pairing see section Pair sensorEDGE device with...

Страница 28: ...can change the password later under Account User Profile Change password see section Sign In Landing page Account menu User profile page 115 for details Figure 3 Create a New Account dialog Read the P...

Страница 29: ...login you have to fill in the Account Information form Figure 4 Account information Fill in the form a red asterisk indicates a mandatory field then click Confirm Account Details You have created your...

Страница 30: ...sensorEDGE device does not need to be installed and connected to the Internet yet for pairing your device with your account You can do the pairing either before or after device installation Step by st...

Страница 31: ...oarding page in sensorEDGE Portal Enter the ID of your sensorEDGE device into the ID 1 field Be aware that the letters are case sensitive If you want to onboard several devices at once click the ID bu...

Страница 32: ...that the sensorEDGE requires is now automatically downloaded to the device and then started on the device This may take a few minutes If you have not installed the sensorEDGE device yet you can procee...

Страница 33: ...You can also enter additional device information in the field next to the icon Under Ports you can check the state of the IO Link sensors connected to the sensorEDGE device A green dot indicates norm...

Страница 34: ...s green and transmits sensor data at least one port is in state normal operation Step by step instructions 1 Open the Dashboard Manager If you are in the Device Manager click on the sensorEDGE logo in...

Страница 35: ...new dashboard On the start page of the Dashboard Manager click Add button The New Dashboard dialog opens Figure 12 New Dashboard dialog Enter a name and a short description for your dashboard then cli...

Страница 36: ...nts in the chart You can hover with your cursor over a data point to display its exact value in a hover box a k a mouseover You can also hide individual lines data sources by clicking on the label in...

Страница 37: ...section Device Details page page 121 Alternatively the interval can also be set in the Local Device Manager under netFIELD App IO Link Configurator Dashboard Payload Refresh interval see section IO Li...

Страница 38: ...n or click the button in the upper right corner and select Edit from the menu Figure 15 Edit chart The configuration panel of the Line chart widget opens Figure 16 Empty data source tab netFIELD senso...

Страница 39: ...of your first line chart The field offers all sensorEDGE devices that are paired onboarded with your account and that are online In the Y Axis drop down list select the sensor data source that you wan...

Страница 40: ...rce is labelled as Sensor followed by a consecutive number 0 1 2 etc You can define an individual name label that will appear as legend by clicking the button The data points may come from different s...

Страница 41: ...iting mode opens Figure 19 Change sensor name Enter here a telling name label for your first data source e g Dist 1 The label will also be displayed in the footer of the chart as legend next to the li...

Страница 42: ...ab then open the Panel Configuration sub tab Figure 20 Visualization panel In the Panel Configuration sub tab of the Visualization tab you can define the overall structure and appearance of the Line c...

Страница 43: ...You can pick from the tableau or enter the HTML color code Gradient to Click in the field to select a grading background color for the chart that increases its saturation from left to right You can p...

Страница 44: ...sensor type e g distance The meta data is provided by the sensor itself Figure 22 Sensor Meta Data tab In the Sensor Health Data tab you can check the health of your selected data sources green dot n...

Страница 45: ...your cursor over a data point in the Line Chart opens a hover box that displays the exact value of the data point Add further widgets e g a Gauge Chart for visualizing temperature Note You can re arr...

Страница 46: ...ent below or the host name of the device see subsection Connecting via host name below to connect with it 1 Establish connection to device Enter into the address bar of your browser the IP address tha...

Страница 47: ...st name printed as Default access on the left side of the device housing Note Your PC and your device must be located in the same subnet 2 Login to Local Device Manager Figure 25 Login Device Manager...

Страница 48: ...w password field enter a new and safe password then click Sign In button Enter your new password again in the Retype new password field then click Sign In button again Note You can change the password...

Страница 49: ...se your new administrator s password You will need it every time when you access the Local Device Manager for configuration purposes Regaining access the Local Device Manager after losing your passwor...

Страница 50: ...ime settings Open the System page of the local Device Manager then click the blue date time value next to System Time Figure 29 System Time value The Change System Time dialog opens Figure 30 Change S...

Страница 51: ...fic NTP servers Opens further fields for entering the addresses of certain NTP servers that you want to use e g ptbtime1 ptb de You can create a list of several servers the system will use the first s...

Страница 52: ...he Internet database you can manually upload the IODD ZIP file from your local PC if the IODD ZIP file is available to you via other sources e g directly from the manufacturer Note that for integrity...

Страница 53: ...Figure 32 Attachments page The Add Device Attachment dialog opens Figure 33 Attachments Add Dialog Click Choose File button to open the file selection dialog of your browser netFIELD sensorEDGE User m...

Страница 54: ...splayed in the Add Device Attachment dialog Figure 35 Selected file in Add Device Attachments dialog Click Upload button After receiving the Successful message you can close the dialog The sensor s se...

Страница 55: ...played on the device s details page of the Device Manager in the sensorEDGE Portal Figure 36 Topics on device s details page Data Topic The sensorEDGE device bundles the current data values from its c...

Страница 56: ...the current health information from all its connected sensors in an array and sends it to the cloud in a single JSON object message This is by default repeated every minute note that this publishing i...

Страница 57: ...documentation The Node RED JavaScript node resource used in this example can be found at https github com HilscherAutomation node red contrib netfield websocket The resource also provides additional...

Страница 58: ...l Note Before installation you can open a detailed description of the nodes by selecting the Open node information option or by clicking the icon After having received the Nodes added to palette messa...

Страница 59: ...d Figure 41 Properties of netFIELD WebSocket node Enter a name into the Name field e g sensorEDGE websocket Keep the preset URL wss api netfield io which is the official WebSocket URL for sensorEDGE O...

Страница 60: ...I Key Manager page 144 for details To copy it click the icon next to the key string Figure 42 Copy API Key in sensorEDGE Portal Go back to Node RED open the Authorization sub tab of the Properties tab...

Страница 61: ...ED Click on the sensorEDGE device in the list to open its details page then copy its Device ID to your clipboard To copy it click the icon next to the ID string Figure 44 Copy Device ID in sensorEDGE...

Страница 62: ...rom all sensors connected to the sensorEDGE device To copy it click the icon next to the topic string Figure 46 Copy Data Topic in sensorEDGE Portal Go back to Node RED and paste the Data topic string...

Страница 63: ...RED Click Done button The Properties dialog of the node closes 3 Add Debug node In the Nodes tab on the left search for the debug node under common and drag drop it into the flow Connect the debug nod...

Страница 64: ...button to open the Debug tab Figure 50 Display payload data The Debug tab displays the topic s message payload data that Node RED receives from the sensorEDGE device via the WebSocket interface of th...

Страница 65: ...again Figure 51 Add Health node Double click the node to open its Properties in edit mode In the Websocket drop down list of the Properties tab keep the preset entry In the Device ID field paste the...

Страница 66: ...rtal In the Name field enter a label for the configured node e g Health data Click the pen icon next to the Websocket field Open the Authorization tab and check whether the Key field contains the API...

Страница 67: ...de Figure 55 Health flow added Double click the debug msg payload node to open its Properties in order to give it a meaningful name e g Health payload Figure 56 Rename debug node Click Done to close t...

Страница 68: ...ayload data of both nodes is displayed Click the filter button to define a filter for the Health payload in the Debug tab Figure 58 Selected nodes filter The Debug tab now displays only the health top...

Страница 69: ...certain sensor e g payload object data Messages 1 Payload health healthscore For a description of the structure of a health message see section Health message page 73 Figure 59 Health payload data in...

Страница 70: ...tal s Device Manager or in the IO Link Configurator of the Local Device Manager By default one JSON data message contains payload data from all connected sensors however the IO Link Configurator also...

Страница 71: ...APTER netfield app opc ua io link adapter 3 Messages DataSetWriterId 524 4 Timestamp 2021 07 01T12 48 30 117Z MetaDataVersion majorVersion 1624960594476 minorVersion 1624960594476 5 POI ifm com 2FO5D1...

Страница 72: ...values data points can be enabled disabled for publishing in the IO Link Configurator of the Local Device Manager 4 Timestamp Timestamp taken in the sensorEDGE device at the time the value was read fr...

Страница 73: ...s it to the cloud in a single JSON object message This is by default repeated every minute this publishing interval cannot be changed by the user Note that the JSON objects published by the sensorEDGE...

Страница 74: ...link adapter DataSetClassId d8e7b6df 42ba 448a 975a 199f59e8ffeb 3 Messages DataSetWriterId 1 4 Timestamp 2021 07 01T12 49 01 019Z 5 POI hilscher com IO Link Adapter IOLINKADAPTER netfield app opc ua...

Страница 75: ...he time the value was read 5 POI Point of interest Unique string that specifies the sensor or other item or asset for which the health status is reported Besides the name it can also include the seria...

Страница 76: ...the WebSocket server in the cloud and consume the data streamed from the sensorEDGE device can be found on GitHub Javascript https github com HilscherAutomation netFIELD example proxy web socket clie...

Страница 77: ...ice can be adapted by the user see subsection Host Name in section System page 79 2 In the navigation panel on the left of the screen you can select the available management and configuration pages 3...

Страница 78: ...user menu About Device Manager Shows information about the Local Device Manager Account Settings Opens the configuration page for your currently used account i e the account you are currently logged i...

Страница 79: ...are features e g RAM Hardware ID Unique identification number of the hardware consisting of article and serial number Not to be confused with the sensorEDGE ID printed on the housing To match the requ...

Страница 80: ...uivalent to the transient host name which can be used to connect to the device and which can be changed by DHCP or mDNS at runtime Can contain lower case characters digits dashes and periods with popu...

Страница 81: ...ge showing the share of certain process categories Nice ni User space processes that have been niced i e prioritized User us User space processes i e applications and processes that do not belong to t...

Страница 82: ...network traffic sending and receiving for the last five minutes Firewall The Firewall is a service available to all Hilscher devices of the netFIELD product portfolio that are based on the netFIELD O...

Страница 83: ...device embedded IO Link controller eth0 This is the Ethernet LAN interface of the device for the location of the Ethernet LAN connector of the device see position 8 in section Device overview page 12...

Страница 84: ...ice recovery procedure see section Device recovery page 147 To change the IP settings e g to set a fixed IP address click on Automatic DHCP next to IPv4 The IPv4 Settings page opens Figure 65 IPv4 Set...

Страница 85: ...y section shows the HTTP HTTPS FTP proxy server settings of your device Note that the No Proxy URIs localhost and 127 0 0 1 are internal destinations in the netFIELD OS and are therefore not to be add...

Страница 86: ...the corresponding proxy server and the Port column shows the port number that the proxy server uses for the protocol The No Proxy entries designate destinations that shall not be addressed via Proxy s...

Страница 87: ...ngle proxy server select the Use this proxy server for all protocols option Figure 69 Using one Proxy server for all protocols In the Host field enter the appropriate prefix of the protocol that the p...

Страница 88: ...S that cannot be handled by a proxy server because they are required for internal communication You can however add further exceptions in the Host field Use case b Using separate proxy servers for dif...

Страница 89: ...later on the System page System Power Options Restart If you choose this option do not forget to restart later otherwise the netFIELD OS will not be able to communicate via your new proxy server sett...

Страница 90: ...ou can create new users and define passwords and access right roles Figure 72 Accounts To create a new user account click on the Create New Account button The Create New Account dialog opens Figure 73...

Страница 91: ...u assign neither role to an account the user has only read access to the netFIELD OS Authorized Public SSH Keys This area lists the SSH keys assigned to this account Click on the button to add an SSH...

Страница 92: ...ensorEDGE UI i e of the Local Device Manager You can display details of your currently installed certificate and upload new Certificate and Private Key files in pem format to your device Figure 75 Web...

Страница 93: ...s Device Manager To update the OS via local access you simply need to upload the corresponding swu update file to this page The update process and the device reboot will be automatically performed by...

Страница 94: ...added the update file to the field click Update button The Confirmation dialog appears Because the update process cannot be aborted after confirmation you should now check carefully whether you have s...

Страница 95: ...ure 79 OS update Disconnected message Click Reconnect button You have updated the OS of the sensorEDGE device You can now sign in again with your usual login credentials The new firmware version will...

Страница 96: ...ware ZIP archive file from Hilscher contact Hilscher support for instructions 2 Upload the ZIP archive file from your local PC to the device On the netX 90 firmware tab simply drag and drop the ZIP ar...

Страница 97: ...In the drop down lists in the header you can filter the messages by time date Severity type and Service i e the service that issued the message Click on a message in the list to display the informatio...

Страница 98: ...Link Configurator 1 The MAIN MENU side bar allows you to navigate through the app by opening submenus or tabs with more detailed information The menu can be hidden by clicking the arrow symbol respect...

Страница 99: ...me basic device information The Live View image is automatically updated when you plugin or remove a sensor Figure 83 Live View tab in Dashboard Note If the sensorEDGE device could not download the IO...

Страница 100: ...On top of the hierarchy are the OPC UA Server and the IO Link Master sensorEDGE internal IP address elements Subordinate elements and parameters can be collapsed or expanded by clicking on the arrow u...

Страница 101: ...all connected sensors are displayed in the list Publishing enabled If this option is selected only check marked sensors are displayed in the list i e the sensors that are enabled for publishing data t...

Страница 102: ...urrently installed containerized software components that are handling the data transmission from the IO Link sensors to the sensorEDGE Portal Figure 85 Container Info tab in Dashboard netFIELD sensor...

Страница 103: ...ng DEVICE ACCESS Connected Device from the MAIN MENU sensorEDGE IO Link Master The top element sensorEDGE 192 168 0 2 in the CONNECTED DEVICE navigation tree represents the sensorEDGE device itself an...

Страница 104: ...ation according to setting in the Configuration tab Note Although by default set to Digital Input digital inputs outputs at pin 2 are not supported by the sensorEDGE Pin2ProcessData Indicates whether...

Страница 105: ...No check No check New device is not checked for validity V1 0 Device validation according IO Link spec V1 0 V1 1 Device validation according IO Link spec V1 1 V1 1 B R Device validation according IO L...

Страница 106: ...pears single shot the time stamp and the specific event code are also displayed For a list of event codes and their meaning please refer to section IO Link event codes page 152 Example of master event...

Страница 107: ...h restore function the new device takes up the behavior as last stored in the master Pin 2 Configuration Note Although by default set to Digital Input digital inputs outputs at pin 2 are not supported...

Страница 108: ...manual They depend on the connected sensor and its IODD file IO device description The IODD file is automatically downloaded and applied according to its default settings by the sensorEDGE after havin...

Страница 109: ...load button you can download the IODD file from the IODD Finder Internet database note that the sensorEDGE requires Internet access for this The IODD file will be automatically applied after the downl...

Страница 110: ...net After download the sensorEDGE immediately applies the default settings specified in the IODD file thus enabling the plug and play functionality of the sensorEDGE The Attachment page shows a list o...

Страница 111: ...in the Name column opens the Internet page of the device s vendor Clicking on a link in the Attachments column opens the corresponding file in your web browser Add Device Attachment dialog To manually...

Страница 112: ...ce Attachment dialog Figure 96 Selected file in Add Device Attachments dialog Click Upload button After receiving the Successful message you can upload further ZIP files or close the dialog The sensor...

Страница 113: ...ete one or more items first select the corresponding item by clicking the checkbox in front of it set checkmark then click the button in the footer You can select checkmark all items at once by clicki...

Страница 114: ...the Memory button in the header to open the Attachments Memory Usage dialog Figure 98 Attachments memory Important Be careful with the Delete button Clicking the Delete button will immediately delete...

Страница 115: ...r sensorEDGE account see section Create user account in sensorEDGE Portal page 28 Figure 99 Sign In dialog Tick the Remember me check box This ensures that your browser token remains valid for one yea...

Страница 116: ...er logging into your sensorEDGE account It allows you to access the management apps by clicking the corresponding tile Figure 100 Landing page sensorEDGE Portal netFIELD sensorEDGE User manual DOC2006...

Страница 117: ...name of the account Cannot be changed by the user Telephone Phone numbers of the account holder Can be changed by clicking Update Details Mobile Phone Address Information Street Address details of th...

Страница 118: ...tton in header to open the sensorEDGE Documentation page providing links to various help and documentation resources Figure 102 sensorEDGE Documentation page netFIELD sensorEDGE User manual DOC200601U...

Страница 119: ...ge Element Description Onboard Opens the onboarding page for new devices Click here to sort the list alphabetically in ascending or descending order Search here for specific devices fuzzy search in NA...

Страница 120: ...en the device was paired with your sensorEDGE account SUBSCRIPTION END DATE Shows the end date of your sensorEDGE subscription ACTION Offboards the sensorEDGE device i e unpairs it from your account A...

Страница 121: ...a software update on your device click the Update button Additional information about the device as free text You can directly enter or edit the text in the field next to the icon Offboard With this b...

Страница 122: ...The payload of individual sensors can be selected or unselected for publication in the Local Device Manager under netFIELD App IO Link Configurator Dashboard Payload Health This topic contains the he...

Страница 123: ...the little triangle icon in front of the DETAILS TOPICS or PORTS areas to expand or collapse the subordinate parameters of the group netFIELD sensorEDGE User manual DOC200601UM01EN Revision 1 English...

Страница 124: ...You can do the pairing either before or after device installation Figure 105 Device Manager Onboarding dialog Element Description ID 1 Enter here the ID of your sensorEDGE device for the position of...

Страница 125: ...n DESCRIPTION Free text field for detailed description of the dashboard To change the description click Edit Dashboard Details button MODIFIED AT Date and time of creation respectively last modificati...

Страница 126: ...e sensorEDGE data Note Newly added dashboards are empty You can start to populate the dashboard by dragging chart templates from the Widget Gallery onto the empty dashboard and then configure it as de...

Страница 127: ...line See section Line Chart widget page 129 for details 4 Gauge Chart The Gauge Chart allows you to visualize the current live value of a single sensor represented as a needle in a gauge The green dot...

Страница 128: ...ts handle in the lower right corner of the widget window Figure 108 Resizing widget window Use the breadcrumbs Home Dashboards on top of the dashboard page to navigate back to the start page of the Da...

Страница 129: ...a data point to display its exact value in a hover box a k a mouseover You can also hide individual lines data sources by clicking on the label in the legend Note The values of the data points in a ch...

Страница 130: ...on your dashboard Figure 110 Drag chart In the Line Chart window click Edit Configuration to open its configuration mode or click the menu button then select the Edit button Figure 111 Line Chart con...

Страница 131: ...should be of the same data type and unit e g distance measurement values in centimeters or e g temperature in Celsius etc Device In this field select the sensorEDGE device that shall be the source de...

Страница 132: ...the tableau or enter the HTML color code If you do not specify a color blue will be used as default Gradient from Click in the field to select a grading background color for the chart that decreases...

Страница 133: ...from the tableau or enter the HTML color code If you do not specify a color blue will be used as default Sensor Meta Data tab In the Sensor Meta Data tab you can display meta information of your data...

Страница 134: ...Device Manager in the Portal see section Device Details page page 121 Alternatively the interval can also be set in the Local Device Manager under netFIELD App IO Link Configurator Dashboard Payload...

Страница 135: ...t the Edit button Figure 117 Gauge Chart configuration window Data Source panel Note Unlike the Line Chart and the Vertical Bar Chart a Gauge Chart can have only one data source by default named Senso...

Страница 136: ...op down list select the sensor data source that you want to visualize in your gauge The list contains all data sources coming from the IO Link sensors that are connected to the selected sensorEDGE dev...

Страница 137: ...for the chart that decreases in saturation from left to right You can pick from the tableau or enter the HTML color code Gradient to Click in the field to select a grading background color for the cha...

Страница 138: ...ources by clicking on the label in the legend Note The values of the data points in a chart are refreshed according to the Data Publishing Interval defined for the sensorEDGE data messages The interva...

Страница 139: ...ashboard Figure 121 Drag bar chart In the Vertical Bar Chart window click Edit Configuration to open its configuration mode or click the menu button then select the Edit button Figure 122 Vertical Bar...

Страница 140: ...all should be of the same data type and unit e g distance measurement values in centimeters or e g temperature in Celsius etc Device In this field select the sensorEDGE device that shall be the sourc...

Страница 141: ...sensorEDGE Portal 141 166 Visualization panel Figure 124 Vertical Bar Chart Visualization panel netFIELD sensorEDGE User manual DOC200601UM01EN Revision 1 English 2021 09 Released Public Hilscher 2021...

Страница 142: ...maximum value displayed on the Y axis Gradient from Click in the field to select a grading background color for the chart that decreases its saturation from left to right You can pick from the tablea...

Страница 143: ...lay meta information of your data sources sensors like e g their data type Sensor Health Data tab In the Sensor Health Data tab you can check the health of your data sources sensors netFIELD sensorEDG...

Страница 144: ...FIELD Platform via WebSocket with your own application s For more information see Querying sensorEDGE data via netFIELD Cloud WebSocket API services page 55 Start page The start page Manage your API K...

Страница 145: ...y ACTION Deletes the API Key If the list contains more than ten entries you can scroll here to display further entries Table 37 Elements on API Key Manager start page To open the details page of a key...

Страница 146: ...ime a request is made Use the button to copy the string to your clipboard Created at Shows date and time of creation of the API key RESOURCE Resource for which the key has permissions PERMISSIONS Perm...

Страница 147: ...e eth0 in the Local Device Manager If you require a recovery of your sensorEDGE device contact Hilscher support via email at support hilscher com or via contact form on https www hilscher com support...

Страница 148: ...ircuit breaker or fuse For this purpose use a 24 V DC max 16 A fuse or circuit breaker with type B trip characteristics Reverse voltage protection Yes Mains buffering power failure bridging 10 ms at 2...

Страница 149: ...A 8 ports Connector 8 x M12 A coded female 5 pole Recommended tightening torque of locking screw 0 4 0 6 Nm Maximum cable length 20 m LED indicators SYS green yellow System status LED of the communica...

Страница 150: ...e 24 V DC 1L powered Current Maximum current consumption per IO Link port without airflow 400 mA Maximum current consumption per IO Link port with airflow of 0 5 m s 1800 mA Circuit High side driver n...

Страница 151: ...d pull off the cables Required tools for dismounting Allen wrench or screwdriver for loosening the M4 screws Dismounting Proceed as follows Make sure that the part of the plant in which the device is...

Страница 152: ...ency Memory out of range 2048 octets Error Delete data storage by reconfiguring the port 0x180A Backup inconsistency Identity fault Error Delete data storage by reconfiguring the port 0x180B Backup in...

Страница 153: ...Warning Check tolerance of 2L voltage 0x6000 Device software fault Error Check firmware revision 0x6320 Parameter error Error Check data sheet and values 0x6321 Parameter missing Error Check data she...

Страница 154: ...Retry error Error See manual of the used IO Link Device Any other code Reserved See manual of the used IO Link Device Table 42 IO Link Device Event Codes common netFIELD sensorEDGE User manual DOC2006...

Страница 155: ...trademark of the Microsoft Corporation GitHub is a registered trademark of GitHub Inc IO Link is a registered trademark of the PROFIBUS Nutzerorganisation e V netFIELD sensorEDGE User manual DOC20060...

Страница 156: ...edit them using electronic systems or to transfer them You are not permitted to make changes to copyright notices markings trademarks or ownership declarations Illustrations are provided without takin...

Страница 157: ...e corresponding documents shall be limited to an event involving willful intent or a grossly negligent violation of a fundamental contractual obligation However the right to assert damages due to a vi...

Страница 158: ...conditions or is due to violations against our operating regulations or against rules of good electrical engineering practice or if our request to return the defective object is not promptly complied...

Страница 159: ...e performances specified in this agreement The customer must not use this confidential information to his own advantage or for his own purposes or rather to the advantage or for the purpose of a third...

Страница 160: ...Change sensor name 41 Figure 20 Visualization panel 42 Figure 21 Defining line color of sensor data 43 Figure 22 Sensor Meta Data tab 44 Figure 23 Sensor Health Data tab 44 Figure 24 Configured Line...

Страница 161: ...payload data in debug tab 69 Figure 60 Overview Device Manager 77 Figure 61 System page 79 Figure 62 Change host name dialog 80 Figure 63 Networking page 82 Figure 64 Details of LAN interface eth0 83...

Страница 162: ...GE Portal 116 Figure 101 User Profile 117 Figure 102 sensorEDGE Documentation page 118 Figure 103 sensorEDGE Portal Device Manager start page 119 Figure 104 Device Details page 121 Figure 105 Device M...

Страница 163: ...ar Chart Visualization panel 141 Figure 125 Sensor visualization parameters 142 Figure 126 API Key Manager start page 144 Figure 127 API Key details page 145 Figure 128 Add API Key dialog 146 netFIELD...

Страница 164: ...Elements in Payload tab 101 Table 22 Elements in Port Info tab 104 Table 23 Elements in Configuration tab of port 107 Table 24 Elements on Attachments page 111 Table 25 User Profile parameters 117 Tab...

Страница 165: ...tables 165 166 Table 41 IO Link Master Event Codes 152 Table 42 IO Link Device Event Codes common 153 netFIELD sensorEDGE User manual DOC200601UM01EN Revision 1 English 2021 09 Released Public Hilsch...

Страница 166: ...Phone 91 8888 750 777 E mail info hilscher in Italy Hilscher Italia S r l 20090 Vimodrone MI Phone 39 02 25007068 E mail info hilscher it Support Phone 39 02 25007068 E mail it support hilscher com J...

Отзывы: