


DS-PR1-60 User Manual
UM DS-PR1-60 090920NA
11
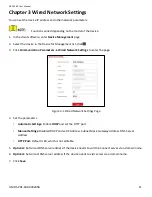
Chapter 3 Wired Network Settings
You can set the device IP address and other network parameters.
Functions varied depending on the model of the device.
1.
In the client software, enter
Device Management
page.
2.
Select the device in the Device for Management list, click
.
3.
Click
Communication Parameters → Wired Network Settings
to enter the page.
Figure 3-1 Wired Network Settings Page
4.
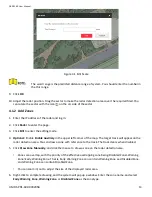
Set the parameters.
•
Automatic Settings:
Enable
DHCP
and set the HTTP port.
•
Manual Settings:
Disabled DHCP and set IP Address, Subnet Mask, Gateway Address, DNS Server
Address.
•
HTTP Port:
Default is 80, which is not editable.
5.
Optional:
Set correct DNS server address if the device needs to visit Hik-Connect server via a domain name.
6.
Optional:
Set correct DNS server address if the device needs to visit server via a domain name.
7.
Click
Save
.
Содержание DS-PR1-60
Страница 1: ...DS PR1 60 Security Radar User Manual...
Страница 32: ...DS PR1 60 User Manual UM DS PR1 60 090920NA 32 Figure 5 5 Installation Scene for One Point Calibration...
Страница 42: ...DS PR1 60 User Manual UM DS PR1 60 090920NA 42...
Страница 69: ...DS PR1 60 User Manual UM DS PR1 60 090920NA 69...
Страница 70: ...DS PR1 60 User Manual UM DS PR1 60 090920NA 70...
Страница 71: ...DS PR1 60 User Manual UM DS PR1 60 090920NA 71 UD13649B...