background image

User Manual of DS-6600 Audio/Video Encoder 

31 

device identifier) as well. 

4.


Click 

Add

 to add the device. 


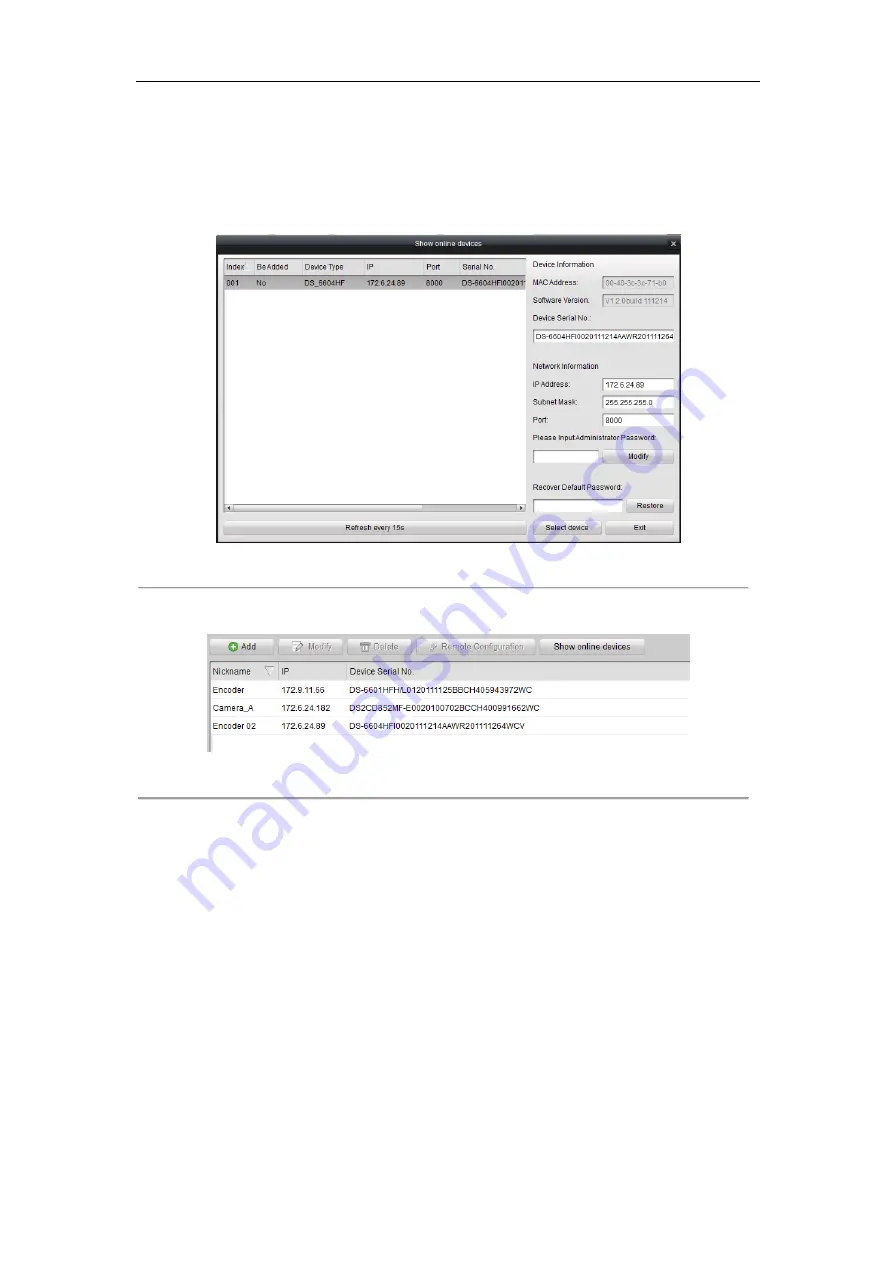
You can also click the

 Show online devices

 icon to search the online devices. All the online devices will show in 

the list. Click to select the online device you want to add, and then click

 Select Device

 to add the device. 


Figure 4.17 Search Online Device by SADP   


5.


The successfully added device (s) will be displayed on the device list.   


Figure 4.18 List of Added Devices 


4.3.2 Starting Live View   

Click

 Control Panel > Main View 

to enter the Live View page: 

Содержание DS-6600 Series

Страница 1: ...DS 6600 Series Audio Video Encoder USER MANUAL Version1 2 0...

Страница 2: ...ITATION THE IMPLIED WARRANTIES OF MERCHANTABILITY AND FITNESS FOR A PARTICULAR PURPOSE REGARDING THE HIKVISION SOFTWARE HIKVISION DOES NOT WARRANT GUARANTEE OR MAKE ANY REPRESENTATIONS REGARDING THE U...

Страница 3: ...of as unsorted municipal waste in the European Union For proper recycling return this product to your local supplier upon the purchase of equivalent new equipment or dispose of it at designated collec...

Страница 4: ...user serviceable parts inside the power supply System Grounding Earthing To avoid shock ensure that all AC wiring is not exposed and that the earth grounding is maintained Ensure that any equipment to...

Страница 5: ...onents such as heat sinks power regulators and processors may be hot care should be taken to avoid contact with these components Electro Magnetic Interference This equipment has not been tested for co...

Страница 6: ...mismatch Please make sure the DVS work in the allowed range of temperature and humidity Please keep the device horizontal and avoid the installation under severe vibration environment The dust board...

Страница 7: ...Hyper Terminal Setup 18 3 2 Network Configuration by Hyper Terminal 20 Chapter 4 Access to DS 6600 by Client Software 23 4 1 Installing the Client Software 23 4 2 Uninstalling the Software 29 4 3 Acc...

Страница 8: ...8 Camera Settings 53 8 1 Configuring OSD Settings 53 8 1 1 Configuring Display Settings 53 8 1 2 Configuring Text Overlay 54 8 2 Configuring Video Settings 56 8 3 Configuring and Handling Alarms 57 8...

Страница 9: ...g Search and Maintenance 76 12 1 Log Search 76 12 2 Viewing Device Information 77 12 2 Maintenance 77 12 3 1 Restarting the Device 78 12 3 2 Restoring Default Settings 78 12 3 3 Importing Exporting Pa...

Страница 10: ...6604HFI JX DS 6608HFI JX DS 6612HFI JX DS 6616HFI JX DS 6620HFI JX DS 6624HFI JX DS 6628HFI JX DS 6632HFI JX DS 6636HFI JX DS 6640HFI JX DS 6644HFI JX DS 6648HFI JX DS 6652HFI JX DS 6656HFI JX DS 6660...

Страница 11: ...tion alarm recording Motion detection alarm recording Manual recording Pre recoding and Post recording Support pre recoding and post recoding with the recording time configurable 0 30sec for pre recor...

Страница 12: ...ng period Exceptions Exception Alarm Handling Exception alarms include network disconnect alarm IP address conflict alarm illegal access alarm etc multiple alarm handling methods are supported relay a...

Страница 13: ...n is abnormal Tx Rx Tx Rx LED indicator 1 Does not light when the network is not connected 2 Blinks in green when the data is transmitting receiving 3 Blinks at higher frequency when the data for tran...

Страница 14: ...D indicator 1 Normally lights in green when the network connection is functioning properly 2 Does not light when the network connection is abnormal Tx Rx Tx Rx LED indicator 1 Does not light when the...

Страница 15: ...RESET Restore the factory default settings by holding the RESET button for 15 seconds after power is turned on 6 LAN 10M 100Mbps self adaptive UTP Ethernet interface 7 RS 232 Serial interface for con...

Страница 16: ...6 RESET Restore the factory default settings by holding the RESET button for 15 seconds after power is turned on 7 LAN 10M 100Mbps self adaptive UTP Ethernet interface 8 RS 232 Serial interface for co...

Страница 17: ...5 half duplex interface 4 LINE IN 3 5mm voice talk input interface for connection to active pick up microphone etc 5 AUDIO OUT 3 5mm audio output interface for connection to audio output device e g lo...

Страница 18: ...r NC Different alarm output connection methods are applied to the AC or DC load Please refer to the following diagram Alarm output connections diagram Figure 2 9 Alarm Output Connections Please note t...

Страница 19: ...software and the Hyper Terminal Software to find and configure the IP address and other parameters of the device Note For the first time user the default user name of DS 6600 is admin and password is...

Страница 20: ...unication port Select COM1 in Connect To interface Please select the COM port according to the reality in case PC has more than 1 COM Press OK to enter Properties dialogue box Figure 3 2 Select Commun...

Страница 21: ...Hyper Terminal item established in the program group Start Accessories Communications Hyper Terminal Connection names of all Hyper Terminal are included You can see an icon named as HK here Figure 3...

Страница 22: ...parameters of the device Table 3 1 Description of Commands The admin and guest have different permission to use commands Please refer to the following table Command guest admin Description helpm Conso...

Страница 23: ...t Get whitelist delWhiteList Delete whitelist setOffLineTime Set offline time setCmsAddr Set IP address of push mode setUserName Set user name of push mode setPuPsw Set password of push mode setNetTyp...

Страница 24: ...ows 2000 or higher CPU Intel Pentium IV 2 4 GHz or higher RAM 1G or higher Display 1024 768 resolution or higher 4 1 Installing the Client Software Insert the DX4500 DX4600 resource disc into the remo...

Страница 25: ...Card Driver WinpCap Select the driver you want to install vcredist_x86 patch for X86 operating system Card Driver for compression card WinpCap for open source software SADP driver Figure 4 3 Select D...

Страница 26: ...In the License Terms dialog box click I have read and accept the license terms and then click Install to install the vcredist_x86 patch Figure 4 5 Install vcredist_x86 patch Accept License Terms Afte...

Страница 27: ...ver If there is compression card installed on your computer you can click the Install or Update Driver option to install the card driver Figure 4 7 Install Card Driver Install WinPcap Follow the insta...

Страница 28: ...en installed continue the following steps Step5 Select the programs you want to install on your computer including the User Client PC NVR Server and Stream Media Server User can also click Browse to c...

Страница 29: ...tart installation of the selected programs Figure 4 11 Install the Selected Programs Step8 After the installing progress is completed enter the Setup Type interface to select the desktop shortcut icon...

Страница 30: ...select Uninstall iVMS 4200 option to enter the following interface Figure 4 14 Uninstall the Programs Select Remove to remove all installed features and then click Next to uninstall iVMS 4200 accordin...

Страница 31: ...ice Management Page 2 Click the Add button to enter the Add Device interface Figure 4 16 Add Device 3 Edit a nickname for the device and then input the IP address port number default 8000 login User N...

Страница 32: ...ces All the online devices will show in the list Click to select the online device you want to add and then click Select Device to add the device Figure 4 17 Search Online Device by SADP 5 The success...

Страница 33: ...the toolbar to operate in the live view mode e g capture picture start stop recording two way audio PTZ control with PTZ camera connected to the encoder digital zoom open close audio play back video f...

Страница 34: ...ice to the LAN and prepare a PC connected to the same LAN with the device The factory default username of the device is admin and the password is 12345 The factory default IP address of the device is...

Страница 35: ...ad and Install Plug in 2 Click Run or Save on the pop up warning message box Figure 5 3 Run WebComponents 3 Click Next on the pop up Setup dialog box Figure 5 4 Click Next 4 When the installation comp...

Страница 36: ...encoder and its channels Window division 1 4 division display mode Live Video Window Display the live video of the current camera Toolbar Realize functions in live view mode e g live view capture rec...

Страница 37: ...use 2 Double click a camera from the device list to start the live view Figure 6 1 Start Live View 3 You can click the button on the toolbar to start the live view of all cameras on the device list Re...

Страница 38: ...live video on Section 8 1 Configuring OSD Settings 6 2 Capturing Picture In live view mode click the button on the toolbar to capture the live pictures When the picture is captured the following pop...

Страница 39: ...per right bottom left bottom right on the display window when the mouse is located in the relative positions Click on the directional buttons to control the pan tilt movement Figure 6 4 PTZ Control Pa...

Страница 40: ...wn Zoom in or out Refocus the lens 3 Click the icon to finish the setting of current preset Note Up to 256 presets can be configured Calling a Preset This feature enables the camera to point to a spec...

Страница 41: ...can configure the OSD On screen Display settings for the camera including date time camera name etc Steps 1 In the live view interface click the button on the bottom right corner to spread the Video...

Страница 42: ...ing Video Settings for the parameters settings of the main stream and sub stream respectively Image Size Select the window division view mode to 4 3 16 9 or Auto fill Video File Size Select the size o...

Страница 43: ...lly Configuring Time Sync by NTP Server A Network Time Protocol NTP Server can be configured on your device to ensure the accuracy of system date time If the device is connected to a Dynamic Host Conf...

Страница 44: ...then click the icon to set the system time from the pop up calendar You can check the checkbox of Snyc with local time to synchronize the time with the local PC Figure 7 5 Time Sync by Manually 4 Conf...

Страница 45: ...lable you can click the checkbox of DHCP to automatically obtain an IP address and other network settings from that server 4 If the DNS server settings are required for some applications e g sending e...

Страница 46: ...ction you may set Dynamic DNS DDNS to be used for network access Prior registration with your DDNS Provider is required before configuring the system to use DDNS Steps 1 Click the Remote Configuration...

Страница 47: ...r You have to apply a static IP subnet mask gateway and primary DNS from the ISP The Server IP should be entered with the static IP address of the PC that runs IPServer software Figure 7 12 IPServer S...

Страница 48: ...vice must be connected to a local area network LAN that maintains an SMTP mail server The network must also be connected to either an intranet or the Internet depending on the location of the e mail a...

Страница 49: ...P IP port used for SMTP is 25 Enable SSL Click the checkbox to enable SSL if required by the SMTP server Interval The interval refers to the time between two actions of sending attached pictures Attac...

Страница 50: ...lable within the network and is properly connected 2 The network storage device is configured with NAS or IP SAN mode please refer to the User Manual of IP SAN NAS Steps 1 Click Remote Configuration N...

Страница 51: ...igure 7 20 Set HDD Property Note 1 Please refer to the User Manual of IP SAN NAS for the creation of File Path in the network management 2 Up to 8 NAS disks or IP SAN disk can be connected to the DS 6...

Страница 52: ...SNMPv1 SNMP v2c and SNMPv3 are disabled 5 Select the security level to no auth no priv auth no priv no auth priv or auth priv Figure 7 22 SNMP Settings 2 6 1 When the security level is set to auth pri...

Страница 53: ...User Manual of DS 6600 Audio Video Encoder 52 and Privacy Algorithm parameters 7 Click Save to save the above settings...

Страница 54: ...gs interface Figure 8 1 Display Settings 2 Select the camera from the drop down list 3 Edit the camera name in the text field of Camera Name Figure 8 2 Edit Camera Name 4 Select the display of camera...

Страница 55: ...gure 8 4 Copy to Camera 9 Click Save to validate the above settings 8 1 2 Configuring Text Overlay Steps 1 Click the Remote Configuration Camera Settings Text Overlay Settings to enter the Text Overla...

Страница 56: ...ings 5 If you want to copy the text overlay settings of the current camera to other cameras spread the Copy to Camera panel and select the camera s to copy or click Select All to select all cameras Fi...

Страница 57: ...the stream type to video stream or video audio composite stream The audio signal will be recorded only when the Stream Type is Video Audio Resolution Select the resolution of the video input BitRate T...

Страница 58: ...igger the alarm actions such as Notify Surveillance Center Send Email and Trigger Alarm Output 8 3 1 Configuring Motion Detection Motion detection is a feature which can alert the personnel and record...

Страница 59: ...detection areas in the same image 5 Click the button to finish drawing You can click the button to clear all areas 6 Move the slide bar to set the sensitivity of the camera Figure 8 10 Motion Detecti...

Страница 60: ...her days Optional 6 Click OK button to save the settings Note The time of each segment can t be overlapped Up to 8 segments can be configured for each day 3 Set the Alarm Actions Taken for Motion Dete...

Страница 61: ...ings 3 Select the channel you want to trigger an external alarm output when a motion detection event occurs Figure 8 14 Motion Detection Trigger Alarm Output Note To trigger an external alarm output w...

Страница 62: ...interface and click Save to save the settings 4 Select the channel you want to trigger recording when a motion detection event occurs Figure 8 17 Motion Detection Alarm Linked Recording 5 Click Save t...

Страница 63: ...e Linking Method tab to set the actions taken for the alarm input Refer to Step 3 Set the Alarm Actions Taken for Motion Detection in Section 8 3 1 Configuring Motion Detection 5 You can also choose t...

Страница 64: ...ion is the same as the Setting of the Arming Schedule for Motion Detection Please refer to Step 2 Set the Arming Schedule for Motion Detection in Section 8 3 1 Configuring Motion Detection 5 Click the...

Страница 65: ...rm Actions Taken for Motion Detection in Section 8 3 1 Configuring Motion Detection 8 3 5 Handling Exception The exception type can be HDD full HDD error network disconnected IP address conflict illeg...

Страница 66: ...rom live viewing and recording Steps 1 Click Configuration Remote Configuration Camera Settings Privacy Mask to enter the privacy mask settings interface 2 Select the camera to configure privacy mask...

Страница 67: ...te Configuration Serial Port Settings 232 Serial Port to enter RS 232 port setting interface Figure 8 24 RS 232 Port Settings Note If you want to connect the camera by the RS 232 port the parameters o...

Страница 68: ...485 parameters By default the Baud Rate is set as 9600 the Data Bit as 8 the Stop Bit as 1 and the Parity and Flow Control as None Note The Baud Rate Address and PTZ Protocol parameters should be exac...

Страница 69: ...e configured Manual and Scheduled The following section introduces the configuration of scheduled recording For the manual recording refer to Section 6 1 Starting Live View Steps 1 Click Remote Config...

Страница 70: ...etection settings interface Refer to the Step 1 Set the Motion Detection Area in the Section 5 7 1 Configuring Motion Detection Record Triggered by Alarm If you select Alarm the video will be recorded...

Страница 71: ...cord time can be configured as No Pre Record 5 s 10 s 15 s 20 s 25 s or 30 s Post Record The Post Record time can be configured as 5 s 10 s 30 s 1 min 2 min 5 min or 10 min Figure 9 3 Edit Schedule 10...

Страница 72: ...layback on the menu bar to enter playback interface Figure 10 1 Playback Page 2 Click the camera from the device list for playback 3 Select the date from the calendar and click Search Figure 10 2 Sele...

Страница 73: ...playing Stop Capture pictures in playback mode Slow forward Start Stop clipping video files Fast forward Audio on off Play by single frame 6 You can also drag the progress bar with the mouse to locat...

Страница 74: ...to Operator or User The user type indicates the permissions you give to the user Operator The Operator user level has permission of Local Log Search in Local Configuration Remote Log Search and Two w...

Страница 75: ...11 4 Modify a User 3 Modify the User Name Password and then select User type 4 Configure the user permission for the user including the Basic Permission and Camera Operation 5 Click OK to finish the...

Страница 76: ...User Manual of DS 6600 Audio Video Encoder 75 Figure 11 5 Delete a User 3 Click OK to delete the selected user account...

Страница 77: ...he HDD or network disk has been initialized for the first time to use Please refer to Section 7 3 5 Adding Network Disk for details Steps 1 Click Log on the menu bar to enter the Log interface 2 Set t...

Страница 78: ...rface of the encoder Figure 12 2 Device Information You can edit the Device Name and Device No and view the device information including Model Serial No Firmware Encode Version Number of Channels Numb...

Страница 79: ...ers to the factory settings Figure 12 5 Restore Default Settings By selecting the Restore button the device restores the default settings for the parameters except the IP address subnet mask gateway a...

Страница 80: ...to import a configuration file Note After having finished the import of configuration files the device will reboot automatically On the Maintenance Export Parameters interface click the Export button...

Страница 81: ...hy cannot add encoder with software 1 Check the encoder IP 2 Make sure the cable is connected 3 User name and password of encoder are correct Why cannot control the connected PTZ camera or speed dome...

Страница 82: ...solution and pixel resolution The display resolution refers to the maximum display zone on the screen in certain display mode measured in horizontal and vertical pixel The image resolution describes t...

Отзывы: