background image

9 – English

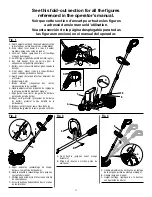
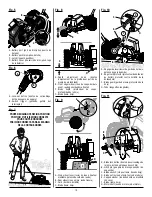
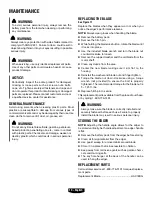
ADJUSTING DEPTH OF CUT

See Figure 8.

There are four depth positions from 1/2 in. to 2 in. Make a 
shallow cut to test the cutting depth. If the cutting depth 
needs adjusting, this should be done progressively until the 
desired depth is reached.


Remove the battery pack.


Loosen the depth adjustment knob.

 NOTE:

  When the knob is loosened, the spring loaded 

wheel will return to the 1/2 in. position.


Adjusting the wheel downward will increase the variable 
cutting depth.


NOTE:

 T

here are four notched positions.

  Securely tighten the depth adjustment knob to lock the 

wheel in the desired position.

DROP WHEEL ADJUSTMENT

See Figure 9.

One of the rear wheels is adjustable and can drop to four 
different positions. This feature enables edging on uneven 
surfaces  such  as  along  curbs.  Keeping  the  unit  level  on 
uneven  surfaces  ensures  the  consistent  cutting  depth  of 
the blade.


Remove the battery pack.


Move the lever out to raise or lower to one of the four 
positions.


NOTE: 

No  adjustment  is  necessary  for  level  surfaces.

Leave the lever in the fully raised position.


Release the lever and make sure it locks securely into 
one of the four positions.

EDGER GUIDE

See Figure 10.

The edger guide protects curbing and other surfaces from 

damage by the edger’s blade.


Remove the battery pack.


Move the lever inward to release.


Raise or lower the lever to adjust the guide.


Lock into place by sliding the lever until it aligns with the 
tabs on the blade guard.

OPERATING THE EDGER

See Figure 7.

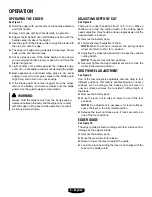
  Hold the edger with your hands on the handle assembly 

and front handle.

  Keep a firm grip with both hands while in operation. 

  Edger should be held at a comfortable position with the 

handle assembly about hip height.

  Use the sight on the blade guide to align the blade with 

the area you wish to edge.  

  The edger will edge along sidewalks, driveways, flower 

beds, curbs, and similar areas.


Cut at a steady pace. If the blade begins to bog down, 
you are edging too fast; slow your pace. Do not force the 
blade into ground.

  Light contact of the blade against the sidewalk edge, 

curb, etc., is acceptable and will not damage the edger.


Best appearance is obtained when grass is dry. Avoid 

edging in wet soil or wet grass areas or the blade guard 

might clog and result in an uneven edge. 

  If the blade guard becomes clogged, stop the edger, 

remove the battery, and remove debris from the blade 
guard. Use the guard sweep to clear debris.

 WARNING:

Always  hold  the  edger  away  from  the  body  keeping 
clearance between the body and the edger. Any contact 

with the edger cutting head while operating can result 

in serious personal injury.

OPERATION

Содержание HLED01

Страница 1: ...iento 10 Correcci n de problemas 11 Pedidos de piezas y servicio P g posterior THIS INSTRUCTION BOOKLET CONTAINS IMPORTANT SAFETY INFORMATION PLEASE READ AND KEEP FOR FUTURE REFERENCE WARNING To reduc...

Страница 2: ...cteur de bordures de trottoir protector contra bordillo de la bordeadora N Blade wrench cl pour lame llave de hoja O Blade guide guide de la lame gu a de cuchilla A Front handle poign e avant mango de...

Страница 3: ...nob bouton d ajustement de la profondeur perilla de ajuste de profundidad B Front edger wheel roue du coupe bordure avant rueda de bordeadora frontal C Blade depth profondeur de coupe profundidad de l...

Страница 4: ...uct or identified as appropriate for use with this product in the operator s manual Avoid Dangerous Environments Don t expose appliance to rain or wet conditions Water entering an appliance will incre...

Страница 5: ...ance or the battery pack as applicable except as indicated in the instructions for use and care Store idle appliances indoors When not in use edger should be stored indoors in a dry locked place out o...

Страница 6: ...le it continues to spin after the motor is stopped or throttle trigger released Maintain proper control until the blade has completely stopped rotating Check blade nut for tightness before operating t...

Страница 7: ...L NAME DESIGNATION EXPLANATION Safety Alert Indicates a potential personal injury hazard Read Operator s Manual To reduce the risk of injury user must read and understand opera tor s manual before usi...

Страница 8: ...curbs EDGE GUIDE LEVER The edge guide lever controls the depth of the edge guard GUARD SWEEP The guard sweep removes clippings and debris from the blade area LOCK OUT The lock out prevents accidental...

Страница 9: ...packing list are included WARNING Do not use this product if any parts on the Packing List are already assembled to your product when you unpack it Parts on this list are not assembled to the product...

Страница 10: ...so the pin secures the position selected TO INSTALL BATTERY PACK See Figure 5 WARNING Always remove battery pack from your tool when you are assembling parts making adjustments cleaning or when not in...

Страница 11: ...ing and other surfaces from damage by the edger s blade Remove the battery pack Move the lever inward to release Raise or lower the lever to adjust the guide Lock into place by sliding the lever until...

Страница 12: ...er s performance lessens NOTE Always wear gloves when handling the blade Remove the battery pack Remove the hitch pin While holding the blade lock button rotate the blade until it locks into place Use...

Страница 13: ...ION Motor fails to start when switch trigger is depressed Battery is not secure Battery is not charged To secure the battery pack make sure the latch or latches snap into place Charge the battery pack...

Страница 14: ...s un accessoire non fourni avec le produit ou indiqu comme pouvant tre utilis sur l outil dans le manuel d utilisation viter les environnements dangereux Ne pas exposer le appareil ou outil la pluie o...

Страница 15: ...orrosif pouvant causer des l sions cutan es ou oculaires Il peut tre toxique en cas d ingestion Ne pas placer les outils lectriques sans fil ou leurs piles proximit de flammes ou d une source de chale...

Страница 16: ...ay une fois que le moteur est arr t et la g chette rel ch e peut causer des blessures Garder le contr le de l outil jusqu ce que la lame soit compl tement immobilis e S assurer que l crou de lame est...

Страница 17: ...sques SYMBOLE NOM D SIGNATION EXPLICATION Symbole d alerte de s curit Indique un risque de blessure potentiel Lire manuel d utilisation Pour r duire les risques de blessures l utilisateur doit lire et...

Страница 18: ...Le levier du guide de bordure prot ge la lame des bordures et des autres obstacles BALAI DE PROTECTEUR Le balai de protecteur permet d liminer les d chets de coupe et les d bris de la zone de la lame...

Страница 19: ...t t remplac es Le non respect de cet avertissement pourrait entra ner des blessures graves AVERTISSEMENT Ne pas essayer de modifier cet produit ou de cr er des accessoires non recommand s pour l produ...

Страница 20: ...e en place de fa on ce que la goupille fixe la position choisie INSTALLATION DU BLOC PILES Voir la figura 5 AVERTISSEMENT Toujours retirer la pile de l outil au moment d assembler des pi ces d effect...

Страница 21: ...UPE Voir la figure 8 Il y a quatre positions de profondeur de 13 00 mm 5 08 cm Effectuer une coupe peu profonde pour tester la profondeur de coupe Si la profondeur de coupe doit tre ajust e il faut le...

Страница 22: ...rrosifs tels que les produits chimiques de jardinage et le sel de d givrage Le trou de serrure pour la suspension situ l arri re de la poign e peut servir ranger le coupe bordure PI CES DE RECHANGE Ap...

Страница 23: ...ON Le moteur ne d marre pas quand change la g chette La pile n est pas fix e La pile n est pas charg e Pour la fixer s assurer que le loquet ou les loquets de la pile sont enclench s Charger la pile c...

Страница 24: ...rio alguno en este producto que no se haya suministrado con el producto mismo o que no est identificado como apropiado para el uso con este producto en el manual del operador Evite los entornos de tra...

Страница 25: ...as en el fuego Las bater as pueden estallar Verifique los c digos de la localidad para conocer posibles instrucciones especiales para desecharlas No desarme el paquete de bater as El electrolito emit...

Страница 26: ...ro de inercia despu s de apagar el motor o de soltar el gatillo del acelerador Mantenga un control adecuado de la herramienta hasta que se detenga por completo la hoja de corte Verifique que la tuerca...

Страница 27: ...Indica un peligro posible de lesiones personales Lea manual del operador Para reducir el riesgo de lesiones el usuario debe leer y comprender el manual del operador antes de usar este producto Protecc...

Страница 28: ...protege la hoja de bordillos y otros obst culos LIMPIADOR DEL PROTECTOR El limpiador del protector elimina los recortes y la suciedad del rea de la cuchilla SEGURO Segurointegradodeapagadoparaevitara...

Страница 29: ...ado todas las piezas faltantes Usar este producto con partes da adas o faltantes puede causar lesiones serias al operador ADVERTENCIA No intente modificar este producto ni hacer accesorios no recomend...

Страница 30: ...liberaci n de la perilla de ajuste del mango Seleccione una configuraci n c moda entre las cuatro opciones Vuelva a girar el ajuste del mango para colocarlo en su lugar de modo que el pasador asegure...

Страница 31: ...de la hoja ENCENDIDO Y APAGADO DEL RECORTADORA DE BORDES Vea la figura 6 Para encendido Oprima el gatillo del seguro de apagado Oprima el gatillo y no lo suelte Para apagado Suelte el gatillo interru...

Страница 32: ...ar para guardar la bordeadora REPUESTOS Llame a Servicio al cliente al 1 800 776 5191 para solicitar repuestos Hoja de repuesto HAC1EDG ADVERTENCIA Para evitar lesiones serias siempre retire el paquet...

Страница 33: ...la g chette La bater a no est fija La bater a no est cargada Para fijar el paquete de bater as aseg rese de que los pestillos situados a ambos lados del paquete de bater as entren completamente en su...

Страница 34: ...d signent les informations du fabricant et doivent tre fournies lors d un appel de demande de service Enregistrer le produit https HARTtools com register Les d tails de la garantie sont disponibles su...

Отзывы:

Похожие инструкции для HLED01