Page 5
INTRODUCTION
This installation guide is intended as an aid to installing the OmniLT automation system. The installer should also have
thoroughly reviewed and understood the OmniLT Owner's Manual, which has important information regarding final setup of the
system. This manual assumes that the installer has a basic understanding of installing a security system.
This guide applies to the Model 21A00 OmniLT controller. Refer to the Underwriters Laboratories Installation Requirements
section for details in the application of each. Failure to install the OmniLT and its accessories in accordance with the UL
Requirements in this manual and in the Owner's Manual, is a violation of the Listing Mark.
INSTALLATION
Go over your plan with your customer.
1.
Install the entire system. Refer to sections in this manual to see how to install various components.
2.
Follow the Power-Up and Checkout procedures.
3.
Explain the basics to the customer. Deliver all manuals and documentation.
4.
Follow up with your customer to keep them satisfied.
CONTROLLER HOOKUP
1.
When choosing a place to mount the controller, consider the following:
a.
A duplex outlet, preferably on its own circuit, is required to be within 5 feet of the controller for the power transformer and
the X-10 Interface Module (if used).
b.
The controller should be protected from weather, temperature extremes, and burglars.
2.
GROUND THE CONTROLLER "GND" TERMINAL TO A COLD WATER PIPE OR TO A 4-FOOT GROUND ROD TO
PRESERVE ITS BUILT-IN TRANSIENT PROTECTION. USE 14 GAUGE WIRE. TRANSIENT PROTECTION WILL
NOT WORK IF THE CONTROLLER IS NOT PROPERLY GROUNDED.
3.
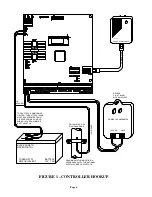
Connect the 16.5 VAC power transformer to the 16 VAC INPUT terminals.
4.
Connect the BLACK battery wire to the minus (-) terminal on the battery. DO NOT connect the red wire at this time. DO
NOT reverse the connections; the battery fuse will blow. Note that the unit will NOT START on the battery alone.
5.
If used, plug the X-10 Interface Module into the X-10 modular connector to the right of the PHONE connections. Use the
supplied 4-conductor modular cable to connect the module to the jack on the processor board. The red LED on the interface
module should be on and will blink off when the interface receives a signal from the controller.
6.
Refer to
FIGURE 1 (CONTROLLER HOOKUP)
for this configuration.
Содержание OmniLT Automation
Страница 1: ...Installation Manual Document Number 21I00 1 Rev A October 2000 ...
Страница 48: ...HAI New Orleans LA U S A ...


