Hach Portable Spectrophotometer DR 2800 Скачать руководство пользователя страница 80

80

Advanced Operations

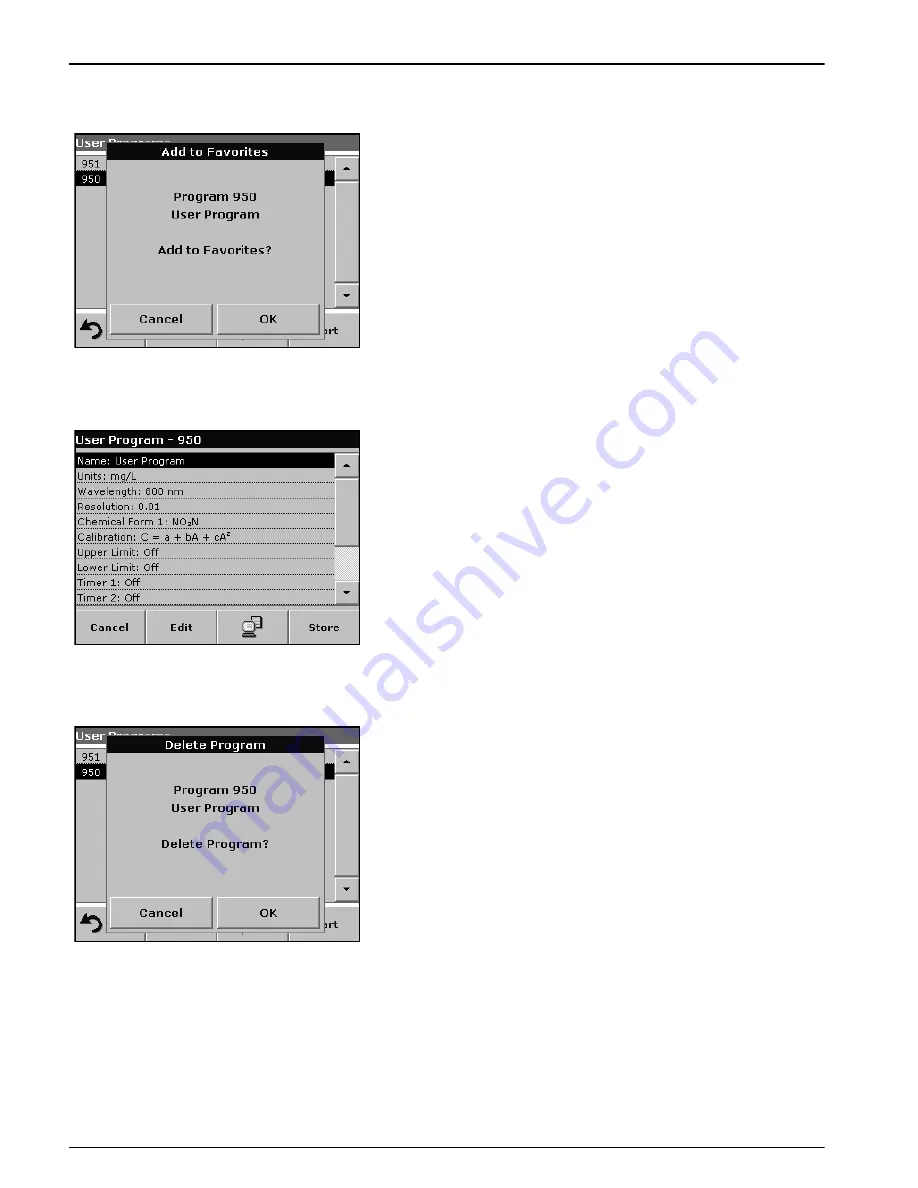
6.1.4.1 Add to Favorites

1.

Press 

Add to Favorites

 and press 

OK 

to confirm.

The program is added to the Favorites.

6.1.4.2 Edit

1.

Press 

Edit 

and press 

OK

 to confirm.

An overview of the specifications of the programmed test is 
displayed. More information about the input options is provided 
in the 

section 6.1.2 on page 72

.

6.1.4.3 Delete

1.

Press 

Delete 

and press 

OK

 to confirm.

The program is deleted from the list of User Programs.

Note: 

If the stored program is deleted in User Programs, it will also be 

deleted in Favorites Programs.

Содержание Portable Spectrophotometer DR 2800

Страница 1: ...DOC022 53 00720 DR 2800 USER MANUAL January 2008 Edition 2 HACH Company 2007 2008 All rights reserved Printed in Germany...

Страница 2: ...2...

Страница 3: ...15 3 5 3 Use of the light shield for measurements 16 3 5 4 Protective Cover 18 3 6 Mobile use of the DR 2800 for field analysis 19 3 6 1 Position the Protective Cover 20 3 7 Beam path 21 Section 4 Sta...

Страница 4: ...ct the measuring range 52 5 5 3 Select the chemical evaluation form 52 5 5 3 1 Change of the default setting of the chemical form 53 5 5 4 Basic test specific and sample specific data settings 53 5 5...

Страница 5: ...can or a time scan analysis 97 6 7 System checks 97 6 7 1 Instrument information 98 6 7 2 Upgrade of the instrument software 98 6 7 3 Optical checks 99 6 7 3 1 Wavelength check 99 6 7 3 2 Stray light...

Страница 6: ...6 Table of Contents...

Страница 7: ...bs with neutral glass at 546 nm Stray Light 0 2 T 340 nm with KV450 3 0 1 T 340 nm with NaNO2 Data storage 500 measured values result date time sample ID user ID User programs 50 Physical and Environm...

Страница 8: ...8 Specifications...

Страница 9: ...Precautionary labels Read all labels and tags attached to the instrument Personal injury or damage to the instrument could occur if not observed A symbol if noted on the instrument will be included w...

Страница 10: ...biologically harmful samples The user must observe all cautionary information printed on the original solution containers and safety data sheet prior to their use All waste solutions must be disposed...

Страница 11: ...environment The following conditions are necessary to ensure correct instrument operation and accurate results Place the instrument firmly on an even surface Do not push any objects under the instrume...

Страница 12: ...power supply and plug are in line Plug the external power supply cord into the connector on the back panel of the instrument then plug the supply into a power outlet 100 240 V 50 60 Hz Press the power...

Страница 13: ...e B interface is used for communications with a PC The optional Hach Data Trans software see section 5 2 6 3 on page 33 must be installed on the PC for this use A USB hub may be used to connect severa...

Страница 14: ...o accommodate different cuvette sample cell types 1 inch square or 50 mm rectangular cuvettes cells can be inserted directly into the cell compartment without using an adapter Adapter A 10 mm square c...

Страница 15: ...ts to the left Figure 5 on page 16 and the orientation tab fits the groove in the compartment opening The cuvette sample cell type imprint should be legible on the adapter Figure 4 Note The arrow on t...

Страница 16: ...re 6 on page 17 prevents light interference when using 13 mm and 16 mm vial tests and must be in place before measurements can be taken in cell compartment 1 The light shield is required only when usi...

Страница 17: ...d can be stored in the Protective Cover Figure 8 on page 18 Installation of the light shield 1 Open the cell compartment 2 Insert the light shield so the arrow on the light shield points to the left a...

Страница 18: ...ective Cover with inserted cuvette sample cell adapter A in position A 2 Protective Cover inside view The inside of the Protective Cover is intended to house the cuvette sample cell adapters The reces...

Страница 19: ...e warning appears again take the following measures Measures Measurements in a 10 mL round cuvette cell a rectangular cuvette cell or AccuVac Ampules Close the lid of the cuvette compartment and carry...

Страница 20: ...r lightly into the correct position until the cell compartment is completely sealed and the Protective Cover cannot slip off 3 Carry out the measurement Note The Protective Cover can simultaneously be...

Страница 21: ...th of the DR 2800 Figure 10 Beam path 1 Tungsten lamp 8 Splitter mirror 2 Entrance slit 9 Reference element 3 Heat protection glass 10 Cell compartment 2 4 Grating 11 Lens 5 Exit slit 12 Measurement e...

Страница 22: ...22 Installation...

Страница 23: ...lection screen will appear 1 Select the desired language 2 Press OK to confirm the language selection The self check will start automatically Change the language setting The instrument functions in th...

Страница 24: ...last calibration a system check has to be carried out 4 Remove the cuvette from the cell compartment and close the lid 5 Then press Start The system check is carried out duration approx 6 minutes Note...

Страница 25: ...when programming the instrument Unavailable options are disabled grayed out The icons on the right and left of the screen are described in Table 1 The central keypad changes to reflect the chosen entr...

Страница 26: ...Absorbance measurements The light absorbed by the sample is measured in absorbance units Transmittance measurements The percentage of the light that passes through the sample and reaches the detector...

Страница 27: ...tup 2 Press New to enter a new Operator ID 3 Use the alphanumeric keypad to enter a new Operator ID 4 Press OK to confirm 5 The display shows the chosen Operator ID 6 Press OK The instrument will retu...

Страница 28: ...ss OK to confirm 5 To number the Sample IDs sequentially e g Inflow 01 etc select Add Number Use the arrow keys to specify the first number of the sequence Use the key between the arrow keys to enter...

Страница 29: ...beep each time the screen is pressed Default off Reading done Activates Deactivates a sound when a reading is complete Default short beep every time a reading is complete Timer Adjusts the length of...

Страница 30: ...backlighting of the screen is switched off Touching the display causes the lighting to switch on again 3 Select one of the options under Auto off to set the length of the idle period that can elapse...

Страница 31: ...e A USB memory stick is used to upgrade data and software see section 6 7 2 on page 98 Important Note A screened USB cable must not be longer than 3 m 1 Press PC Printer in the Instrument Setup A list...

Страница 32: ...off is available 4 Select Auto Send On to send all measured data automatically to the Thermal printer Note The option Auto Send is not available for any other printer e g ink jet printer 5 Press Reso...

Страница 33: ...section 5 3 1 2 on page 37 4 Press the PC Printer icon to send the data table curve immediately to the printer 5 Highlight Single point or Filtered data or All data and press OK to confirm Sending Dat...

Страница 34: ...Password The Password menu contains a variety of security settings to control access to various functions For example prevent unauthorized changes to stored programs or instrument configurations 1 Pr...

Страница 35: ...7 Press On to highlight the new settings of the Security List 8 Enter the new Password again to confirm 9 Press OK to return to Instrument Setup Note The alphanumeric keypad to the Password inquiry a...

Страница 36: ...36 Standard Operations 3 Press Off to deactivate the settings of the Security List 4 Press OK to return to Instrument Setup Note Use this function to delete the former Password or to enter a new one...

Страница 37: ...ly in which case the user has to decide which data to store 1 Press Store On Off in the Options menu With the Store On setting all measurement data are stored automatically With the Store Off setting...

Страница 38: ...a USB memory stick to a file named DATALOG The file can then be processed using a spreadsheet program The file name will be formatted as DLYear_Month_Day_Hour_Minute_Second CSV To send data to a Print...

Страница 39: ...m the data log 1 Press Recall Data in the Main Menu 2 Press Data Log Options Delete 3 Highlight Single Point or Filtered data or All data and press OK to confirm Note The number in parentheses is the...

Страница 40: ...Store icon in the Options menu from Time Course mode after a reading is taken The Store Data list opens 2 Press Store to save the current scan to the highlighted numbered line A run can also be overwr...

Страница 41: ...Data list 5 3 2 3 Send Data from Time Course Option 1 4 Press Recall Data in the Main Menu and then Time Course to send the data to a USB memory stick or to a printer The files will be automatically...

Страница 42: ...Time Course Data The file name will be formatted as TCYear_Month_Day_Hour_Minute_Second CSV Time Course Data For further processing use a spreadsheet program 5 3 2 4 Delete Stored Data from Time Cours...

Страница 43: ...highlight the program or press Select by number to search for a specific program number Use the alphanumeric keypad to enter the test number and press OK 3 Press Start to run the program After a progr...

Страница 44: ...ll appear on the display Standard Addition This enables the accuracy of the measurements to be checked The working procedure for a test parameter contains a detailed explanation of how to use this fun...

Страница 45: ...timed activity for the Stored Program press the Timer icon and OK Note Press Close to view the measurement screen while the timer is running The time will be shown left side bottom instead of the dat...

Страница 46: ...or of 2 enter 2 The default setting of the dilution factor is turned off 2 Press OK to confirm Press again OK 3 Press Return to return to the result display 4 Confirm Store present reading again to sa...

Страница 47: ...the new value Press OK to confirm 5 Press Adjust to enable the Standard Adjust The Standard Adjust icon will appear Note The adjustment must be within certain limits which vary with each program The...

Страница 48: ...ect the new default setting 4 Press Save as Default The current result and all further measurements will be displayed in the new chemical form 5 4 7 Run a reagent blank Some of the stored tests method...

Страница 49: ...ote The Reagent Blank function is deactivated when the measurement program is left To use the same blank value later for other tests using the same reagent lot enter the value per step 7 Note The resu...

Страница 50: ...ist The Favorites menu simplifies test selection by creating a list of the most frequently used tests from the Stored Programs and User Programs 1 Press Stored Programs in the Main Menu The Stored Pro...

Страница 51: ...ns during a rotation A special outlier elimination program is run and then the average of the measured values is calculated Cuvette vial errors and soiling are recognized and highly precise results ar...

Страница 52: ...is measuring range is to apply to all subsequent measurements Changing the standard setting In the result display press Options More Permanent On The key will change to Permanent Off 5 5 3 Select the...

Страница 53: ...ngs Send Data icon Send Data To send data to a printer computer or USB memory stick Type A Timer icon This functions as a stopwatch It helps to ensure that the steps of an analysis are correctly timed...

Страница 54: ...then corrected by adding or subtracting the blank value The final result is displayed with the message After blank value corr Some barcode tests do not require a sample blank value to be determined a...

Страница 55: ...r or the version number etc is entered here Measurement process Exact definition of the test the number of wavelengths at which measurements are carried out the number of absorbance measurements neede...

Страница 56: ...a overview and press Edit 2 Press Edit select the sequence to be edited and press Delete 3 Press New and use the alphanumeric keypad to enter the process indicated in the working procedure Enter the F...

Страница 57: ...ic keypad to enter the data specified in the working procedure for F1 F2 1 U1 etc Confirm each entry with OK Abbreviation of Variables F1 Factor 1 F2 Factor 2 1 Wavelength 1 U1 Conversion Factor 1 for...

Страница 58: ...responding line and press Edit 6 When finished programming press Store and then Cancel to return to the User Programs menu 7 Press Start to begin the test with the new data Option 2 Manual check revis...

Страница 59: ...specifications of the test that is to be programmed and press Edit 5 To finish programming press Store and then Cancel to return to the Main Menu 6 Press Start to begin the test with the new data 5 5...

Страница 60: ...60 Standard Operations 6 Press OK to return to the System Checks menu Note When the instrument software has been updated a prompt to restart the instrument is displayed...

Страница 61: ...methods and tests Press User Programs in the Main Menu and then Program Options The Program Options menu contains several input and editing options Table 7 6 1 1 Program a user method All input steps...

Страница 62: ...am data Program Type 6 Select the required option Table 8 and press Next 7 If the Single Wavelength section 6 1 1 1 on page 63 or Multi Wavelength section 6 1 1 2 on page 64 is selected define the uni...

Страница 63: ...uded in this list can be added in the edit program under Program Options Edit Select Units Edit and then New Wavelength single wavelength program type Use the alphanumeric keypad to enter the measurem...

Страница 64: ...ed unit from the list and press Next Note Units of measure not included in this list can be added in the edit program under Program Options Edit Select Units Edit and then New Absorbance formula multi...

Страница 65: ...e been entered The wavelengths must be in the range from 340 900 nm Press OK Concentration Factor Kx Multiplication factor for converting absorbance values into concentration values Press a factor key...

Страница 66: ...Descriptions Enter values A calibration table is created by entering the concentration values and the absorbance values of the analyte solution The absorbance values are plotted versus standard conce...

Страница 67: ...the data have all been entered press Graph Note The correlation coefficient r2 is shown on the left below the axes 5 The linear equation corresponds to the standard setting Press Next Curve to displa...

Страница 68: ...ond standard solution into the cell compartment Press Read Repeat this sequence until all the standard solutions have been measured maximum of 24 solutions The entered and measured data are displayed...

Страница 69: ...Go to section 6 1 1 4 on page 70 Calibration by entering the formula 1 Press Enter Formula and press Next 2 Press the formula key A list of available formulas linear and 2nd and 3rd order polynomial...

Страница 70: ...t to another create a new folder on the USB memory stick named dbhlc and copy the lst files into this folder see section 6 7 2 on page 98 6 1 1 5 Additional user defined parameters and functions In ad...

Страница 71: ...entered in mm ss Chemical form 2 chemical form 3 chemical form 4 If a Chemical Form 1 has been defined up to three additional alternative forms can be entered here 1 Highlight the appropriate line in...

Страница 72: ...e completed Are waiting times necessary between measurements Table 10 Definitions of the program points Program point Description Name Name of the analysis parameter Version An abbreviation or version...

Страница 73: ...eted 1 Highlight the Measurement Process line in the data overview and press Edit 2 Press Edit again and then New Content and definition of the keys Z key Zeroing 1 Press the Z key to program a zero m...

Страница 74: ...at a number of wavelengths repeat the above two steps for each wavelength Note The entered measurement sequence is displayed key Elements of the measurement sequence that are to be repeated are place...

Страница 75: ...play The data overview is then displayed 6 1 2 3 Enter the calibration formula evaluation formula The calibration formula evaluation formula defines the calculation and display of intermediate and fin...

Страница 76: ...the most recently entered element of the formula Table 11 Edit formula key descriptions Screen Key Description Abs Variables Press the Abs Variables key to select from the displayed list the required...

Страница 77: ...s mathematically permissible in the defined formula this also applies to the basic mathematical operations The following mathematical operations are available Addition Subtraction Division x Multiplic...

Страница 78: ...ified in the working procedure for F1 F2 1 U1 etc Press OK to confirm each entry Abbreviation of Variables F1 Factor 1 F2 Factor 2 1 Wavelength 1 U1 Conversion Factor 1 for the first chemical form U2...

Страница 79: ...The most frequently used tests methods in the User Program menu can also be added to the list of favorites to simplify their selection 1 Press User Programs in the Main Menu The User Programs list wi...

Страница 80: ...to confirm An overview of the specifications of the programmed test is displayed More information about the input options is provided in the section 6 1 2 on page 72 6 1 4 3 Delete 1 Press Delete and...

Страница 81: ...search for the program by number Use the alphanumeric keypad to enter the test number program number and confirm the input by pressing OK 3 Press Start 6 2 2 Delete a favorite program 1 Press Favorite...

Страница 82: ...he sample The detection rate should be close to 100 Measures to identify other interference factors Checklist 1 Check if the procedure is completed correctly a Are the reagents added in the correct or...

Страница 83: ...y step to an already analyzed sample The sample is measured again after each addition Sample volume A defined volume of a standard solution of known concentration is added to the volume of sample spec...

Страница 84: ...h the instructions in the Procedures Manual When the measurement is complete leave the sample cuvette cell in the cuvette sample cell holder 4 Press Options More Standard Addition An overview of the d...

Страница 85: ...shows the reading of the samples with and without added standard The third column shows the detection rate of the added standard Note The black highlighted line is active 8 The reading of the sample i...

Страница 86: ...points are to the line If the correlation coefficient 1 the curve is linear The concentration shown above the curve is the estimated concentration of the sample without the added standard Note In the...

Страница 87: ...further Options Store Off On With the Store On setting all measurement data are stored automatically With the Store Off setting no measurement data are stored Trans Abs To switch to transmittance con...

Страница 88: ...bance readings are to be multiplied Press the Unit key to select the units for concentration measurements or to create a new unit 3 Press OK to confirm Concentration resolution 1 Press Concentration R...

Страница 89: ...he blank cuvette cell into the cuvette sample cell holder Press Zero Note The Read key is only active after the zero measurement has been completed 2 Insert the sample cuvette cell into the cuvette sa...

Страница 90: ...ulti wavelength setup options Options Description More For further Options Store Off On With the Store On setting all measurement data are stored automatically With the Store Off setting no measuremen...

Страница 91: ...2 A 2 K 1 A 1 K 2 A 2 K 3 A 3 K 1 A 1 K 2 A 2 K 3 A 3 K 4 A 4 K 1 A 1 K 2 A 2 K 1 A 1 K 2 A 2 K 3 A 3 K 1 A 1 K 2 A 2 K 3 A 3 K 4 A 4 A 1 refers to the absorbance at wavelength 1 A 2 refers to the abs...

Страница 92: ...significant digits with a maximum of 4 significant digits after the decimal point Concentration factor 1 Press Concentration Factor Off in the Options menu Press On to highlight this feature 2 Press t...

Страница 93: ...rt the blank cuvette cell into the cuvette sample cell holder Press Zero Note The Read key does not become active until the zero measurement has been completed 2 Insert the sample cuvette cell into th...

Страница 94: ...t the total time for data collection and the time interval between the collection of data points To input the wavelength setting View Table To display readings in absorbance transmittance or concentra...

Страница 95: ...the alphanumeric keypad to set the limits ymin and ymax The graph is adjusted to display only the values in the selected range If automatic scaling is selected the instrument sets the limits automatic...

Страница 96: ...lso shown in the table Select Stop to stop taking sample readings 6 6 3 Analysis of time course data After the data are collected the following manipulations can be done on the graphic data The Time C...

Страница 97: ...le Use the active cursor to select any point on the measurement curve The difference to the fixed cursor is shown on the curve The delta values are correspondingly highlighted and displayed on the x a...

Страница 98: ...lick Lab System Software Software Update Downloads under Downloads 3 Locate the appropriate download and follow the prompts for saving the file s to the USB memory stick 4 On the DR 2800 press Instrum...

Страница 99: ...values tolerances and instructions is available and is recommended as an aid for carrying out comprehensive in house instrument checks 6 7 3 1 Wavelength check The Wavelength Check test is used to ch...

Страница 100: ...ls in the cell compartment 2 Press Zero 4 Insert the sample cuvette cell or reference filter into the cell compartment 2 Close the cell compartment Press Start 5 The Average and Std Deviation are calc...

Страница 101: ...102 1 Press Absorbance Check in the Optical Checks menu 2 Press to input the wavelength 3 Input the wavelength and press OK to confirm 4 Remove any cuvette sample cell from the cell compartment and p...

Страница 102: ...l certificate contact the manufacturer 1 Press Verification Kit in the Optical Checks menu 2 Press Nominal Values 3 Press Edit An automatic menu guidance queries values filters wavelength nominal valu...

Страница 103: ...e given order one after the other Press Next after inserting a filter After the last measurement the results are displayed 9 Press PC Printer icon to send the data to a USB memory stick PC or to a pri...

Страница 104: ...that the lamp has been on Hours After a lamp is replaced and the Lamp History is reset the display of the total operating time is reset to 0 1 Press Lamp History in the System Checks menu 2 Press Res...

Страница 105: ...vice Time in the System Checks menu 2 Select On and then Last Service to enter the date of the last inspection 3 Press OK to confirm 4 Select Next Service to determine a specific period of time up to...

Страница 106: ...s Instrument Backup in the System Checks menu 2 Connect the USB memory stick section 3 4 on page 13 3 Press Store to start a Backup Note If the USB stick is not connected the message Please insert USB...

Страница 107: ...rent data will be overwritten when restoring the Backup file 1 Press Instrument Backup in the System Checks menu 2 Connect the USB memory stick containing the Backup section 3 4 on page 13 3 Press Res...

Страница 108: ...108 Advanced Operations 4 Press OK to confirm after the message Instrument Backup from S N XXXXXXX Restore is displayed 5 After the backup start the instrument again...

Страница 109: ...rt a brush or sharp object into Cell Compartment 1 to avoid damaging the mechanical components Dry the cleaned parts carefully with a soft cotton cloth 7 1 2 Display Take care not to scratch the displ...

Страница 110: ...ver 6 Remove the cover and place it to one side CAUTION For quality and safety reasons only the manufacturer s lithium batteries LZV551 should be used for this instrument Use of non instrument specifi...

Страница 111: ...ry A lithium battery allows the DR 2800 to be used as a portable instrument Please dispose the batteries of in compliance with the country specific regulations information about the charge status of t...

Страница 112: ...is the range in which it can be most effectively charged to 100 7 2 1 3 Lifespan of the battery The battery has a limited lifespan The more it is used the more its capacity is reduced If a fully char...

Страница 113: ...Burn Hazard Wait until the lamp cools down Contact with the hot lamp can cause burns 4 Turn the instrument over carefully and place it on a soft surface 5 Use a screwdriver or a coin to remove the sc...

Страница 114: ...ard Wait until the lamp cools down Contact with the hot lamp can cause burns 9 Lift the lamp fitting carefully 10 Put both screws to one side 11 Push up on the pressure spring 12 Remove the halogen la...

Страница 115: ...ointing down 16 Press the plug with slight pressure into the direction of the halogen lamp and push the pressure spring down so that it will engage 17 Carefully insert the lamp fitting again 18 Use a...

Страница 116: ...116 Maintenance...

Страница 117: ...e error Error x Electronic defect Contact the manufacturer or a sales representative and indicate the error number It s recommended to execute a Full System Check Please remove cuvette Please close th...

Страница 118: ...118 Troubleshooting...

Страница 119: ...and C LZV647 Wall power supply LZV610 Protective Cover and adapter holder LZV642 Dust cover HYH019 USB Memory Stick 2946900 USB Interface Cable 1 m LZV567 USB Keyboard keyboard layout US LZV582 USB B...

Страница 120: ...120 Replacement Parts...

Страница 121: ...4 63 11 50 info hach lange nl www hach lange nl HACH LANGE APS kandevej 21 DK 2700 Br nsh j Tel 45 36 77 29 11 Fax 45 36 77 49 11 info hach lange dk www hach lange dk HACH LANGE AB Vinthundsv gen 159A...

Страница 122: ...122 Contact Information...

Страница 123: ...aused by any repair or attempted repair not authorized by Hach Company Any product not used in accordance with the instructions furnished by Hach Company Freight charges to return merchandise to Hach...

Страница 124: ...124 Limited Warranty...

Страница 125: ...99 L Lamp see VIS Lamp Language 23 M Main Menu 26 Maintenance 109 Marking 96 Measurement Process 55 56 72 Measuring sequence 73 Multi Wavelength 64 66 90 91 92 93 N Name 55 O Operator ID 26 create 26...

Страница 126: ...126 V Variables 55 57 78 Verification Kit 102 Version 55 56 View Table 94 VIS Lamp Lamp Control Lamp History 104 W Warranty 123 Wavelength 87 90 Wavelength Check 99 Wavelength setting 94...

Отзывы: