


1-6
S5800-56C
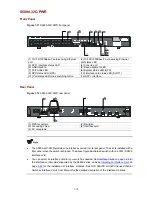
Front Panel
Figure 1-3
S5800-56C front panel
(1) 10/100/1000Base-T auto-sensing Ethernet
port
(2) 10/100/1000Base-T auto-sensing Ethernet port
status LED
(3) Seven-segment LED
(4) Port mode LED
(5) SFP+ interface status LED
(6) Logo panel (A console port and a USB interface
are under this logo panel)
(7) System status LED (SYS)
(8) RPS status LED (RPS)
(9) Interface card status LED (SLOT1)
(10) SFP+ interface
(11) Port status LED mode switching button
To use the console port and USB interface, open the logo panel.
Figure 1-4
S5800-56C logo panel I
(1)
When opening or closing the logo panel, follow these steps to avoid damage to the logo panel:
z
Insert your finger into the notch on the right side of the logo panel to open it. Do not try to open the
logo panel from any other parts.
z
The logo panel is attached to the chassis through a rubber strip on its left. Swing the logo panel
within the elasticity of the rubber strip. Do not pull or swing the logo panel with excessive force;
otherwise, the rubber strip may fall off or be broken.
z
Before pushing in the logo panel, make sure that the pin on the left of the logo panel is engaged
with the slot on the front panel. Then engage the tab on the right of the logo panel into the slot on
the chassis, and then press the logo panel until the tab clicks into the slot. If the tab is not engaged
into the slot, do not press the logo panel with excessive force to avoid damage to the tab.


