MAINTENANCE
62
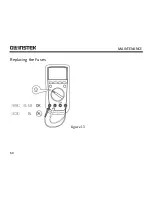
10A range:
F2, 10A H 240V,
φ
6x25 mm. (CE)
6.
Rejoin the case bottom and case top, and reinstall the screw.
7.
Rejoin the tilt stand, battery compartment and case bottom, and reinstall the
screw.
USB and RS232C Serial Port
USB is optional at extra cost.
Please refer to the “
Installation Guide & Computer Interface Software”
for
installing and operating instructions for the
GDM-397/461 Interface Program
.
Содержание GDM-397
Страница 19: ...GDM 397 GDM 461 User Manual 17 B DC AC Current Measurement see figure 3 A GDM 397 A GDM 461 figure 3...
Страница 22: ...MEASUREMENT OPERATION 20 C Resistance Measurement see figure 4 mAuA COM V Hz figure 4...
Страница 25: ...GDM 397 GDM 461 User Manual 23 D Testing for Continuity see figure 5 figure 5...
Страница 27: ...GDM 397 GDM 461 User Manual 25 E Testing Diodes see figure 6 figure 6...
Страница 30: ...MEASUREMENT OPERATION 28 F Capacitance Measurement see figure 7 mAuA V Hz figure 7...
Страница 35: ...GDM 397 GDM 461 User Manual 33 H Temperature Measurement GDM 397 only see figure 9 figure 9...
Страница 62: ...MAINTENANCE 60 Replacing the Fuses figure 13...

