GDM-397/GDM-461 User Manual
11
Functional Buttons
The table below describes what operations are performed for each of the buttons.
Button
Operation Performed
LIGHT
(GDM-397)
Press and hold for 2 seconds to turn the display backlight on or off.
Hold
Press to enter or exit data hold mode.
BLUE Button
Press to select the alternate function.
Yellow
(GDM-461)
Hz%
(GDM-397)
Press the Hz% button (GDM-397) or the Yellow button(GDM-461) for
frequency and duty cycle measurement.
RANGE
Press RANGE to enter the manual ranging mode; the Meter beeps.
Press RANGE to step through the ranges available for the selected
function; the Meter beeps.
Press and hold RANGE for 2 seconds to return to auto range
mode; the Meter beeps
MAX/MIN
(GDM-397)
Press to select the maximum and minimum value.
REL
Press to enter REL mode.
Press again to exit REL mode
For Model GDM-397: Press and hold for over 2 seconds to enter or
exit RS232C or USB mode (optional).
PEAK
(GDM-461)
Press to step the display through Pmax and Pmin readings.
Press and hold for 2 seconds to exit Peak mode.
“CAL” means the meter has entered self-calibration mode.
Содержание GDM-397
Страница 19: ...GDM 397 GDM 461 User Manual 17 B DC AC Current Measurement see figure 3 A GDM 397 A GDM 461 figure 3...
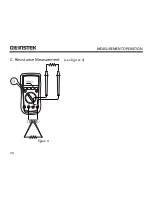
Страница 22: ...MEASUREMENT OPERATION 20 C Resistance Measurement see figure 4 mAuA COM V Hz figure 4...
Страница 25: ...GDM 397 GDM 461 User Manual 23 D Testing for Continuity see figure 5 figure 5...
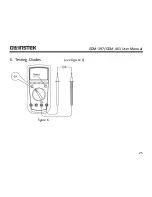
Страница 27: ...GDM 397 GDM 461 User Manual 25 E Testing Diodes see figure 6 figure 6...
Страница 30: ...MEASUREMENT OPERATION 28 F Capacitance Measurement see figure 7 mAuA V Hz figure 7...
Страница 35: ...GDM 397 GDM 461 User Manual 33 H Temperature Measurement GDM 397 only see figure 9 figure 9...
Страница 62: ...MAINTENANCE 60 Replacing the Fuses figure 13...


