


25
29
2. Press Right/Left button to select the rotate icon .
3. Press Up/Down button to select the rotate option.
4. Press Menu Button to confirm how many degrees you want to rotate the photo.
5.
A “
Saving
”
message will appear on the screen. Please wait while the photo is rotated as per your choice.
6. The photo will now be rotated and saved.
Note:
1. You cannot rotate a protected file. On attempting to rotate a protected file a
“
This File is Write-Protected
”
message will appear on the screen.
2.
“
Card Removed
”
will appear on the screen if no SD card is inserted. Please insert a SD memory card to
use this function.
Protect
You can protect your photos/videos from accidental deletion by selecting the
“lock”
feature.
1. Press Menu Button.
2. Press Right/Left button to select the
protect option.
3. Press Up/Down button to select the Protect options that appears in the menu.
30
4. Press Menu Button.
5. If you select Lock, a lock icon
will appear on the top of the LCD for the photo or video selected.
Note:
To “Unlock” the
current file follow steps 1 through 4. Select
“
Unlock
”
and press Menu Button to unlock
the current file.
Delete
Delete unwanted photos and videos at any time in order to free up memory. You can delete one image or
video clip at a time or delete all except the protected photos and videos that are currently stored and saved on
the memory card.
1. Press Menu Button.
2. Press Right/Left button to select the Delete icon .
3. Press Up/Down button to select
“
This Image
” (if the image is a photo) or “
This Video
”
(if the image is a
video file) to delete the current photo or video you selected
. Select the “All” option to
delete all unprotected
images.
Press ‘Cancel’ to exit the Delete option if you do not wish to delete anything at this stage.
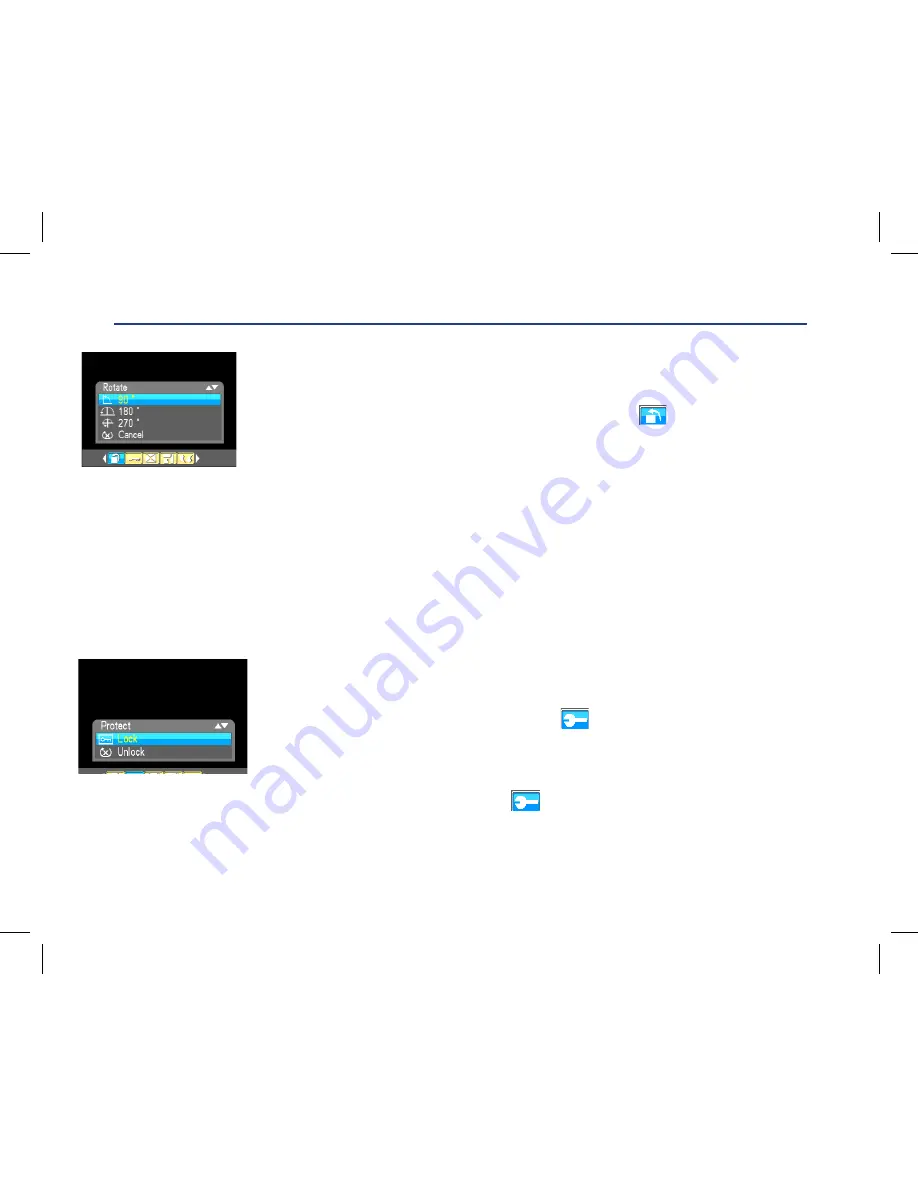
Rotate
The rotate feature will only work for images on the SD card that is inserted.
1.
Press Menu Button.
2.
Press Right/Left button to select the rotate icon
.
3.
Press Up/Down button to select the rotate option.
4.
Press Menu Button to confirm how many degrees you want to rotate
the photo.
5.
A “Saving” message will appear on the screen. Please wait while the
photo is rotated as per your choice.
6.
The photo will now be rotated and saved.
Note:
1.
You cannot rotate a protected file. On attempting to rotate a protected file a
“This File is Write-Protected” message will appear on the screen.
2.
“Card Removed” will appear on the screen if no SD card is inserted. Please insert a SD memory
card to use this function.
Protect
You can protect your photos/videos from accidental deletion by selecting the
“lock” feature.
1.
Press Menu Button.
2.
Press Right/Left button to select the
protect option.
3.
Press Up/Down button to select the Protect options that
appears in the menu.
4.
Press Menu Button.
5.
If you select Lock, a lock icon
will appear on the top of the LCD for
the photo or video selected.
Note:
To “Unlock” the current file follow steps 1 through 4. Select “Unlock” and press Menu Button to
unlock the current file.
17
3. Press Up/Down button to select 2, 5 or 10 seconds countdown shooting or you can select
‘
Off
’
to turn off.
4. Press Menu button to confirm.
Press Shutter button to take a photo, the self timer LED indicator will flash 2, 5 or 10 seconds (per you
selection) until the photo is taken.
Setup Menu
You can set Exposure, ISO, White Balance, Sharpness, Image Quality, Effect, Date, Auto Power off, Sound
Effect, Language, Frequency, Format, Default Setting.
To operate it as below:
1. Press Menu button.
2. Press Right/Left button to select icon
, the function menu as below:
Exposure
This setting allows you to control the brightness of your images.
1. Press Up/Down button repeatedly to select Exposure in Set up menu.
2. Press Menu button.
29
2. Press Right/Left button to select the rotate icon .
3. Press Up/Down button to select the rotate option.
4. Press Menu Button to confirm how many degrees you want to rotate the photo.
5.
A “
Saving
”
message will appear on the screen. Please wait while the photo is rotated as per your choice.
6. The photo will now be rotated and saved.
Note:
1. You cannot rotate a protected file. On attempting to rotate a protected file a
“
This File is Write-Protected
”
message will appear on the screen.
2.
“
Card Removed
”
will appear on the screen if no SD card is inserted. Please insert a SD memory card to
use this function.
Protect
You can protect your photos/videos from accidental deletion by selecting the
“lock”
feature.
1. Press Menu Button.
2. Press Right/Left button to select the
protect option.
3. Press Up/Down button to select the Protect options that appears in the menu.
Содержание GVA12DC
Страница 1: ...Instruction Manual Digital Camera GVA12DC...
Страница 5: ...5 Getting to know your Digital Camera...


