background image

4G, 8G                                                                                                          Digital Direct Security 

35 | 

P a g e


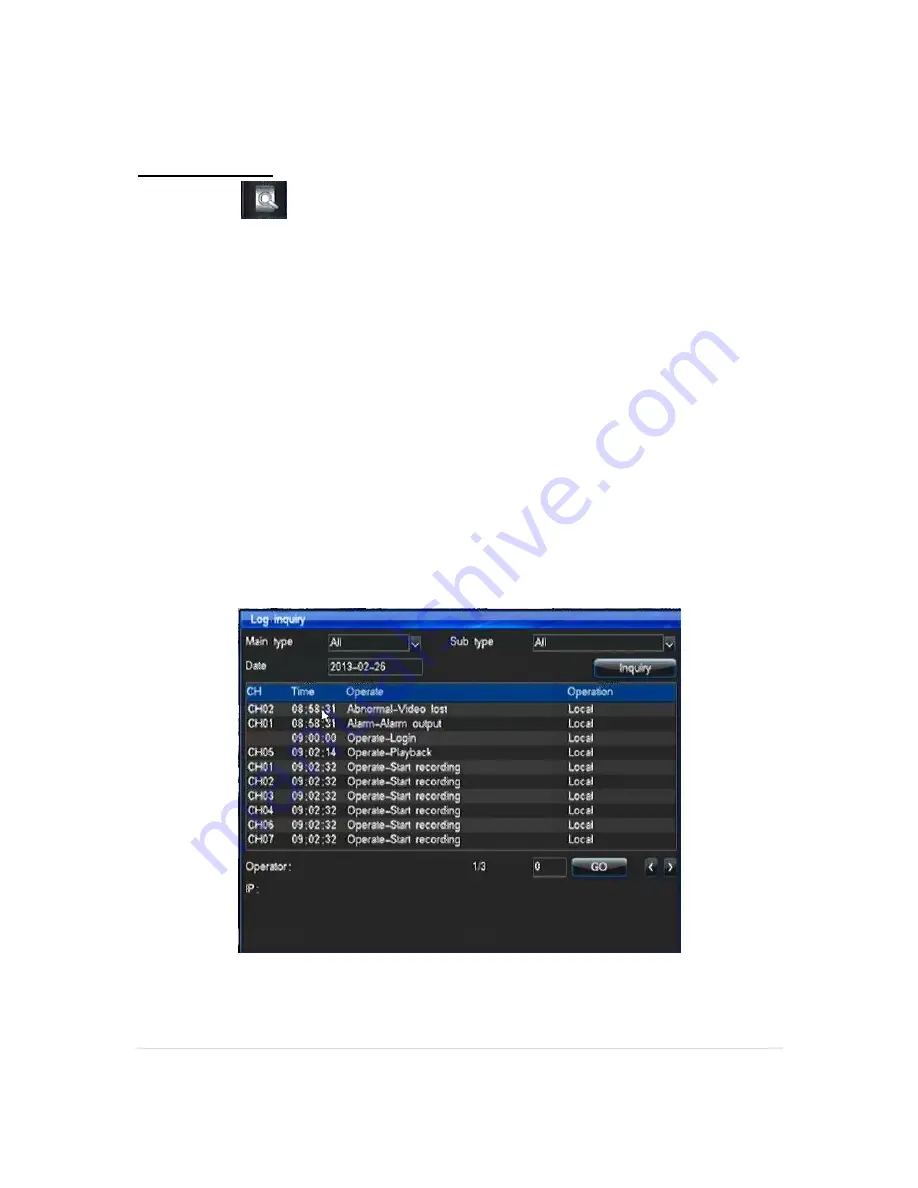
Log Inquiry 

The log inquiry 

 will serve as a place where you can check the entire goings on with your 

DVR. It will provide information such as when certain functions are used like PTZ  to if the unit is 
ever shutdown abnormally.  


Main type

 : In this drop down box you will be able to select from; 

o


Operate 

: This option covers functions activated by the user, such as Playback and 

shutting down the unit. 

o


Alarm 

; This option will cover when functions such as motion and sensors have 

been triggered. 

o


Abnormal 

: This option will cover errors such as video loss and HDD failures. 


Sub type

 : In this drop down box you will be able to specify further on the option you choose 

in the 

Main type

 box 


Date

 : This box will let you choose which date you wish to search. 


Inquiry 

: Once you have selected the Main type, Sub type and Date you can now click the 

Inquiry 

button and providing there is data to be found a list will be populated in the 

Inquiry 

result 

box.


Содержание K-DVR-4G

Страница 1: ...4G 8G Digital Direct Security 1 P a g e Guardian Range K DVR 4G K DVR 8G DVR Instruction Manual ...

Страница 2: ...equency energy and if not installed and used in accordance with the instruction manual may cause harmful interference to radio communications Incorrect operation of this equipment in a residential area may cause harmful interference in which case the users will be required to correct the interference at their own expense FCC Caution To assure continued compliance use only shielded interface cables...

Страница 3: ...ENT OR REASONABLE MAINTENANCE OF THE PRODUCT FOR THE CASES INCLUDING BUT NOT LIMITED TO THE FOLLOWINGS ANY DAMAGE OR LOSS INCLUDING BUT WITHOUT LIMITATION DIRECT OR INDIRECT SPECIAL CONSEQUENTIAL OR EXEMPLARY ARISING OUT OF OR RELATING TO THE PRODUCT PERSONAL INJURY OR ANY DAMAGE CAUSED BY INAPPROPRIATE USE OR NEGLIGENT OPERATION BY THE USER UNAUTHORIZED DISASSEMBLE REPAIR OR MODIFICATION OF THE P...

Страница 4: ...at registers stoves or other apparatus that produce heat Protect the power cord from being stepped on or pinched particularly at plugs convenient receptacles and the points where they exit from the apparatus Do not drop metallic parts through slots This could permanently damage the appliance Turn the power off immediately and contact qualified service personnel for service if this occurs Handle th...

Страница 5: ...dian 16ch GUI Operations Main Screen Logging In General Settings Record Settings Scheduling Output Sequence Alarm Motion External Sensor Alarm Outputs COM Settings PTZ Settings PTZ Control Network Settings DDNS Settings E mail User Management Account Settings Playback Backing up HDD Factory Default Restore System Info Log Inquiry Remote Access Part 1 LAN Local Access Part 2 WAN Outside Access Sett...

Страница 6: ...Up to 4 cameras can be connected BNC H 264 baseline profile video compression decompression Up to 2 audio inputs including PC microphone G 711 audio compression decompression Real time operating system Supports up to 1 Hard disk drive Up to 2TB Record Capabilities 1 channel Full D1 25IPS 3 channels CIF 75IPS Real time live display Playback search by time or logged event Optional display formats fu...

Страница 7: ... Up to 4 8 cameras can be connected BNC H 264 baseline profile video compression decompression Up to 2 audio inputs including PC microphone G 711 audio compression decompression Real time operating system Supports up to 1 Hard disk drive Up to 2TB Record Capabilities Full D1 50IPS CIF 100IPS Real time live display Playback search by time or logged event Optional display formats full screen 4 9 way...

Страница 8: ...ck button This will let the user go back one stage in the menus 9 F2 button NO FUNCTION 10 Auto button 11 Wiper button This function can only be used with a PTZ camera that has a wiper 12 Lock Button This will lock the DVR so it requires logging in again 13 Info button This will take you to the System Information menu 14 Copy button This will take you to the Backup menu 15 Contrast button This wil...

Страница 9: ...on This button is for navigating Down in the menus and also for skipping frame by frame during playback 23 Menu button This will access the menus 24 VGA TV button NO FUNCTION 25 F1 button NO FUNCTION 26 PTZ button This will bring up the PTZ controls Only functional with a PTZ camera installed 27 DN button NO FUNCTION A B These buttons are the numerical and alphabetical keys they will be used whene...

Страница 10: ...he front will be orange you will now have to press the power button on the front to take the unit out of standby mode 4 Channel Guardian Back Panel Diagram 1 Video In Video input connectors for cameras 2 Audio In Audio input connectors for devices such as microphones 3 Video Out Connection for a composite monitor TV 4 Audio Out Connection for speakers 5 Mic In Connection for a microphone 6 VGA Con...

Страница 11: ...se refer to remote control guide for other button function s 4 Channel Guardian Back Panel 1 Video In Video input connectors for cameras 2 Audio In Audio input connectors for devices such as microphones 3 Video Out Connection for a composite monitor TV 4 Audio Out Connection for speakers 5 Mic In Connection for a microphone 6 VGA Connection for a VGA monitor 7 Ethernet Connection for a network cab...

Страница 12: ...se refer to remote control guide for other button function s 8 Channel Guardian Back Panel 1 Video In Video input connectors for cameras 2 Audio In Audio input connectors for devices such as microphones 3 Video Out Connection for a composite monitor TV 4 Audio Out Connection for speakers 5 Mic In Connection for a microphone 6 VGA Connection for a VGA monitor 7 Ethernet Connection for a network cab...

Страница 13: ...y operation that your user level permits See page 29 User Management If audio is on you can use the system in conjunction with microphones Please note that microphones are not recommended for external use recording The percentage sign at the bottom of the screen shows you how full your HDD is Please note that the HDD percentage sign becomes irrelevant once recycle record is activated The unit will...

Страница 14: ... to access the menus shown below Main Menu Access the main menu Channel switch Switch between number of channels Data inquiry Access the playback function PTZ control Displays the controls for a PTZ camera Video adjustment Access settings for brightness contrast etc Digital Zoom Starts the zoom function Shutdown Starts the shutdown procedure Main Menu You can gain access to the Main Menu after you...

Страница 15: ...se the image if jittery If you wish to restore these settings to Factory Default you can select the Default button or if you wish to save any changes made you can select the Save button The Parameters that can be configured in the Time option can be accessed from the Config menu are Date Day Month Year Time Hour Minutes Seconds Auto Update Whether you want your DVRs time to update automatically wi...

Страница 16: ... VBR takes longer to encode but produces the most favourable results Image Quality 5 levels of quality to choose from are HIGHEST HIGH MIDDLE LOW and LOWEST Frame Rate With this tab you will be able to select the rate at which the channel will record Bit Rate The term bit rate is a synonym for data transfer rate Bps Bytes per second bps bits per second The digital equivalent of bandwidth bit rate ...

Страница 17: ...nge orange means it will record at these points Now you will be able to click and drag to make a grey gap in the middle or area of your choosing of the orange bar These grey areas are where the DVR is NOT recording Note Make note of the start time and end time of the grey areas as this will be the start and end points for the motion schedule Now that you have chosen the areas in orange where you w...

Страница 18: ... individual channels whatever you wish and it will replace the default CH01 CH02 etc on the live view Video adjustment This button will take you to the settings where you can adjust the brightness contrast etc for each channel Channel name position This button will allow you to re position where the channel name will sit on the screen By default it is the in top left hand corner OSD Settings On sc...

Страница 19: ...activated the user must log out and the DVR needs to be in locked status Sequence cycle s In this box you will determine how many seconds the cameras will stay full screen before changing to the next one Division mode Set the number of channels to be displayed per sequence page to 1 4 8 channels 4 and 8 channel division sequencing not available on 4GL or 4G Sequence channel no This drop down box w...

Страница 20: ...ion will allow you to adjust the sensitivity for each channel 1 being the least sensitive and 5 being the most If the channel is set to a lower sensitivity it will take bigger movements to activate the DVR to record whereas a higher sensitivity will activate recording with less motion Linkage setting Trigger Record Links the corresponding camera to trigger motion recording on any selected camera A...

Страница 21: ...mpletely grey it will not detect motion anywhere Double click twice to cancel your changes Sensor excluding K DVR 4G1 model This menu allows you to configure what input sensors that can be connected to the DVRs Alarm inputs trigger Examples of input sensors Pressure pads PIR sensors IR beams dry contacts etc You can schedule when you want sensors to activate recording on certain cameras and or act...

Страница 22: ...larm outputs to be active You can first select whether the sensor is normally on or normally off the dwell time of the alarm in seconds how the DVR displays to you that the alarm output is active by audio buzzer or full screen and select which hours of which day s you wish the alarm outputs to be active It is important that you schedule the alarm outputs if you wish to use them If your alarm outpu...

Страница 23: ...en the Baudrate is 2400 4800 or 9600 Data bit This is part of the PTZ protocol code please consult your PTZs manual for this information this option is usually set to 8 Stop bit This is part of the PTZ protocol code please consult your PTZs manual for this information this option is usually set to 1 Parity bit This is part of the PTZ protocol code please consult your PTZs manual for this informati...

Страница 24: ...TZ E g if your PTZ was plugged into channel 3 you would choose the number 3 Protocol What protocol is your PTZ camera s set to There is wide selection but the most common protocols are PELCO D and PELCO P Address code This depicts the ID that the PTZ camera is set to This can be set to a numerical value 0 to 255 Polling Configure automated polling You can set the interval time Cruise interval s Th...

Страница 25: ...o pan the camera in any direction you like by clicking on the directional arrows on the panel You can adjust the speed of which the PTZ camera moves adjusting the Speed option Zoom focus and IRIS functions can also be adjusted with the buttons The switch button will take you to a slightly different panel where you can program and call presets It is here that you can also change the channel number ...

Страница 26: ...ackup DNS can only be edited if the DHCP option is unchecked These boxes should be filled in by an IT professional or with instruction from one Putting inconsistent or incorrect values in here could have a detrimental effect on your network IP You can edit the IP address of the system in these four boxes Subnet Mask You can edit the Subnet mask in these four boxes Default gateway You can edit the ...

Страница 27: ...e DVR If your router does not support this function this menu is where you will need to enter the information Server In this drop down box you will find three options orey net and dyndns com and no ip com You need to select no ip com Username Once your No IP account has been created you will need to enter the username you chose in the username box Password Once your No IP account has been created ...

Страница 28: ...l This is the email address that will be sending the notifications from the DVR Receiver Email This is the email address you wish to receive the notifications on Port Number The port will also be defined by the mail server For example gmx mail server uses port 465 Cycle minute This option will set the minimum amount of time minutes after each motion event before another email can be sent This opti...

Страница 29: ...e privileges selection screen see 2nd image below Delete If you wish to delete one of the user accounts highlight the name and click delete Edit If you wish to edit any of the privileges of a certain user highlight the name and click edit to be taken to the privileges screen The privileges screen will be where you define what each user has access to from being only allowed to view playback for cer...

Страница 30: ...ish to playback or All of them Inquiry This button will then produce you a list of footage files from the specified date and channel Once you selected a time date and camera press play to view the footage Camera Selection You can select which camera s you wish to playback or All of them Mode This drop down box will allow you to choose which type of record mode you wish to search Motion alarm etc D...

Страница 31: ... display what option you are hovering over Slow forward plays the footage back in slow motion Rewind the footage at 2 4 8 and 16 speed Click on the icon to increase the speed Pause the footage Fast forward the footage at 2 4 8 and 16 speed Click on the icon to increase the speed Frame forward plays the footage back frame by frame Exit playback menu Displays the channel camera you are playing back ...

Страница 32: ...to back up from 2 Now double click on the DATE to bring up a calendar and choose which day you would like to backup footage from 3 Input the relevant START TIME and END TIME of the segment of footage you wish to backup 4 Now click ADD to add the file to the ITEMS list You are able to add 25 files to the item list for backing up 5 Once you have added all the files to the list click BACKUP After you...

Страница 33: ...OM THE HARD DRIVE simply tick the relevant box next to the HDD you wish to format then click the Format button at the bottom of the screen A percentage bar will show you the progress of the format Default Restore The default menu located in the other settings menu is where you are able to reset all the settings to factory default You can also select individual sections to reset using the tick boxe...

Страница 34: ...USB if you are provided with one from DDS Record Status This option will show you the current settings for each channel It will indicate what record type quality definition the DVR is set to and it will also indicate with audio is set on each channel Alarm Status This option will show you when events such as sensors motion detection and video loss are triggered the triggers are indicated by colour...

Страница 35: ... user such as Playback and shutting down the unit o Alarm This option will cover when functions such as motion and sensors have been triggered o Abnormal This option will cover errors such as video loss and HDD failures Sub type In this drop down box you will be able to specify further on the option you choose in the Main type box Date This box will let you choose which date you wish to search Inq...

Страница 36: ... corner make sure this is ticked then press Save 3 You should now see the default IP address has changed 4 Take note of the IP address and type it into an Internet browser address bar at the top of the screen make sure you add 81 to the end on a computer that is connected to the same router as the DVR 5 You will be presented with the screen below You will be prompted to download WebControl exe bef...

Страница 37: ...arted your browser you will see the login screen as shown below 7 Next simply log in using the same login details as you would on the DVR itself For details on how to use the Netviewer please refer to the Netviewer section of this manual Note This method will only give you local Internet access to your DVR ...

Страница 38: ...to find a section on your routers configuration page called either virtual server port forwarding game and application sharing or firewall rules In here you need to make a TCP rule for ports 8101 and 81 4 Once you have made a rule that forwards these ports you need to assign them both to your DVRs internal IP address 5 If you have a static IP you will now be able to access your DVR from anywhere u...

Страница 39: ...ress 3 Open the email from unmonitored webmaster no ip com and click the activate your account link 3rd link down You will need to sign in to complete the verification process 4 Now you have signed in you will need to locate and click Host Redirects Once on the Manage Hosts page you will next need to click Add a Host 5 You should now see the Hostname Information form In this section you will be ab...

Страница 40: ...u will need to input the hostname your no ip com email and your no ip com password You must also make sure the service provider is set to www no ip com Note all routers will vary consult your routers manual if you are unsure In rare cases where a router does not support no ip com you will be able enter your information into the actual DVR ...

Страница 41: ...nel and then press OPEN ALL this will start the video stream for each of your cameras Preview tab will let you view your cameras Playback tab will display the Playback screen Download tab will let you Backup footage to your computer Device Log tab will give you a detailed log of DVR operations Config tab will take you to the settings menu ...

Страница 42: ...occurred By default it will always display the current days footage If you wish to view another date you will find a calendar see image below on the right and side of the screen Once you have clicked which date you wish to search you next need to press the Inquiry button When you want to play a piece of footage simply double click the coloured part of the timeline you wish to view The Local Play b...

Страница 43: ...d to press Inquiry This button will return a list of video events that have occurred between the two points you previously defined Once the list has been populated you will be able to select which files you wish to backup by ticking the tick boxes on the left If satisfied with your selections next you will need to select where on your PC you wish to save these files You can select a destination by...

Страница 44: ...le to define the start date and end date which will allow you to narrow the number of log pages returned You can do this by using the Inquiry box If you wish to save the log information you can do so by using the Log Path option To save you will need to select a folder you wish to save it to using the browse button Once chosen click Save Log ...

Страница 45: ... refer to the main manual for a description of each setting and what it changes PTZ Control Whilst on the Preview Tab you will have access to the PTZ control panel From here you will be able to pan tilt and zoom your PTZ camera as well as access the presets Note Your camera must have PTZ capabilities in order to use this ...

Страница 46: ... be used to improve the picture which may also improve motion detection If you wish to return the settings to their original state press the default button Channel Options Whilst on the Preview Tab you are able to bring up channel options by right clicking will allow you too Switch between the main stream and the sub stream Take a snapshot Force manual record Open audio channels requires a mic Clo...

Страница 47: ...4G 8G Digital Direct Security 47 P a g e Interface Map ...

Отзывы: