


-42-
G1023S/G1023S110 Heavy-Duty 10'' Table Saw
REF
PART #
DESCRIPTION
REF PART #
DESCRIPTION
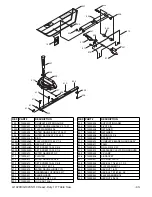
1
P1023S001
CABINET
56
P1023S110056 MOTOR 2HP 110V (G1023S110)
2
P1023S002
SCALE
56A
P1023S056A
MOTOR 3HP 220V (G1023S)
3
P1023S003
TAP SCREW #6 X 1/2
57A
P1023S057A
HEX BOLT 5/16-18 X 1-5/8
4
P1023S004
TRAP DOOR
58
P1023S058
HEX BOLT 5/16-18 X 1
5
P1023S005
HEX NUT 5/16-18
60
P1023S060
HEX BOLT 5/16-18 X 3/4
5A
P1023S005A
HEX NUT 3/8-16
61
P1023S061
FLAT WASHER 5/16
6
P1023S006
LATCH
62
P1023S062
SUPPORT BRACKET
7A
P1023S007A
KNOB 3/8-16 X 1-1/2
63
P1023S063
FLANGE CASTING V1.12.95
8B
P1023S008B
HANDWHEEL LOCK V2.07.07
64
P1023S064
ROLL PIN 5/16 X 5/8
9A
P1023S009A
HANDLE V2.07.07
65
P1023S065
CAP SCREW 3/8-16 X 1
10A
P1023S010A
HANDWHEEL V2.01.06
66
P1023S066
FLAT WASHER 3/8
11
P1023S011
SET SCREW 1/4-20 X 5/16
67A
P1023S067A
KEY 5 X 5 X 40
12A
P1023S012A
CAP SCREW 10-24 X 2
68
P1023S068
SHAFT
13
P1023S013
POINTER BRACKET
69
P1023S069
LOCK NUT 3/4-16
14A
P1023S014A
PHLP HD SCR 5/16-18 X 3/8
70
P1023S070
REAR TRUNNION V3.02.96
15
P1023S015
POINTER
71
P1023S071
HEX NUT 5/8-18
16
P1023S016
CAP SCREW 1/4-20 X 1/2
72
P1023S072
BLADE GUARD SUPPORT
17
P1023S017
CAP SCREW 1/4-20 X 1-3/4
79
P1023S079
SET SCREW 1/4-20 X 1/2
18
P1023S018
CAP SCREW 3/8-16 X 1
80-1
P1023S080-1
SPRING CLIP 10 X 30.7 X 7.5
19
P1023S019
HEX BOLT 3/8-16 X 1-1/2
80-2
P1023S080-2
PHLP HD SCR 10-24 X 3/8
20
P1023S020
LOCK WASHER 3/8
80B
P1023S080B
STD TABLE INSERT 8.5
21
P1023S021
HEX NUT 3/8-16
80D
P1023S080D
DADO TABLE INSERT 8.5 IN
22A
P1023S022A
SET SCREW 1/4-20 X 3/8
81
P1023S081
TABLE
23
P1023S023
WORM 1.410" OD
82A
P1023S082A
LOCK WASHER 3/8
24
P1023S024
COLLAR
83
P1023S083
HEX BOLT 3/8-16 X 1-1/4
25
P1023S025
SET SCREW 5/16-18 X 1/4
84A
P1023S084A
BEVELED LEFT EXT WING V2.07.07
26
P1023S026
PHLP HD SCR 10-24 X 3/4
84B
P1023S084B
BEVELED RIGHT EXT WING V2.07.07
27
P1023S027
DOWEL PIN
85A
P1023S085A
LOCK WASHER 1/2
28A
P1023S028A
KEY 5 X 5 X 40
85B
P1023S085B
HEX NUT 1/2-12
29
P1023S029
FLAT WASHER #6
85C
P1023S085C
FLAT WASHER 1/2
30
P1023S030
FLAT WASHER #10
85D
P1023S085D
LOCK WASHER 7/16
31
P1023S031
FLAT WASHER 1/4
86
P1023S086
HEX BOLT 7/16-20 X 1
32
P1023S032
FLAT WASHER 3/8
87
P1023S087
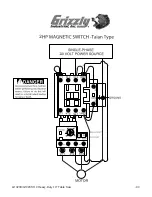
MAGNETIC SWITCH ASSEMBLY SDE (G1023S110)
33
P1023S033
FLAT WASHER #10
87A
P1023S087A
MAGNETIC SWITCH ASSEMBLY SDE (G1023S)
35
P1023S035
GEARED BEARING HOUSING
88
P1023S088
SWITCH MOUNT BRACKET
36
P1023S036
HEX BOLT 3/8-16 X 1-1/2
89
P1023S089
KEY 5 X 5 X 40
37A
P1023S037A
LOCK WASHER 3/8
90
P1023S090
WHITE SWITCH COVER SCREW V1.12.95
37C
P1023S037C
KEY 1/4 X 1/4 X 1-1/2
91A
P1023S091A
FLAT WASHER #10
38
P1023S038
BALL BEARING 6203-2RS
91B
P1023S091B
HEX NUT 10-24
39
P1023S039
FLAT WASHER 1/4
91C
P1023S091C
PHLP HD SCR 10-24 X 3/4
40A
P1023S040A
JAM NUT 5/8-18
93
P1023S093
SET SCREW 5/16-18 X 3/8
41
P1023S041
COLLAR
94
P1023S094
SPRING 5.5 X 12 X 7
42
P1023S042
FLAT WASHER 5/16
95
P1023S095
BALL
43
P1023S043
SET SCREW 1/4-20 X 1/2
96A
P1023S096A
SET SCREW 5/16-18 X 1/2
44A
P1023S044A
KEY 5 X 5 X 40
96B
P1023S096B
SET SCREW 5/16-18 X 3/8
45
P1023S045
BLADE ARBOR W/SHAFT
97
P1023S097
WAVE WASHER
47
P1023S047
ARBOR FLANGE
98
P1023S098
POWER CORD 12G X 3W 86"L
48
P1023S048
ARBOR NUT 5/8-12 LH
99
P1023S099
POWER CORD 12G X 3W 36"L
48A
P1023S048A
OPEN-END ARBOR WRENCH 7/8 X 7/8"
100
P1023S100
LOGO PLATE
50
P1023S050
MOTOR FRAME SUPPORT V2.12.95
101
P1023S101
DISCONNECT POWER LABEL
51
P1023S051
CLIP
102
P1023S102
SAFETY GLASSES LABEL
52
P1023S052
PIVOT PIN
103
P1023S103
USE GUARD LABEL
53A
P1023S053A
HEX BOLT 1/2-13 X 4
104
P1023S104
READ MANUAL LABEL
54
P1023S054
V-BELT M26 3L260
105
P1023S105
ELECTRICITY LABEL
55
P1023S055
MOTOR PULLEY
106A
P1023S106A
WARNING ID LABEL
Содержание G1023S
Страница 39: ...G1023S G1023S110 Heavy Duty 10 Table Saw 37 1 1 2...
Страница 40: ...38 G1023S G1023S110 Heavy Duty 10 Table Saw...
Страница 51: ......
Страница 52: ......