


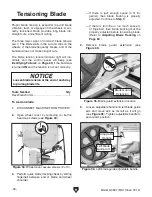


-42-
Model G0887 (Mfd. Since 01/19)
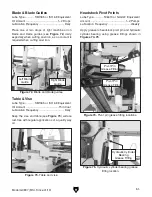
The control panel has been calibrated at the fac-
tory to return the headstock angle to 0°.
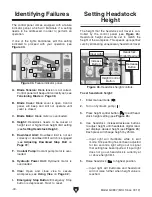
To set angle to 0°:
1. Enter manual mode (
).
2. Turn on hydraulic pump ( ).
3. Raise headstock (
) to highest position.
Note: If headstock does not clear vise and
table components at highest position, set
headstock height higher so it will (see
Setting
Headstock Height on Page 40).
4. Press angle control button (
) to edit head-
stock angle setting (see
Figure 47).
5. Press both headstock increase and decrease
buttons and hold them until headstock digital
readout changes to zero (see
Figure 47).
6. Wait until headstock digital readout returns
to current angle, then use headstock angle
joystick to adjust headstock to 0°
(see
Figure 47).
Setting Angle to 0°
Figure 47. Headstock control section.
Headstock
Digital Readout
Input Light
Angle Control
Button
Increase
Button
Decrease
Button
Headstock Angle
Joystick
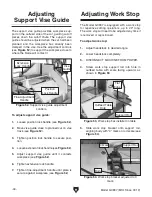
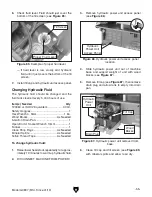
To avoid serious injury, always turn saw
OFF and allow blade to come to complete
stop before adjusting vise!
Using Vise
The Model G0887 vise consists of a movable
vise jaw that is manually positioned near the
workpiece, hydraulic vise clamping controls for
opening and closing, and adjustable vise clamp-
ing pressure.
Adjusting Vise Clamping Pressure
The Model G0887 features adjustable clamp-
ing pressure so the vise will not crush fragile
workpieces.
To adjust vise clamping pressure:
1. Loosen nut shown in Figure 48.
2. Adjust pressure adjustment knob until desired
pressure on gauge has been achieved, then
tighten nut to secure (see
Figure 48).
IMPORTANT: Do not exceed 497 PSI
(35 kg/cm²).
Tool Needed
Qty
Open-End Wrench 27mm .................................. 1
Figure 48. Vise clamping pressure adjustment
components.
Nut
Gauge
Pressure
Adjustment
Knob
Содержание G0887
Страница 108: ......