


Model G0887 (Mfd. Since 01/19)
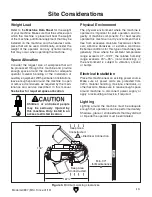
-25-
18. Press motor stop button (V). All motors
should turn
OFF.
19. Press hydraulic start/stop button (U) and
press raise headstock button (
O) to raise
headstock until indicator light on height con-
trol button (
H) illuminates.
20. Press vise close button (R) until vise close
button illuminates.
21. Press automatic operation button (N). Saw
will enter auto mode.
22. Turn feed rate dial (C) to a value other than
zero.
23. Press auto cycle button (D). Automatic cut
cycle should begin: coolant pump will start,
blade will start, vise will close, headstock will
lower, and bandsaw will perform cut. Then
blade will stop, headstock will raise to top of
its travel, and vise will open.
— If blade does shut off and headstock does
raise to top of its travel, lower limit stop is
working correctly. Continue to
Step 24.
— If blade does not shut off or headstock
does not raise, lower limit stop is not
working correctly. This safety feature must
work properly before proceeding with reg-
ular operations. Refer to
Page 72 to adjust
downfeed stop bolt.
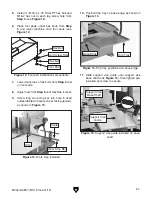
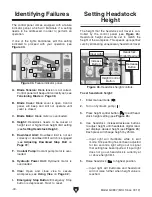
24. Remove (4) button head cap screws to open
blade cover (see
Figure 19).
Figure 19. Blade cover secure screws (2 of 4).
Note: Failure indicator door safety light (L)
will illuminate to indicate wheel cover is open
and that it must be closed before operation
can resume.
25. While staying safely away from blade, press
hydraulic start/stop button (
U), vise close but-
ton (
R), then automatic operation button (N).
— If blade does not start, blade cover safety
switch is working correctly. Proceed to
Step 26.
— If blade does start, immediately turn
machine
OFF and disconnect power.
Blade cover safety switch feature is not
working correctly. This safety feature must
work properly before proceeding with reg-
ular operations. Call Tech Support for
help.
26. Press Emergency Stop button (A), then close
wheel cover and secure.
Congratulations! Test Run is complete.
Recommended
Adjustments
The adjustments listed below have been per-
formed at the factory. However, because of the
many variables involved with shipping, we recom-
mend that you at least verify the following adjust-
ments to ensure accurate cutting results.
Step-by-step instructions on verifying these adjust-
ments can be found in
SECTION 7: SERVICE.
Factory adjustments that should be verified:
1. Downfeed Stop Bolt (Page 72).
2. Blade Tracking (Page 68).
3. Blade Guide Bearings (Page 66).
4. Squaring Blade to Table (Page 70).
5. Hydraulic Pressure (Page 53).
Содержание G0887
Страница 108: ......