background image

-2-

Model G0825 (Mfd. Since 02/17)

We stand behind our machines! If you have ques-
tions or need help, contact us with the information 
below. Before contacting, make sure you get the 

serial number  and  manufacture date  from  the 
machine ID label. This will help us help you faster.

Grizzly Technical Support

1815 W. Battlefield

Springfield, MO  65807
Phone: (570) 546-9663

Email: [email protected]

We want your feedback on this manual. What did 
you  like  about  it?  Where  could  it  be  improved? 
Please take a few minutes to give us feedback.

Grizzly Documentation Manager

P.O. Box 2069

Bellingham, WA  98227-2069

Email: [email protected]

Contact Info

We  are  proud  to  provide  a  high-quality  owner’s 
manual with your new machine!

We made every effort to be exact with the instruc-
tions,  specifications,  drawings,  and  photographs 
in this manual. Sometimes we make mistakes, but 
our policy of continuous improvement also means 
that 

sometimes the machine you receive is 

slightly different than shown in the manual.

If you find this to be the case, and the difference 
between  the  manual  and  machine  leaves  you 
confused  or  unsure  about  something,  check  our 
website for an updated version. We post current 
manuals and manual updates for free on our web-
site at 

www.grizzly.com.

Alternatively, you can call our Technical Support 
for help. Before calling, make sure you write down 
the 

Manufacture Date and Serial Number from 

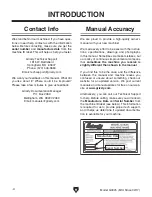
the machine ID label (see below). This information 
is required for us to provide proper tech support, 
and it helps us determine if updated documenta-
tion is available for your machine.

Manufacture Date

Serial Number

Manual Accuracy

INTRODUCTION

Содержание G0825

Страница 1: ...C WARNING NO PORTION OF THIS MANUAL MAY BE REPRODUCED IN ANY SHAPE OR FORM WITHOUT THE WRITTEN APPROVAL OF GRIZZLY INDUSTRIAL INC JH18821 PRINTED IN TAIWAN V1 08 17 MODEL G0825 PORTABLE EDGEBANDER OWNER S MANUAL For models manufactured since 02 17 ...

Страница 2: ...ng grinding tool integrity and the usage of personal protective equipment The manufacturer will not be held liable for injury or property damage from negligence improper training machine modifications or misuse Some dust created by power sanding sawing grinding drilling and other construction activities contains chemicals known to the State of California to cause cancer birth defects or other repr...

Страница 3: ...erial Inspection Edgebander Preparation 18 Checking Adding Glue 18 Setting Infeed Guide 19 Setting Guide Plate 19 Performing Edgebanding Operations 21 Edgebanding Inside Corners 23 Adjusting Glue Amount 24 Using Low Temperature Mode 25 Installing Table Mount 26 SECTION 5 ACCESSORIES 27 SECTION 6 MAINTENANCE 29 Schedule 29 Cleaning Protecting 29 Lubrication 29 SECTION 7 SERVICE 30 Troubleshooting 3...

Страница 4: ...ade every effort to be exact with the instruc tions specifications drawings and photographs in this manual Sometimes we make mistakes but our policy of continuous improvement also means that sometimes the machine you receive is slightly different than shown in the manual If you find this to be the case and the difference between the manual and machine leaves you confused or unsure about something ...

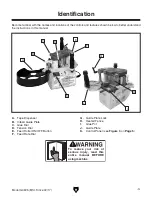
Страница 5: ...ication To reduce your risk of serious injury read this entire manual BEFORE using machine Become familiar with the names and locations of the controls and features shown below to better understand the instructions in this manual A B C E G H J K D F G Guide Plate Lock H Heated Fence I Glue Pot J Guide Plate K Control Panel see Figure 3 on Page 5 I ...

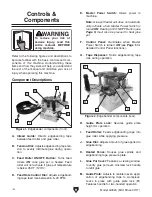
Страница 6: ...e Adjusts to maintain even appli cation of edgebanding tape to workpiece Locks in place with guide plate lock H Features handle for two handed operation Figure 2 Edgebander components rear H L M To reduce your risk of serious injury read this entire manual BEFORE using machine Component Descriptions Figure 1 Edgebander components front A Refer to the following figures and descriptions to become fa...

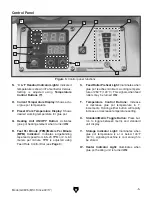
Страница 7: ... adjusted using Feed Rate Control Dial see Page 4 S Feed Roller Preheat Light Illuminates when glue pot reaches minimum working tempera ture of 250 F 120 C This signals when feed rollers may be turned ON T Temperature Control Buttons Increase or decrease glue pot temperature in 1 increments Holding either button will rapidly increase or decrease temperature setting U Standard Metric Toggle Button ...

Страница 8: ...gth x Width x Height 19 x 17 x 21 in Must Ship Upright No Electrical Power Requirement 110V Single Phase 60 Hz Full Load Current Rating 8A Minimum Circuit Size 15A Connection Type Cord Plug Power Cord Included Yes Power Cord Length 16 ft Power Cord Gauge 18 AWG Plug Included Yes Included Plug Type 5 15 Switch Type ON OFF Push Button Motor Main Type AC Mini Motor Horsepower 15W Voltage 110V Phase S...

Страница 9: ...5 310 80 C 155 C Approximate Warmup Time 4 minutes High Construction Housing Cast Aluminum Rollers Rubber Paint Type Finish Powder Coating Other Specifications Country of Origin Taiwan Warranty 1 Year Approximate Assembly Setup Time 20 Minutes Serial Number Location Barcode on Motor ISO 9001 Factory Yes Certified by a Nationally Recognized Testing Laboratory NRTL Yes Features Digital Display and T...

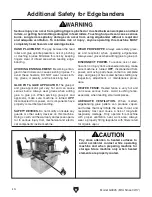
Страница 10: ... proof DANGEROUS ENVIRONMENTS Do not use machinery in areas that are wet cluttered or have poor lighting Operating machinery in these areas greatly increases the risk of accidents and injury MENTAL ALERTNESS REQUIRED Full mental alertness is required for safe operation of machin ery Never operate under the influence of drugs or alcohol when tired or when distracted For Your Own Safety Read Instruc...

Страница 11: ... moving parts or flying debris Make sure they are properly installed undamaged and working correctly BEFORE operating machine FORCING MACHINERY Do not force machine It will do the job safer and better at the rate for which it was designed NEVER STAND ON MACHINE Serious injury may occur if machine is tipped or if the cutting tool is unintentionally contacted STABLE MACHINE Unexpected movement dur i...

Страница 12: ...ate the nose throat and respiratory tract and cause a risk of long term respiratory damage Only operate this machine with proper ventilation near work area Always wear a properly fitting respirator with filters rated for organic vapor HAND PLACEMENT The gap between the feed roller and glue spindle presents a risk of pinching or crushing injuries Minimize this risk by keeping fingers clear of infee...

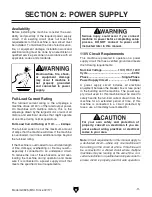
Страница 13: ...sized circuit To reduce the risk of these hazards avoid over loading the machine during operation and make sure it is connected to a power supply circuit that meets the specified circuit requirements For your own safety and protection of property consult an electrician if you are unsure about wiring practices or electrical codes in your area Note Circuit requirements in this manual apply to a dedi...

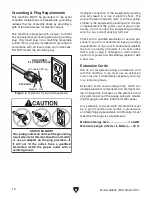
Страница 14: ...ord size gets longer and the gauge size gets smaller higher gauge numbers indicate smaller sizes Any extension cord used with this machine must be in good condition and contain a ground wire and matching plug receptacle Additionally it must meet the following size requirements Minimum Gauge Size 14 AWG Maximum Length Shorter is Better 50 ft Grounding Plug Requirements Figure 5 Typical 5 15 plug an...

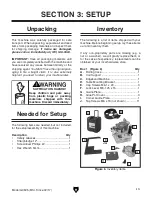
Страница 15: ...aterials shipped with this machine Discard immediately The following items are needed but not included for the setup assembly of this machine Description Qty Safety Glasses 1 Straightedge 12 1 Screwdriver Phillips 2 1 Hex Wrench 5mm 1 Needed for Setup Inventory The following is a list of items shipped with your machine Before beginning setup lay these items out and inventory them If any non propri...

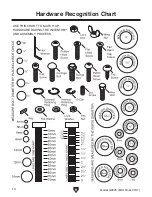
Страница 16: ... 14 Model G0825 Mfd Since 02 17 Hardware Recognition Chart USE THIS CHART TO MATCH UP HARDWARE DURING THE INVENTORY AND ASSEMBLY PROCESS 5mm 5mm Flat Head Cap Screw ...

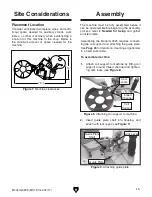
Страница 17: ...d attaching the guide plate See Page 25 for details on mounting edgebander to a fixed work table To assemble machine 1 Attach coil support to machine by fitting coil support around infeed channel and tighten ing cam locks see Figure 8 The machine must be fully assembled before it can be operated Before beginning the assembly process refer to Needed for Setup and gather all listed items 2 Insert gu...

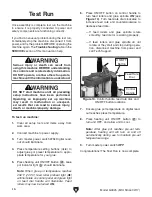
Страница 18: ...llers and glue spindle rotate smoothly feed motor is working properly If feed rollers and glue spindle do not rotate or they start and stop during opera tion disconnect machine from power and call Tech Support Figure 10 Control handle feed rate dial and ON OFF button locations 7 Ensure glue pot temperature on digital read out reaches preset temperature 8 Press heating unit ON OFF button to turn un...

Страница 19: ... pot to storage mode Note Indicator light will illuminate beside storage symbol when edgebander may be stored Light indicates when glue pot tem perature falls below 140 F 60 C 11 Turns master power switch OFF and unplugs edgebander The purpose of this overview is to provide a basic understanding of how the machine is used during operation so the machine controls components discussed later in this ...

Страница 20: ...ce We highly recommend testing edgebanding setup edgebanding settings glue adjustment setting and material type on a test workpiece similar to the final product to ensure proper adhesion and finish Checking Adding Glue Always check the glue level and if necessary add glue pellets before operations The glue pot is full when the glue level is within 3 8 10mm of the top of the pot Avoid leaving glue ...

Страница 21: ...n the scale at the base of the guide plate post The angle scale allows the guide plate to be accurately adjusted to 15 The infeed guide controls the height of the edge banding tape to ensure it gets applied flush with the top of the workpiece In order to function properly the infeed guide must be set at the same height as the guide plate which slides across the top of the workpiece during operatio...

Страница 22: ...each workpiece 2 Retighten guide plate lock lever to secure setting Guide Plate Lock Lever Figure 17 Guide plate adjusted for workpiece height Guide Plate Outfeed Roller Base Plate Setting Guide Plate Height 4 Tighten lock screw and re check to confirm setting 5 Calibrate angle scale pointer scale plate to 0º by loosening Phillips head screws adjusting scale plate then retightening screws To set g...

Страница 23: ...see Accessories on Page 27 to easily achieve precise seam alignment To perform an edgebanding operation 1 Read and follow all safety and initial setup instructions described earlier in this manual 2 Inspect workpiece to make sure it is suitable for edgebanding 3 Check add glue to glue pot refer to Page 18 4 Ensure height of infeed guide is set for width of edgebanding tape refer to Page 5 Level gu...

Страница 24: ...ng has been applied to entire work surface Edgebander Movement Start Point 1 2 Workpiece End Figure 21 Typical edgebander operation Figure 20 Edgebander orientation along workpiece Heated Fence Edgebanding Outfeed Roller 9 Press heated fence and outfeed roller see Figure 20 flush against workpiece edge and then start feed rollers to begin applying tape to workpiece As tape is applied move edgeband...

Страница 25: ...to inside corner see Figure 23 Figure 22 Connecting corner plate Corner Plate 3 Trim edgebanding tape according to workpiece edge length leaving a small amount of excess to trim after banding it applied 4 With corner plate in inside corner of workpiece feed edgebanding tape through edgebander until leading edge contacts inside corner of workpiece as shown in Figure 24 Figure 24 Edgebanding tape co...

Страница 26: ...ease or decrease amount of glue being applied to glue roller depending on glue pot tempera ture 5 Tighten set screw and nut against glue scraper Run a test piece to check glue setting If amount of glue applied is uniform across entire width of edgebanding and edge banding applies evenly glue scraper is set properly If amount of glue is not uniform across entire width of edgbanding or edgeband ing ...

Страница 27: ...dard setting repeat Step 2 Figure 30 Infeed guide adjustment components Feed Roller ON OFF Button The edgebander can toggle between standard temperature mode and low temperature mode depending upon the type of glue being used Low temperature mode operates at 175 310 F 80 155 C High temperature mode standard operates at 250 390 F 120 200 C Choose the temperature mode that best matches the melting p...

Страница 28: ...Trace included template onto edge of appro priately sized work surface for operation Figure 27 Attaching table mounting bracket to edgebander 4 Align edgebander and bracket to edge of work surface using clamps see Figure 28 Use 11 M4 x 18 tap screws to attach brack et to underside of work surface Note Use a straightedge to ensure work surface is even with edgebander base Apply spacers or flat wash...

Страница 29: ... convenience of the portable edgebander Simply attach the G0825 Edgebander to the table and accurately run straight or curved pieces Includes built in ON OFF button and magnetic switch Figure 32 T1188 Edgebanding Trimmer T1188 Edgebanding Trimmer This trimmer features a micro adjustment scale for precision edging and is designed to take on the tight 1 inner radius of the G0825 Edgebander for a per...

Страница 30: ...he newest hot melt technology with special additives to create low density glue pellets with the highest possible bonding strength This provides greater efficiency higher productiv ity and practically invisible glue lines Great for PVC ABS veneer solid wood melamine and polyester These pellets come in a 44 lb bag Figure 36 T27707 Edgebanding Glue Pellets Edgebanding Hand Tools G7911 Double Edge Tr...

Страница 31: ... a light coat of ISO 68 machine oil to the chain Turn master power switch ON and press heating unit ON OFF button to heat glue pot Once pre heated press ON OFF button on control handle to start feed motor and disperse oil Run machine for several seconds ensuring oil covers chain and sprockets then turn machine OFF Re install top cover Figure 38 Feed chain lubrication locations Cleaning the Model G...

Страница 32: ...fix broken disconnected or corroded wires 9 Inspect replace 10 Test repair replace Motor stalls or is underpowered 1 Motor overheated 2 Chain slipping oil grease on belt s 3 Motor s wired incorrectly 4 Plug receptacle at fault 5 Pulley sprocket slipping on shaft 1 Allow motor to cool 2 Clean tension replace chain Pages 29 3 Wire motor s correctly 4 Test for good contacts correct wiring 5 Replace l...

Страница 33: ...pot temperature according to glue manufacturer s directions confirm glue temperature on control panel digital readout 3 Inspect heater rod connections tighten test heater rod amperage and replace if necessary Glue only adheres to part of edge tape 1 Operator not exerting enough force against workpiece 2 Glue spindle not making full contact with edgebanding 3 Outfeed pressure roller not making full...

Страница 34: ...nt at the time of printing but may not match your machine If you find this to be the case use the wiring diagram inside the motor junction box CAPACITORS INVERTERS Some capacitors and power inverters store an electrical charge for up to 10 minutes after being disconnected from the power source To reduce the risk of being shocked wait at least this long before working on capacitors EXPERIENCING DIF...

Страница 35: ...OTOR M ACNN MOTOR SPEED SENSOR GP 25A KEY LED process Motor Start Button LED ACL ACN HEAT X 4 PCS 840W INT ZERO 10A 250V Terminal Block C F ENT AC110V AC220V ACL ACN ACIN ACCL ACCN ACI N DC POWER SUPPLY 12V 5V GND VDD Vcc FILTER EMI FILTER C CCW CW COM H H THERMOSTAT POWER Switch K Type 4MFD 250V MOTOR DRIVE DISPLAY Wiring Schematic ...

Страница 36: ...1 2 3 4 5 6 7 8 9 10 13 14 15 16 17 18 19 20 21 22 23 24 25 25 1 25 2 25 3 25 4 26 27 28 29 30 51 52 53 54 55 56 32 31 Housing Accessory Breakdown SECTION 9 PARTS BUY PARTS ONLINE AT GRIZZLY COM Scan QR code to visit our Parts Store ...

Страница 37: ... 28 P0825028 HEAT RESISTANT WIRE WHITE 13 P0825013 FUSE BRACKET CUL CE RED 10A 29 P0825029 HEAT RESISTANT WIRE 14 P0825014 FUSE 6A 100 120V 30 P0825030 HEAT RESISTANT WIRE 15 P0825015 CONTROL PANEL 31 P0825031 BUTTON HD CAP SCR M5 8 X 12 16 P0825016 PANEL 100V 240V 32 P0825032 PHLP HD SCR M3 5 X 5 17 P0825017 POWER PLATE 100 240V 51 P0825051 MOULDED CASE 18 P0825018 CAP SCREW 52 P0825052 METAL PLA...

Страница 38: ...106 107 108 109 110 111 111 1 111 2 111 3 111 4 112 113 114 115 116 117 118 119 120 121 122 123 124 125 126 127 128 129 130 131 132 133 134 135 136 137 138 139 140 141 142 143 144 145 146 147 148 149 150 151 152 153 154 155 156 157 158 159 160 161 162 163 164 165 166 167 168 169 170 171 172 173 174 175 176 177 179 180 182 181 183 186 185 184 187 188 ...

Страница 39: ...LOCK WASHER 111 P0825111 INFEED GUIDE SHAFT ASSY 159 P0825159 COMPRESSION SPRING 111 1 P0825111 1 INFEED GUIDE SUPPORT A 160 P0825160 WASHER 111 2 P0825111 2 INFEED GUIDE SUPPORT B 161 P0825161 GLUE APPLICATOR ADJ KNOB 111 3 P0825111 3 LOCK WASHER 162 P0825162 SCRAPER SUPPORT PIN 111 4 P0825111 4 HEX NUT 163 P0825163 GLUE APPLICATOR SHAFT 112 P0825112 INFEED GUIDE 164 P0825164 GLUE POT COVER 113 P...

Страница 40: ...NTONE 109 C COLOR CODES GRIZZLY LOGO RED PANTONE 711 C or RAL 3020 PANTONE 151 C or RAL 2005 WARNING G0825 Machine Labels 11 08 16 Scale 1 1 unless otherwise noted Labels MUST be made of chemical resistant material COPYRIGHT GRIZZLY INDUSTRIAL INC FOR GRIZZLY MACHINES ONLY DO NOT REPRODUCE OR CHANGE THIS ARTWORK WITHOUT WRITTEN APPROVAL Grizzly will not accept labels changed without approval If ar...

Страница 41: ... metalworker ____ 0 2 Years ____ 2 8 Years ____ 8 20 Years ____20 Years 6 How many of your machines or tools are Grizzly ____ 0 2 ____ 3 5 ____ 6 9 ____10 7 Do you think your machine represents a good value _____Yes _____No 8 Would you recommend Grizzly Industrial to a friend _____Yes _____No 9 Would you allow us to use your name as a reference for Grizzly customers in your area Note We never use ...

Страница 42: ...D LINE FOLD ALONG DOTTED LINE GRIZZLY INDUSTRIAL INC P O BOX 2069 BELLINGHAM WA 98227 2069 Place Stamp Here Name_______________________________ Street_______________________________ City______________State______Zip______ Send a Grizzly Catalog to a friend ...

Страница 43: ... shall be tried in the State of Washington County of Whatcom We shall in no event be liable for death injuries to persons or property or for incidental contingent special or consequential damages arising from the use of our products To take advantage of this warranty contact us by mail or phone and give us all the details We will then issue you a Return Number which must be clearly posted on the o...

Страница 44: ......
Отзывы: