


-24-
Model G0825 (Mfd. Since 02/17)
Adjusting Glue
Amount
The tension dial adjusts the pressure the scraper
applies to the backside of the tape to evenly dis-
tribute the glue. The amount of glue being applied
is set according to the edgebanding width. The
glue dial (see
Figure 12) quickly controls the
amount of glue being applied to the edgbanding,
and can be adjusted depending on the glue pot
temperature setting being used.
IMPORTANT: DO NOT attempt to adjust either of
these dials when the glue pot is cold, as this can
damage internal adjustment components.
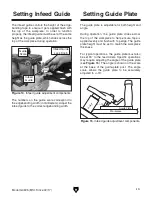
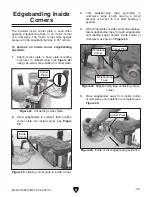
3. Loosen glue scraper set nut (see Figure 13)
to adjust tension dial inward or outward.
4. Turn tension dial clockwise to increase glue
scraper tension and counterclockwise to
decrease tension.
Tip:
Press inward on scraper (toward glue
spindle) with a flat head screwdriver to make
adjusting tension dial easier.
Note: Adjusted glue dial setting to increase
or decrease amount of glue being applied to
glue roller depending on glue pot tempera-
ture.
5. Tighten set screw and nut against glue
scraper. Run a test piece to check glue
setting.
— If amount of glue applied is uniform across
entire width of edgebanding, and edge-
banding applies evenly, glue scraper is set
properly.
— If amount of glue is not uniform across
entire width of edgbanding, or edgeband-
ing does not adhere properly to workpiece,
repeat
Steps 3–5 until edgebanding is
applied properly.
6. Re-install top cover.
Use a scrap piece of edgebanding and workpiece
to ensure glue evenly covers the entire back side
of the edgebanding. Follow the steps below to
adjust the glue scraper for even glue application.
Tools Needed
Qty
Open-End Wrench 7mm ................................... 1
Hex Wrench 3mm ............................................. 1
Flathead Screwdriver #2 .................................... 1
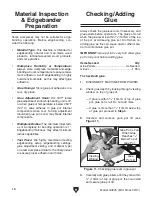
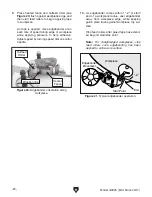
To adjust amount of glue:
1. Turn master power switch and glue pot ON
(see
Figure 12). Allow glue pot to heat com-
pletely.
2. Remove top cover (see Figure 12).
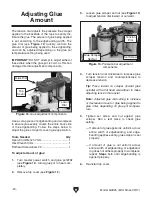
Figure 12. Glue adjustment components.
Tension
Dial
Glue Dial
Top
Cover
Figure 13. Pressure bar adjustment
components.
Glue Scraper
Set Nut
Tension
Dial
Set Screw
Содержание G0825
Страница 44: ......


