❏
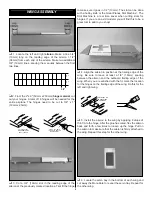
7. Test fit the fin in the slot in the fuselage. When you are
satisfied with the fit, mark a line on both sides of the fin
where the top of the fuselage contacts the fin. Trim the
covering 1/32" (.8mm) inside of the lines.
❏
8. When you are satisfied with the fit, use 6-minute epoxy
to glue the fin in position. Check the alignment of the fin to
the stabilizer with a triangle, then secure it in position with
masking tape until the epoxy has cured. Double-check the
alignment of the fin with the stabilizer while the epoxy cures.
❏
9. Install the hinges in the stabilizer and elevator. Glue
the hinges to the elevator the same way you did with the
ailerons. Repeat this step for the rudder.
❏
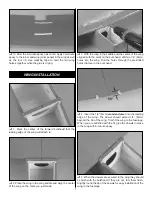
1. The top left and right corners of the firewall have pre-
drilled holes. These holes are for the fuel and pressure line to
pass through. Check to be sure that the holes are large enough
for your fuel line. If not, drill the holes to fit the fuel tubing.
❏
2. Mix a small amount of 6-minute epoxy. Brush the
epoxy on the front of the firewall and let it cure. This will
fuelproof the firewall.
❏
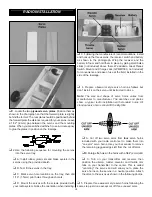
3. Cut the “spreader bar” from each
Engine Mount
half.
Carefully trim any extra material left by the spreader from
each mount half. The surfaces where the spreader bars were
attached must be smooth to allow the mount halves to fit
together. Trim the flashing off any rough edges if necessary.
❏
4. Locate four 6-32 blind nuts and four 6-32 x 3/4" pan
head screws. Install the blind nuts onto the back side of the
firewall. Use the screws to attach the engine mount to the
firewall and to set the blind nuts.
ENGINE INSTALLATION
10


