background image

Section 5 - Lubrication & Maintenance

5-11

80804002

125

EVERY

* - Number of Lube Points

- Added Number of Lube Points if 4x4

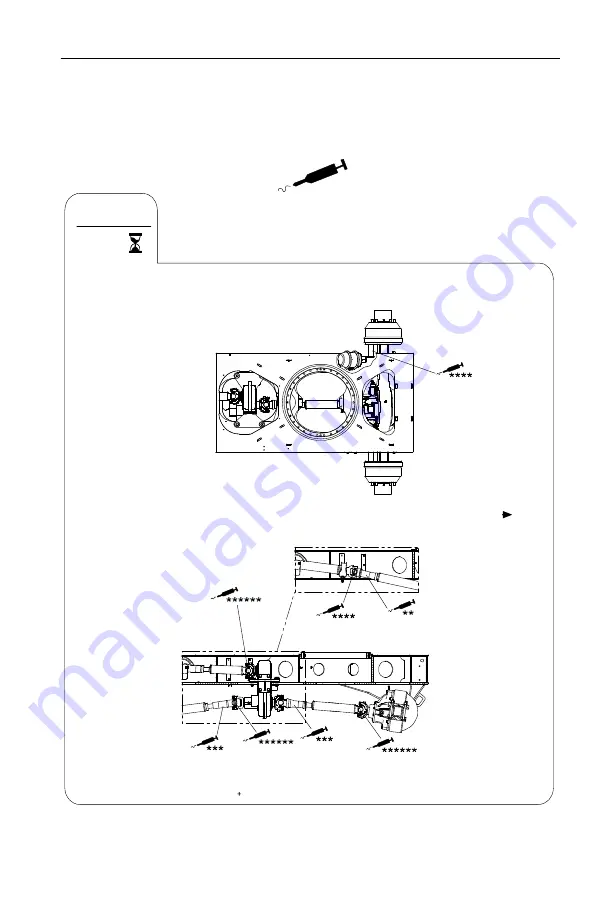
Rear

Grease (extreme pressure #2)

OAC2071

4 x 4

TRANSFER

CASE AND

DRIVE SHAFT

4 x 2

DRIVE SHAFT

Slack Adjusters

Universal Joints

Universal Joints

Universal

Joints

Universal Joints

Drive Shaft

Splines

Drive Shaft

Splines

Drive Shaft Splines

Содержание XL3100IV

Страница 1: ...3120000244 After 4x4 S N 3140000313 After 6x4 S N 4100000461 After 6x6 S N 4160000050 After S N 5100000586 After 80804002 Revised December 10th 2018 This manual and all manuals for the Gradall Hydrau...

Страница 2: ...ntrolled copy of the manual The current version can be viewed downloaded at www mygradall com Gradall is a registered trademark for hydraulic excavators industrial mainte nance machines attachments an...

Страница 3: ...hour Maintenance Schedules November 20 2013 C Added Battery Spec to Section 7 May 1st 2014 D Revised 1500 hour Maintenance Schedule and Transfer Case Spec October 20th 2014 E Revised manual April 14th...

Страница 4: ...nd qualified instructor Operators of this equipment must possess a valid applicable driver s license be in good physical and mental condition Operator must not be using medication which could impair a...

Страница 5: ...notified immediately in all instances where Gradall products have been involved in an accident involving bodily injury or death of personnel or when damage has occurred to personal property or the Gr...

Страница 6: ...Read This First d 80804002 NOTES...

Страница 7: ...Hazards 1 10 Dust Hazard 1 12 1 4 Personal Protection Equipment 1 13 Section 2 Pre Operation and Controls 2 1 Pre Operation Checks Inspection 2 1 2 2 Walk Around Inspection 2 2 2 3 Safety Decals 2 5...

Страница 8: ...Travel Mode Brake System 3 4 Service Brake 3 5 Emergency Brake 3 6 Parking Brake 3 8 3 4 Travel Mode Power Train 3 10 Shifting Gears 3 10 3 5 Travel Mode Engine Shutdown 3 14 3 6 Remote Control Prepa...

Страница 9: ...ng Bucket 4 4 Grading Blade 4 4 4 4 Adapter Attachment Installation 4 5 Section 5 Lubrication Maintenance 5 1 Introduction 5 1 Clothing and Safety Gear 5 1 5 2 General Maintenance Instructions 5 2 Tir...

Страница 10: ...perator Maintenance Instructions 5 21 10 Hours 5 21 50 Hours 5 30 100 Hours 5 34 750 Hours 5 36 Section 6 Emergency Procedures 6 1 Loss Of Power 6 1 Stowing the boom without engine power 6 1 To extend...

Страница 11: ...ING indicates a potentially hazardous situation which if not avoided could result in death or serious injury CAUTION indicates a potentially hazardous situation which if not avoided may result in mino...

Страница 12: ...where overhead power lines overhead or underground cables or other power sources may exist without ensuring the appropriate power or utility company de energizes the lines Always check for power line...

Страница 13: ...e Position machine to prevent possibility of a person being crushed between counterweight and another object Do not allow anyone inside the cab s other than the operator while in operation Always be c...

Страница 14: ...y Practices 1 4 80804002 The circle of safety is a circle around the excavator with the boom at full extension Establish and inform others of the circle of safety Keep others from entering into the ci...

Страница 15: ...or dismounting machine Repair or replace damaged steps and grab handles Keep grab handles steps and walkways free of mud oil grease and other foreign material Replace non skid surface material as req...

Страница 16: ...resting on the ground and the engine is stopped Be sure all access covers are in the fully open position before performing any procedures inside compartments Stay clear of moving parts while engine is...

Страница 17: ...General Safety Practices 1 7 80804002 Never permit anyone under boom attachment or load Rest boom or attachment on ground and stop engine before permitting anyone to work beneath boom or behind cradl...

Страница 18: ...direction you may expect Always wear seat belt Keep head arms and other body parts inside cab at all times Maintain proper tire pressure at all times Inspect brakes before driving undercarriage after...

Страница 19: ...strict movement Never pass load line over open bucket Relief valves in bucket circuit could cause unexpected dangerous movement of the load Bucket linkage could also be damaged Be sure the surface exc...

Страница 20: ...e you to chemicals including gasoline diesel fuel lubricants petroleum products engine exhaust carbon monoxide and phthalates which are known to the State of California to cause cancer and birth defec...

Страница 21: ...ical attention immediately Stop engine and relieve trapped pressure before loosening any hydraulic fitting Hydraulic oil is under enough pressure that it can penetrate the skin DO NOT attempt to repai...

Страница 22: ...icosis Concrete masonry many types of rock and various other materials contain silica sand California lists respirable crystalline silica as a substance known to cause cancer Operation of this equipme...

Страница 23: ...ditions You may need Hard hat Safety shoes Safety glasses goggles or face shield Heavy gloves Hearing protection Reflective clothing Wet weather gear Respirator or filter mask Wear adequate clothing f...

Страница 24: ...Section 1 General Safety Practices 1 14 80804002 NOTES...

Страница 25: ...ury Walk around inspection must be performed at beginning of each work shift or at each change of operator Ensure all Safety decals are legible and in place Clean or replace as required Refer to pages...

Страница 26: ...in manual drawer Grab handles and steps secure and clean Window glass and mirrors clean and unobstructed Adjust mirrors for maximum visibility before and during operation Be sure windows and doors are...

Страница 27: ...belt if frayed or cut webbing damaged buckles or loose mounting hardware 9 Center Pin See Inspection Note 10 Wheel Tire Assemblies No loose or missing lug nuts proper inflation see page 5 33 for detai...

Страница 28: ...Do not remove the radiator cap Be sure antifreeze solution is adequate for expected temperatures Be sure radiator and oil cooler fins are clean Drive belt check condition replace as required Engine co...

Страница 29: ...UTION and instructional decals and proper capacity charts are legible and in place Clean and replace as required Upperstructure Decal Locations OAC0980 80509018 80509018 80509015 80509015 80509007 805...

Страница 30: ...Section 2 Pre Operation and Controls 2 6 80804002 NO STEP OAC0990 80509013 80373077 80509015 91143288 80509013 80509016 80509012 80509015...

Страница 31: ...Section 2 Pre Operation and Controls 2 7 80804002 Undercarriage Decal Locations OAC1590 80503005 91143288 80509016 80509015 80509004 80509012 80783208 77383675...

Страница 32: ...Section 2 Pre Operation and Controls 2 8 80804002 OAC1601 AdBlue ONLY NO Diesel 80483160 ON FAN SHROUD 80509014 80509012 80509015 80213104 80784165...

Страница 33: ...Section 2 Pre Operation and Controls 2 9 80804002 NOTES...

Страница 34: ...Section 2 Pre Operation and Controls 2 10 80804002 2 4 UNDERCARRIAGE CAB COMPONENTS OAC1610 9 8 6 7 5 6 13 11 10 1 2 3 4 12...

Страница 35: ...Diffuser Vents 5 Defroster Vents 6 Air Vents 7 Right Hand Dash Panel See page 2 23 for details 8 Transmission Shift Selector See Shifting Gears on page 3 10 for detailed operating instructions 9 Accel...

Страница 36: ...ressed Also used to access navigate prognostics diagnostics 4 Down Arrow Pushbutton downshifts transmission when pressed Also used to access navigate prognostics diagnostics 5 Drive Pushbutton shifts...

Страница 37: ...ted and remains solid for two minutes after Drive is selected Filter Life Monitor When the filter s is due for a change the wrench icon 1 flashes on and off for two minutes after Drive is selected Tra...

Страница 38: ...usly press the Up and Down arrows 1 two times oM appears followed by a number from 99 to 0 which represents the percentage of oil life remaining before a fluid change is required Filter Life Monitor S...

Страница 39: ...Monitor Press and hold Mode button 1 for approximately 10 seconds while in Filter Life Monitor mode Or Perform the following shift sequence with the ignition on but the engine off Do not stop the sequ...

Страница 40: ...ay and a numerical countdown Engine is at idle The fluid temperature is between 60 C 140 F and 104 C 220 F Transmission is in N Neutral The vehicle has been stationary for approximately two minutes to...

Страница 41: ...d a numberical display The numerical display is a fault code and indicates conditions are not proper to recieve the fluid level information or there is a system malfunction The fault codes that may be...

Страница 42: ...item displayed followed by the Diagnostic Trouble Code DTC P 07 22 Each item is displayed for about one second The display cycles continuously until the next code list position is accessed by pressin...

Страница 43: ...ENGINE COOLANT TEMP INPUT NOT PRESENT ACTUATOR SUPPLY VOLTAGE1 HSD1 LOW ACTUATOR SUPPLY VOLTAGE1 HSD1 HIGH TRANSMISSION CONTROL SYSTEM PERFORMANCE TRANSMISSION CONTROL SYSTEM ELECTRICAL TRANSID BRAKE...

Страница 44: ...AT LIMIT PRESSURE CONTROL SOLENOID MAIN MOD CONTROL OPEN PRESSURE CONTROL SOLENOID MAIN MOD CONTROL LOW PRESSURE CONTROL SOLENOID MAIN MOD CONTROL HIGH PRESSURE CONTROL SOLENOID 2 CONTROL OPEN PRESSUR...

Страница 45: ...CONTROL SOLENOID 5 CONTROL HIGH RETARDER OIL TEMPERATURE HOT RETARDER OIL TEMPERATURE SENSOR LOW RETARDER OIL TEMPERATURE SENSOR HIGH TCC PCS CONTROL OPEN TCC PCS CONTROL HIGH TCC PCS CONTROL LOW KIC...

Страница 46: ...r hour mph 7 Tachometer w Engine Hourmeter Tachometer indicates engine speed in revolutions per minute rpm Hourmeter indicates total time of engine operation in hours and tenths of hours 8 Engine Cool...

Страница 47: ...switch to activate headlights depress bottom of switch to activate marker lights Middle position is OFF 7 Engine Brake Switch if equipped 3 position rocker switch Depress top of switch to activate com...

Страница 48: ...t engine in either remote control mode or travel mode 3 Pump PTO Indicator Illuminates green to indicate main PTO pump is engaged PTO pump must be off to start engine in travel mode PTO pump must be e...

Страница 49: ...ming intake manifold to proper starting temperature 4 Undercarriage Key Indicator Illuminates green to indicate undercarriage ignition key is in the RUN position see page 2 27 for details 5 Upperstruc...

Страница 50: ...al lock is engaged XL3100IV Illuminates green to indicate front rear tandem axle differential lock is engaged XL4100IV XL5100IV 12 Engine Brake Indicator if equipped Illuminates green if engine brake...

Страница 51: ...ge is available for all electrical functions 2 OFF Engine off 3 RUN Prohibits rotating key switch to position 4 in the event the engine does not start Rotate the key to position 2 then back to positio...

Страница 52: ...beam high beam function for the headlights Turn Signal Hazards Push the lever forward 2 to activate the right turn signal Pull the lever back 3 to activate the left turn signal Pull hazard switch 5 to...

Страница 53: ...Section 2 Pre Operation and Controls 2 29 80804002 NOTES...

Страница 54: ...Section 2 Pre Operation and Controls 2 30 80804002 2 7 UPPERSTRUCTURE CAB COMPONENTS OAC0470 1 2 3 4 5 6 8 9 10 11 12 7...

Страница 55: ...operator seat Keep Operator Safety manual with machine at all times 6 Electronic Monitoring Unit See page 2 32 for details 7 Circuit Board and Fuse Box See Fuses on page 7 9 8 Right Hand Joystick See...

Страница 56: ...a travel lockout condition 3 Hydraulic Oil Level Indicator Illuminates red if oil level falls below acceptable operating level 4 Hydraulic Filter Indicator Illuminates red to indicate hydraulic reserv...

Страница 57: ...tor Illuminates red and a pulsing alarm is activated to indicate excessive engine temperature or low engine oil pressure Stop engine immediately and repair before continued use 14 Low Air Indicator Il...

Страница 58: ...fan 4 Air Conditioning Switch On Off switch 5 Travel Speed Switch Depress front of switch for high travel speed Depress back of switch for low creeper travel speed Note If travel speed is switched whi...

Страница 59: ...ate auto idle Depress back of switch II to deactivate auto idle With auto idle activated engine speed will return to low idle after 7 seconds of hydraulic control inactivity Once controls are activate...

Страница 60: ...0804002 Left Hand Arm Pod 1 Boom Tilt Speed Switch Rotary switch Rotate switch clockwise to decrease boom tilt speed rotate counterclockwise to increase boom tilt speed 2 Park Brake Switch See page 2...

Страница 61: ...Section 2 Pre Operation and Controls 2 37 80804002 NOTES...

Страница 62: ...ected while the engine is running it will not change until the engine is turned off then restarted When a control pattern is changed the corresponding control decal must be displayed in the cab GRADAL...

Страница 63: ...ever 1 located on the left hand arm pod 2 is moved to the unlocked active position Joystick Control Patterns Before operating refer to the position of the joystick control pattern switch located on th...

Страница 64: ...ward and to the left will extend and swing the boom left simultaneously Right Hand Joystick Functions Move the joystick back to raise boom move joystick forward to lower boom Move joystick right to op...

Страница 65: ...to the left will lower boom and open tool simultaneously Right Hand Joystick Functions Move the joystick back to retract boom move joystick forward to extend boom Move joystick right to swing boom ri...

Страница 66: ...k forward and to the left will lower and swing boom left simultaneously Right Hand Joystick Functions Move the joystick back to retract boom move joystick forward to extend boom Move joystick right to...

Страница 67: ...or to starting engine adjust seat for position and comfort 1 Weight Control Adjustment 2 Upper Seat Fore and Aft Adjustment Control 3 Lower Seat Fore and Aft Adjustment Control 4 Height Adjustment Con...

Страница 68: ...ge is available for all electrical functions 2 OFF Engine off 3 RUN Prohibits rotating key switch to position 4 in the event the engine does not start Rotate the key to position 2 then back to positio...

Страница 69: ...trols 2 45 80804002 Intermittent Wiper Washer 1 OFF 2 DELAY Rotating knob clockwise decreases delay 3 LOW Low wiper speed No delay 4 HIGH High wiper speed No delay 5 WASHER Press and hold switch to ac...

Страница 70: ...nd release of the park brake Indicator light on electronic monitoring unit illuminates to indicate brake is applied With the engine running and the park brake switch in OFF position 1 park brakes are...

Страница 71: ...RT position Notice The engine must not start or crank with the transmission in gear Release key immediately when engine starts If engine does not start after three attempts check fuel supply system 7...

Страница 72: ...er starting aid may be used with this engine only if it does not have the optional grid heater ENGINE EXPLOSION If your excavator is equipped with a cold start aid do not spray additional ether into a...

Страница 73: ...els and any unusual steering response to normal steering effort 4 Check operation of horn back up alarm and any other signal devices Must be audible from inside operator s cab with the engine running...

Страница 74: ...rown from driver s seat during braking emergency Do not fan the brake valve pedal A long series of rapid brake applications could reduce system pressure to a point where effective service braking will...

Страница 75: ...in tank 2 which supplies the rear axle brakes If pressure in either portion of the system falls below safe operating range the low air indicator light will illuminate and an audible alarm will sound...

Страница 76: ...the wheels of rear axle There will be no braking of the wheels of the front axle If air pressure is lost from the rear portion of the dual brake system normal actuation of the brake pedal will apply...

Страница 77: ...re drops to 60 psi 414 kpa and there will be a complete application when pressure decreases to 40 psi 276 kpa Air pressure is required to release the spring brakes therefore they will remain ON until...

Страница 78: ...upperstructure cab is inoperative when in travel mode Undercarriage park brake must remain applied when in remote mode Apply parking brake in undercarriage cab by raising parking brake control knob K...

Страница 79: ...Section 3 Operation 3 9 80804002 NOTES...

Страница 80: ...es the transmission upshifts automatically through each range As the vehicle speed decreases the transmission automatically downshifts to the correct range You may also manually select a lower forward...

Страница 81: ...te control travel The interaxle differential may be locked when traveling but NEVER when the wheels have lost traction and are spinning If shifting interaxle differential while traveling release accel...

Страница 82: ...over the side When differential is locked the turning radius will increase Unlock the differential when need for maximum traction has passed or when traveling on good surface Do not lock differential...

Страница 83: ...the I position Notice Engaging front axle drive while undercarriage is moving will damage transfer case Stop undercarriage before engaging front axle drive To Disengage Stop machine Move toggle lever...

Страница 84: ...g the excavator park in a safe location on flat level ground and away from other equipment and or traffic lanes From Undercarriage Cab 1 Apply the park brake 2 Shift transmission to neutral 3 Operate...

Страница 85: ...o upperstructure cab Preparing Upperstructure for Remote Control Operation All instructions on undercarriage cab remote control decal must be followed before starting machine in remote operation 1 Pla...

Страница 86: ...travel alarm and horn function properly Both must be audible from the cab with engine running Check to ensure control pattern decal matches joystick controls Make sure all boom and attachment function...

Страница 87: ...ing brake before leaving upperstructure cab With the travel remote switch in remote position the digging brake will set and release as travel pedal in upperstructure is actuated and released Under cer...

Страница 88: ...ated the digging brake is applied to all wheels to hold the undercarriage stationary while the excavator is digging Apply digging brake by moving travel remote switch to remote position and turning on...

Страница 89: ...n will damage the transmission Never tow a load using remote control drive Operate the engine at full throttle Undercarriage speed is controlled by travel speed switch position and amount of travel pe...

Страница 90: ...rcarriage travel alarms and back up lights will activate when steer pedal is depressed NOTE Due to varying conditions of front axle load and ground conditions steering may be restricted until unit is...

Страница 91: ...stem Holding steering wheel or remote steering pedal in full turn position will cause system to overheat This may cause steering pump to fail POWER STEERING FAILURE In the event power steering fails s...

Страница 92: ...or ventilation Remove boom tie down chain from boom 3 Perform checks before remote control operation located on page 3 16 Set engine to full throttle position 4 Be certain control cut out lever is in...

Страница 93: ...en reduced for conditions speed can be temporarily increased by depressing fast tilt button 1 Note Practice with controls in a safe open area Joysticks and pedals return to neutral position when relea...

Страница 94: ...pushing left joystick forward F to extend boom push right joystick forward B to lower boom into position for start of cut 4 Move right joystick to right C to open bucket or to left D to close bucket...

Страница 95: ...st tilt button to return to fast tilt 6 While pushing forward on right joystick B to lower boom and force bucket into ground pull back on left joystick E to retract boom and fill bucket 7 As bucket is...

Страница 96: ...D to close bucket At same time pull right joystick back A to raise boom far enough to clear obstructions 9 Move left joystick to right H to swing right or to left G to swing left to dump site If nece...

Страница 97: ...Section 3 Operation 3 27 80804002 11 Move left joystick to left G or right H to align boom for next cut Repeat steps 3 through 11...

Страница 98: ...to the value on the lift capacity chart If it becomes necessary to shut the engine off while positioning a load place load on the ground prior to shutting off engine Be thoroughly familiar with excav...

Страница 99: ...d delivery not the best The worst condition can only be determined by performing an UNLOADED TEST AND DELIVERY of the load Loads shown on chart in cab are hydraulic lift capacities with those in shade...

Страница 100: ...ure boom height depth from hole in adapter to ground level same level as bottom of tire Be sure to allow for length of chain and height of load 5 Measure load radius from inner corner of frame at fron...

Страница 101: ...lift capacity The rated lift capacity is based on the machine being equipped with 15 500 lb 7030 kg counterweight standard boom standard tires no auxiliary hydraulics and no bucket Adjust the listed...

Страница 102: ...he machine being stationary and level on a firm supporting surface The user must make allowance for particular job conditions such as soft or uneven ground out of level conditions side loads hazardous...

Страница 103: ...pedals 2 Swing the machine to align upperstructure with undercarriage 3 Lower attachment boom to ground or stow boom in boom rest See Boom Stow Procedure on page 3 35 4 Operate engine at low idle for...

Страница 104: ...the procedure shown on page 5 37 3 Position boom over rear of undercarriage and embed bucket in ground or against a solid object 4 Apply down pressure with boom and pull and push with boom while a he...

Страница 105: ...Unit for Driving Drive to and from job site only under the following conditions With boom stowed secure boom as shown above Mirrors are clean and properly adjusted for visibility Doors and upperstruct...

Страница 106: ...y display warning flags flares or flashing lights Parking Procedure 1 Perform Travel Mode Engine Shutdown on page 3 14 or Remote Mode Engine Shutdown on page 3 33 2 Fill fuel tank to minimize condensa...

Страница 107: ...440 4645 to exposed cylinder rods Maintenance Take a sample of hydraulic fluid for analysis Note Not all analysis methods are compatible with all hydraulic fluids e g laser particle counters do not re...

Страница 108: ...Section 3 Operation 3 38 80804002 This Page Intentionally Left Blank...

Страница 109: ...use unapproved attachments for the following reasons Gradall cannot establish range and capacity limitations for will fit homemade altered or other non approved attachments An overextended or overloa...

Страница 110: ...tion beginning on page 4 4 Ditching Buckets Installation Procedure Refer to Adapter Attachment Installation beginning on page 4 4 Size Cu Yd m3 24 610mm 3 8 31 30 762mm 1 2 41 36 914mm 5 8 54 42 1 07m...

Страница 111: ...Attachment Installation beginning on page 4 4 Pavement Removal Bucket Installation Procedure Refer to Adapter Attachment Installation beginning on page 4 4 Size Cu Yd m3 15 381mm 1 5 15 21 533mm 1 4 1...

Страница 112: ...lation Procedure Refer to Adapter Attachment Installation beginning on page 4 4 Grading Blade Installation Procedure Refer to Adapter Attachment Installation beginning on page 4 4 Size Cu Yd m3 72 1 8...

Страница 113: ...s 2 Bucket Adapter 3 Bucket Bars Installation Procedure 1 Be sure wedge bolts 1 are secured in storage position toward rear and position bucket adapter 2 above bucket bar 3 as shown 2 Lower boom until...

Страница 114: ...es forward or to keep wedges from turning when tightening nuts Be certain wedge surfaces are flush between adapter and bar and tighten fully Jog tool control a few times and re tighten Check often to...

Страница 115: ...rds are removed for service replace them before operating machine Do not step or stand on engine cover or upperstructure heater cover when performing checks and services in the area of the main boom a...

Страница 116: ...coating of engine oil to all linkage pivot points Drain engine and gear cases after operating when oil is hot Check all lubricant and coolant levels when cool MACHINE DAMAGE Contact Gradall before we...

Страница 117: ...5 3 SERVICE MAINTENANCE SCHEDULES Daily or Shift 10 Hour Maximum Maintenance Schedule Drain air tanks daily To prevent possible damage to emission controls components wait a minimum of 10 minutes afte...

Страница 118: ...50 EVERY Drain Expansion Ping Tank Check Swing Transmission Oil Level Follow Lubrication Schedule Follow Lubrication Schedule Check Tilt Transmission Level Check Tilt Transmission Level Inspect Air Fi...

Страница 119: ...VERY Check Axle Oil Level Check Front Axle Wheel End Oil Levels 4X2 6X4 Machines Only Check Transfer Case Oil Level Check Fan Belt Check Battery Check Transmission Oil Level Inspect and Clean Cooler C...

Страница 120: ...ce Heater Air Filter Follow Lubrication Schedule Check Hydraulic Cab Heater Oil Reservoir 250 Torque all Items Listed in Torque Chart 1st 30 DAYS Drain and Refill Swing Transmission Oil Drain and Refi...

Страница 121: ...Section 5 Lubrication Maintenance 5 7 80804002 400 Hour Maintenance Schedule OAC2031 400 Change Engine Oil and Filter EVERY Replace DEF Injector Unit Filter...

Страница 122: ...ers Have hydraulic fluid analyzed to determine condition Use test port mini check in pump line to obtain sample Drain flush and replenish system if required Check Brak e System Slack Adjusters Follow...

Страница 123: ...ollow Lubrication Schedule 1500 EVERY Change Engine Coolant Hydraulic Fluid Filters Drain and Refill Steering System Reservoir Unless hydraulic fluid is analyzed semi annually to determine level of co...

Страница 124: ...umber of Lube Points if 4x4 Front Grease extreme pressure 2 OAC2061 4 x 2 FRONT STEERING AXLE 4 x 4 FRONT DRIVE AXLE 4 x 4 FRONT DRIVE AXLE Universal Joints Universal Joints Drive Shaft Splines Wheel...

Страница 125: ...nts Added Number of Lube Points if 4x4 Rear Grease extreme pressure 2 OAC2071 4 x 4 TRANSFER CASE AND DRIVE SHAFT 4 x 2 DRIVE SHAFT Slack Adjusters Universal Joints Universal Joints Universal Joints U...

Страница 126: ...EVERY Number of Lube Points Added Number of Lube Points if 6x6 Front Grease extreme pressure 2 OAC2081 Universal Joints Universal Joints Drive Shaft Splines Wheel End King Pin Pivot King Pin Pivot Dra...

Страница 127: ...Number of Lube Points if 6x6 Rear Grease extreme pressure 2 OAC2091 Slack Adjusters Universal Joints Universal Joints Universal Joints Universal Joints Universal Joints Walking Beam Pivot Universal J...

Страница 128: ...ximum Lubrication Schedule XL3100IV 750 EVERY Number of Lube Points Added Number of Lube Points if 4x4 Front Grease extreme pressure 2 OAC1391 4 x 2 FRONT STEERING AXLE 4 x 4 FRONT DRIVE AXLE 4 x 4 FR...

Страница 129: ...Section 5 Lubrication Maintenance 5 15 80804002 750 EVERY Number of Lube Points Added Number of Lube Points if 4x4 Rear Grease extreme pressure 2 OAC1431 Brake Camshafts...

Страница 130: ...80804002 Semi Annual 750 Hour Maximum Lubrication Schedule XL4100IV XL5100IV 750 EVERY Number of Lube Points Added Number of Lube Points if 6x6 Grease extreme pressure 2 OAC0031 Front Brake Camshafts...

Страница 131: ...Section 5 Lubrication Maintenance 5 17 80804002 750 EVERY Number of Lube Points Added Number of Lube Points if 6x6 Grease extreme pressure 2 OAC0041 Rear Brake Camshafts...

Страница 132: ...ction 5 Lubrication Maintenance 5 18 80804002 5 5 UPPERSTRUCTURE LUBRICATION SCHEDULES Daily or Shift 10 Hour Maximum Lubrication Schedule 10 EVERY Number of Lube Points Grease extreme pressure OAC005...

Страница 133: ...Section 5 Lubrication Maintenance 5 19 80804002 Weekly 50 Hour Maximum Lubrication Schedule 50 EVERY Number of Lube Points Grease extreme pressure OAC0061...

Страница 134: ...Section 5 Lubrication Maintenance 5 20 80804002 Annual 1500 Hour Maximum Lubrication Schedule 1500 EVERY Number of Lube Points Grease extreme pressure OAC0081...

Страница 135: ...rform shutdown procedure on page 3 14 or page 3 33 and proceed to fuel tank 3 3 Turn fuel tank cap 2 and remove from fuel tank 3 Add diesel fuel as needed Replace fuel tank cap Replenish diesel fuel a...

Страница 136: ...shutdown procedure on page 3 14 or page 3 33 3 Check level of hydraulic oil at the sight gauge 1 on the hydraulic tank 2 The oil level should be visible in the upper gauge window 4 If hydraulic oil i...

Страница 137: ...5 Remove dust cap from pressure fill port 5 Locate female coupling from tool kit and attach to pressure fill port Add hydraulic fluid to level where oil is visible in upper gauge window 6 Remove fema...

Страница 138: ...nk Element Change as filter indicator light indicates 1 Perform shutdown procedure on page 3 14 or page 3 33 2 Locate reservoir breather 1 mounted on hydraulic tank 2 3 Depress breather plunger 3 to r...

Страница 139: ...Maintenance 5 25 80804002 4 Remove bolts 4 on return filter to allow removal of filter cover 5 5 Remove old filter element 6 and replace with new element 6 Replace filter cover 5 and bolts 4 Torque b...

Страница 140: ...be replaced 3 Remove dust from vacuator valve 3 by squeezing bottom of valve to allow loose particles to fall out 4 Locate air inlet hood 9 loosen clamp 8 and remove hood 5 Remove dust from hood 6 Re...

Страница 141: ...and vacuator valve 4 Replace inner safety element 7 after every third primary element change If replacing the inner safety element at this time carefully slide the element out and replace with new ele...

Страница 142: ...ould be at the HOT LEVEL mark When coolant is cool level should be at the COLD LEVEL mark 4 If coolant is low remove overflow bottle cap 2 and add coolant 50 50 mixture of ethylene glycol and water as...

Страница 143: ...Remove dipstick 1 and check oil mark The oil should be between the full 2 and add 3 marks within the crosshatched area of the dipstick 4 If oil is low remove oil fill cap 4 and add motor oil to bring...

Страница 144: ...n Air Tanks 1 Perform shutdown procedure on page 3 14 or page 3 33 2 Locate air tanks 1 3 Loosen drain cocks 2 to drain any moisture from air tanks If significant moisture is found check operation of...

Страница 145: ...rform shutdown procedure on page 3 14 or page 3 33 2 Locate fuel water separator on front fuel tank mount 1 3 Loosen drain cock 3 on underside of fuel filter 2 and allow all water to drain into a glas...

Страница 146: ...ering reservoir 1 Remove dipstick 2 and check fluid mark The fluid should be between the full 3 and add 4 marks within the crosshatched area of the dipstick 4 If fluid is low add steering fluid to bri...

Страница 147: ...Check 1 Perform shutdown procedure on page 3 14 or page 3 33 2 Remove valve stem cap 3 Check tire pressure using a good quality gauge 4 Add air if required inflate tires to air pressure located on sid...

Страница 148: ...re on page 3 14 or page 3 33 2 Locate reservoir breather 1 mounted on hydraulic tank 2 3 Depress breather plunger 3 to relieve hydraulic reservoir pressure 4 Spin reservoir breather counter clockwise...

Страница 149: ...procedure on page 3 14 or page 3 33 2 Open the battery box cover 3 Wearing eye protection visually inspect the batteries 1 Check terminals for corrosion Replace battery if it has a cracked melted or d...

Страница 150: ...oil drain plug 3 Drain oil into a suitable container 4 Unscrew bowl 4 and remove filter element from element location spigot in the filter head 5 Replace the filter element Verify that the designation...

Страница 151: ...visible notify maintenance personnel for adjustment or repair 1 Position unit in a safe level area 2 With brake system fully charged 125 psi apply digging brake stop engine and remove key 3 Install w...

Страница 152: ...Section 5 Lubrication Maintenance 5 38 80804002 NOTES...

Страница 153: ...ract side of the boom circuit 2 Direct the rod side oil into a waste container as the boom is SLOWLY pulled out 3 Once the boom is at the proper extension secure the telescoping boom to the main boom...

Страница 154: ...w the shift back to travel mode Towing When transporting the vehicle with one or all axles on the road it is possible to damage the axles if the wrong procedure is used before transporting begins Befo...

Страница 155: ...allons 30 liters Type of Coolant 50 50 ethylene glycol water Hydraulic System System Capacity XL3100IV 65 gallons 246 liters XL4100IV XL5100IV 70 gallons 265 liters Type of Oil Mobilfluid 424 Tractor...

Страница 156: ...XL4100IV XL5100IV Capacity 31 pints 14 7 liters Type of Fluid 80w90 1440 3126 Front Axle XL3100IV 4x4 Capacity 27 pints 12 8 liters Type of Fluid 80w90 1440 3126 Front Axle Wheel Ends XL3100IV 4x2 XL4...

Страница 157: ...ressure Lube 2 Capacities are approximate Check level to be sure Hydraulic Fluid Specifications Pour Point 46 F SSU 100 F 275 Flash Point 442 F Approved Supplier Type Mobil Mobilfluid 424 Tires Air Pr...

Страница 158: ...ing Weight 6x4 49 684 lb 22 536 kg Operating Weight 6x6 50 925 lb 23 099 kg Gross Vehicle Axle Rating 6x4 66 000 lb 29 937 kg Gross Vehicle Axle Rating 6x6 69 000 lb 31 928 kg XL5100IV Operating Weigh...

Страница 159: ...learance 10 in 254 mm Transport Length without bucket 25 1 ft 7 7 m Transport Height without bucket 6x4 10 11 ft 3 1 m 6x6 11 3 ft 3 4 m Transport Width without bucket 8 6 ft 2 6 m XL5100IV Wheelbase...

Страница 160: ...r Rod Retainer Quantity 6 Thread Size grade 5 8 11 8 Torque lubricated 200 215 lb ft 272 292 Nm Swing Bearing Quantity 72 Thread Size grade 5 8 11 8 Torque lubricated 200 215 lb ft 272 292 Nm Swing Mo...

Страница 161: ...grade 3 4 10 8 Torque lubricated 450 500 lb ft 610 678 Nm Front Axle U Bolt Nuts Quantity ALL Thread Size grade 3 4 10 8 Torque 300 310 lb ft 406 420 Nm Undercarriage Cab Steering Wheel Retaining Nut...

Страница 162: ...ad Size grade 7 8 14 8 Torque bolts in a 4 stage criss cross pattern Torque Stage 1 150 185 lb ft 203 251 Nm Torque Stage 2 280 315 lb ft 380 427 Nm Torque Stage 3 470 505 lb ft 637 685 Nm Torque Stag...

Страница 163: ...LT AUXILIARY POWER F23 SPARE ACCY B POWER F24 POWER OUTLET 2 F25 WIPER POWER F26 D C CONVERTER POWER F27 SPARE ACCY A POWER F28 SWITCH POWER F29 POWER OUTLET 1 F30 HEATER POWER F31 SP 1 SPARE 1 OAC191...

Страница 164: ...Section 7 Specifications 7 10 80804002 This Page Intentionally Left Blank...

Страница 165: ...check lug nut torque no damage or cracks Grab Handles and Steps secure and clean Tires proper inflation no damage adequate tread Horn clean and undamaged Air tanks open petcocks to drain water no dama...

Страница 166: ...Engine operates properly Upperstructure Lights Indicators and Gages function properly Dash Lights Indicators and Gages function properly Control Cut Out Lever controls do not operate while in the rai...

Страница 167: ...check lug nut torque no damage or cracks Grab Handles and Steps secure and clean Tires proper inflation no damage adequate tread Horn clean and undamaged Air tanks open petcocks to drain water no dama...

Страница 168: ...Engine operates properly Upperstructure Lights Indicators and Gages function properly Dash Lights Indicators and Gages function properly Control Cut Out Lever controls do not operate while in the rai...

Страница 169: ...Shutdown Remote Mode 3 33 Engine Shutdown Travel Mode 3 14 Excavating Buckets 4 2 F Fuel Level 5 21 Fuel Tank 7 2 Fuel Water Separator 5 31 Fuse Panel 7 9 G Grading Blade 4 4 H Hazards Lever 2 28 Hig...

Страница 170: ...S Safety Practices 1 1 Safety Signal Words 1 1 Service Maintenance Schedule 5 3 1st 30 Days 5 6 250 Hour 5 6 400 Hour 5 7 Annual 1500 Hour Max 5 9 Daily Shift 10 Hour Max 5 3 Monthly 125 Hour Max 5 5...

Страница 171: ...OVE SLOWLY Place one hand motionless in front of hand giving motion signal Raise load slowly shown EXTEND BOOM With both hands clenched point thumbs outward RETRACT BOOM With both hands clenched point...

Страница 172: ...H 44663 USA Phone 330 339 2211 Customer Support Toll Free 800 445 4752 Fax 330 339 3579 www gradall com Gradall Europe Division of Tieluiska Harkkokatu 6 FI 05800 Hyvink Finland Tel 358 0 20 759 0400...

Отзывы: