background image

24

EVERYDAY OPERATION

MAIN MENU

You can also select the required channel directly from the on-screen channel list. This is displayed using the FreeView

receiver’s Main Menu. First bring up the menu with the [MENU] key on the remote control handset.

Using the [UP] or [DOWN] keys on the remote control, make sure that the first item, Channel List, is highlighted and

press the [SELECT] key, to display the channel list.

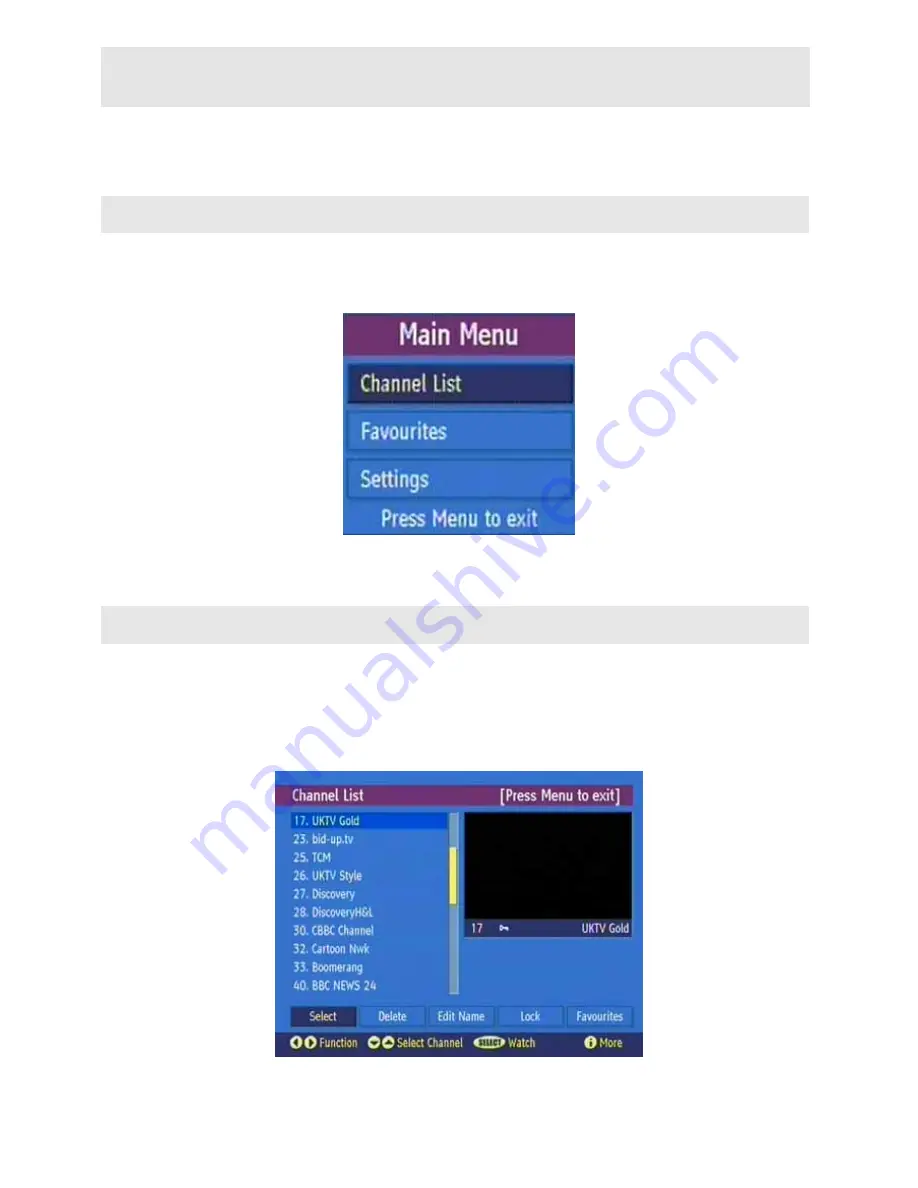
CHANNEL  LIST

Here, you can preview any channel stored by the receiver before viewing it full screen. The complete list of channels

is displayed in pages of 10 channels at a time, with their channel list number. The name and a quarter-screen image

of the channel last viewed is displayed in the top right of the screen.

Содержание GDVDR 305 DVBT

Страница 1: ......

Страница 2: ...HE CAMERA ANGLE DVD 57 BASIC PLAYBACK DVD VCD AUDIO CD 57 STARTING PLAYBACK FROM ON SCREEN MENU DVD VCD 58 STOPPING PLAYBACK DVD VCD AUDIO CD 58 PAUSING PLAYBACK DVD VCD AUDIO CD 58 REMOVING A DISC 58 PLAYING AT X2 X4 X6 OR X8 THE NORMAL SPEED DVD VCD AUDIO CD 58 PLAYING FORWARDS AND BACKWARDS IN SLOW MOTION DVD VCD 58 RESUMING PLAYBACK FROM THE SAME LOCATION DVD VCD AUDIO CD 59 LOCATING A SPECIFI...

Страница 3: ...ur own safety Use of performance control or adjustment procedures other than those specified may result in hazardous radiation exposure Do not open the covers and do not attempt to repair any damaged parts Please refer to a service technician or qualified personnel for any necessary repairs WARNING To reduce the risk of fire or electric shock do not expose this equipment to rain or moisture To red...

Страница 4: ...acuum Fluorescent Display VFD 15 Dolby Digital DTS LPCM audio via coaxial and optical digital audio outputs 16 Only for DVD Multiple aspect ratio support 16 9 Widescreen 4 3 Letterbox 4 3 Pan Scan 17 Only for DVD Multi audio up to 8 support according to disc content 18 Only for DVD Multi subtitle up to 32 support according to disc content 19 Only for DVD Multi angle up to 9 support according to di...

Страница 5: ... consequences Some discs may not be read at all Some discs may cause system crash after playing for a while Some parts of the disc may be skipped or worked abnormally Compare with the original discs the time passed for reading a CD R RW DVD R RW ande DVD R RWdiscs may be longer DUQLQJ 7R SUHYHQW ILUH VKRFN KD DUG R QRW H SRVH WKLV DSSOLDQFH WR ULSSLQJ RU VSODVKLQJ ZDWHU 7KH PDLQV SOXJ RU WKH DSSOL...

Страница 6: ...he disc in its case On cleaning Before playing clean the disc with a cleaning cloth Wipe the disc from the center out Discs that should not be used Only the discs including the marks shown on this page can be played See also title Supported Discs Note however that discs with special shapes heart shaped discs hexagonal discs etc cannot be played Do not attempt to play such discs as they may damage ...

Страница 7: ...o the mains WIRING INSTRUCTIONS Your receiver is designed to operate on 230 to 240V AC 50Hz current only Connecting it to another power source may damage the receiver The wires in the mains lead are coloured as follows Blue Neutral Brown Live WARNING To prevent electric shocks do not remove the cover IMPORTANT The colours of the wires in the mains lead from your receiver may not be the same as the...

Страница 8: ... or give you an electrical shock Check the power cord once in a while When you find it damaged ask closest service agent for help When the AC power cord need to be changed it should be done at a qualified service shop only Choice Of Location Please do not place the set in a place subject to direct sun light excessive dust or mechanical shock or in a location near heat sources The set should be pla...

Страница 9: ...l cable plug from your TV set Insert it into theANTENNAsocket at the back of the DVD recorder 2 Insert one end of the supplied aerial cable into the TV socket at the back of the DVD recorder and the other end into the aerial input socket at the back of the TV set 3 Plug a scart cable into the scart socket OUTPUT to TV at the back of the DVD recorder and the scart socket for the DVD recorder at the...

Страница 10: ...socket on the GDVR 305 DVBT Connect the other end to the TV Aerial In Out socket 4 Connect an RF Loop through aerial cable to the TV aerial Out socket on the Sky Box Connect the other end to the aerial input socket on the GDVR 305 DVBT 5 Connect a Scart Lead to the SKY Box AV1 socket and the other end to the GDVR 305 DVBT Scart IN socket 6 Connect another Scart Lead to SKY Box AV2 socket and the o...

Страница 11: ...V operating instructions 4 Insert one end of the supplied audio Cinch cable into the red white Cinch socket L R AUDIO OUT at the back of the DVD recorder and the other end into the audio input socket usually red white on the TV set usually labeled Audio in or AV in See TV operating instructions 5 Switch on the TV set Switch the TV set over to this input socket or select the relevant channel number...

Страница 12: ...n or AV in See TV operating instructions 4 Insert one end of the supplied audio Cinch cable into the red white Cinch socket L R AUDIO OUT at the back of the DVD recorder and the other end into the audio input socket usually red white on the TV set usually labeled Audio in or AV in See TV operating instructions 5 Switch on the TV set Switch the TV set over to the Video Audio input socket or select ...

Страница 13: ...th two channel analogue stereo HIW 5LJKW XGLR FRQQHFWLRQ WR L L L L 8 2 287 8 2 1387 5 HIW 5LJKW XGLR 6RFNHW CONNECTING AUDIO DEVICES TO THE DIGITAL AUDIO SOCKET At the back of the DVD recorder there is a digital audio output sockets DIGITALAUDIO OUT for an optical and coaxial cable These can be used to connect the unit to an external audio amplifier RD LDO 2SWLFDO LJLWDO XGLR FRQQHFWLRQ WR LJLWDO...

Страница 14: ...yback is started on this additional device DVD recorder automatically connects the INPUT OUTPUT VCR STB scart socket with the OUTPUT to TV scart socket CONNECTING EXTERNAL VIDEO RECORDERS DVD PLAYERS You can connect a video recorder or DVD player to the INPUT OUTPUT VCR STB socket Please note Most pre recorded video cassettes and DVDs are copy protected If you try to copy them you will see a prohi...

Страница 15: ... the camcorder 5 6 9 6 HIW 5LJKW XGLR DQG 9LGHR 6RFNHW DPFRUGHU 6 9LGHR 6RFNHW 9 5 H F R U G H U Connect Camcorder to the Front Sockets of DVD Recorder BASIC OPERATIONS When you power on the unit it will 1 Load the disc if there is one inside the tray 2 Switch to monitor mode if there is no disc Whenever your recorder is in stop mode it will switch to monitor mode For transitions between the disc ...

Страница 16: ... 6 5 02 67 1 23 1 26 3 02 220 5 3 7 7 7 8 0 18 67 1 23 1 26 63 1 2 7 7 9 67 1 23 1 26 220 5 3 7 0 18 7 79 63 1 2 7 7 8 3 02 7 7 6 783 5 7851 7 552 6 6 7 6723 æ 6 3 25 5 6 3 5 3 3 86 6 5 25 5 6 5 5 5 02 79 9 16 57 37 5 5 25 9 2 6285 7 0 5 6 5 02 9 1 68 7 7 8 2 180 5 6 352 5 0 6 783 7 79 5 7851 7 012 345 678 9 ...

Страница 17: ...ill switch to monitoring state 17 SKIP BACKWARD Press the button during playback Previous chapter film or previous title Only for DVD Press the button during pause mode Plays one frame back at each press 18 SKIP FORWARD Press the button during playback Next chapter film or next title Press the button during pause mode Shows next frame at each press 19 SEARCH FORWARD Fast forward in x2 x4 x6 x8 20 ...

Страница 18: ...r film or previous title Only for DVD Press the button during pause mode Plays one frame back at each press 6 NEXT Press the button during playback Next chapter film or next title Press the button during pause mode Shows next frame at each press 7 PROGRAM Goes to next programme while watching TV 8 PROGRAM Goes to the previous programme while watching TV 9 REC MODE Record type quality To select the...

Страница 19: ...ENNA INPUT Connect the TV aerial to this socket 3 ANTENNA OUTPUT Connect the aerial loop through cable here and to TV aerial input 4 5 DIGITALAUDIO OUT Connection of a digital audio device amplifier receiver 6 AUDIO OUT Left Right Center Subwoofer Analog audio output to an external audio amplifier Surround Left Surround Right AUDIO 7 OUT S VIDEO Y C Video output Connection of an S Video compatible...

Страница 20: ...remaining DTS DTS audio signal is available on the digital audio output DD A Dolby digital audio signal is available on the digital audio output PCM A PCM audio signal is available on the digital audio output Playback in progress Playback record interrupted Pause RECORD Recording in progress TIMER Arecording timer has been programmed 2CH During playback a HiFi 2 channel tone was detected or a HiFi...

Страница 21: ...wing discs can be used in your DVD recorder for playback and recording Playback and recording DVD RW Digital Versatile Disc rewritable DVD R Digital Versatile Disc recordable Playback Only DVD Video Digital Versatile Disc DVD R DVD Recordable DVD RW DVD Rewritable These discs can only be played back if the recording was made in video mode and the recording was finalized 5HFRUGDEOH Audio CD Video C...

Страница 22: ...of the DVD recorder and the enclosed batteries 2x 1 5 V R03 AAA batteries 2 Open the battery compartment insert the batteries as shown and then close the compartment The remote control range is approximately 5 to 10 metres 5HPRWH FRQWURO VLJQDO VHQVRU 2 5 7 85 1 3 3 8 6 67 23 6 7 6 3 6 5 35 2 5 0 5 02 79 9 5 25 7 68 7 7 0 21 72 5 8 2 1 6 5 02 5 67 1 23 1 2 6 2 20 7 0 5 5 3 7 6 78 3 0 1 8 67 1 23 1...

Страница 23: ...arch selection menu is displayed on the screen Using the LEFT or RIGHT keys on the remote control make sure that the YES button is highlighted and press the SELECT key to start the automatic search The DVB T receiver will automatically tune to the UHF transmission channels 21 to 68 looking for digital terrestrial TV broadcasts and displaying the names of channels found This process may take about ...

Страница 24: ...r will display a message Check that an aerial is connected to the aerial input socket of the recorder NOTE Important that you must NOT turn off the recorder within 5 seconds after the automatic search since the unit is updating the program table and all channels may be lost ...

Страница 25: ...or DOWN keys on the remote control make sure that the first item Channel List is highlighted and press the SELECT key to display the channel list CHANNEL LIST Here you can preview any channel stored by the receiver before viewing it full screen The complete list of channels is displayed in pages of 10 channels at a time with their channel list number The name and a quarter screen image of the chan...

Страница 26: ...adcasters and some longer names are abbreviated to become unrecognisable You can edit the names to suit your preferences with the Edit Name function Highlight the channel to be renamed highlight the EDIT NAME button at the base of the screen using the LEFT or RIGHT keys and press SELECT The highlighted channel name appears on the right of the screen with the first character highlighted by a cursor...

Страница 27: ...l handset to display the Main Menu and then using the UP or DOWN keys on the remote control make sure that the first item Channel List is highlighted and press the SELECT key Highlight the channel to be locked using the UP or DOWN keys You can move through the list 10 channels in one jump using RED Play Mode or GREENZoom Now select the LOCK button at the base of the screen with the LEFT or RIGHT k...

Страница 28: ... MENU key to display the Main Menu and highlight Settings then press SELECT to display the Settings menu In Settings menu highlight Configuration and press SELECT to open Configuration screen Highlight the Favourite Mode line and using the LEFT or RIGHT keys to change and SELECT to apply the settings When you leave the Configuration menu by pressing MENU the favourite mode is activated Now changin...

Страница 29: ...ration menu screen is accessed from the Settings Menu Press the MENU key to display the Main Menu and use UP and DOWN keys to highlight Settings line then press SELECT key to open Settings menu Again use UP and DOWN keys to highlight Configuration line and press SELECT key to open Configuration menu screen By means of this menu you can configure the unit ...

Страница 30: ... mode are not effective in DVD mode FAVOURITE MODE This function enables or disables the favourite channel list mode In this mode you can also choose favourite channel list CHANNEL LIST There are three kinds of channels which are TV radio and text channels This function enables or disables the categorised channel list mode EPG PREFERENCE Highlight the line in the Configuration menu and use the LEF...

Страница 31: ... lock setting through Disabled Main Menu and Installation The Main Menu setting will lock out the complete menu system the Installation Menu setting locks only the Installation menu see ADVANCED OPERATION Re installation and the Disabled setting allows free access to any of the menus You must return to normal TV viewing by pressing the MENU key three times to activate the lock Now any attempt to a...

Страница 32: ... keys highlight Audio or Subtitle Language With LEFT or RIGHT buttons you can set the preferred language The chosen language will be seen in subtitles To activate your recent settings press SELECT Current via SELECT button current language can be changed By pressing UP and DOWN keys highlight Audio or Subtitle With LEFT or RIGHT buttons you can set the preferred language To activate your recent se...

Страница 33: ...n highlight the Installation line and press SELECT to open Installation Menu You can either perform an automatic search or manual search to add channels MANUAL SEARCH The FreeView receiver can search for channels automatically searching all the broadcast frequencies for free to air channels or manually searching one specified broadcast frequency only for any channels to be found there This is for ...

Страница 34: ...hin digital teletext pages These usually require the TEXT button to be pressed to activate the digital teletext pages In both cases moving through the different pages of information is accomplished in a variety of ways dependent on the individual broadcasters but including use of the UP DOWN LEFT RIGHT and SELECT keys to select items from on screen menus and the coloured keys to jump directly to p...

Страница 35: ... displaying a widescreen programme the WIDE key switches between displaying the picture with black bars at the top and bottom of the screen and filling the whole height of the screen but cropping the sides off according to instructions broadcast with the programme called pan and scan The effect of the WIDE key on the picture display is cancelled by pressing WIDE again Only for FreeView SUBTITLE Su...

Страница 36: ...nel by pressing OK key Press MENU key to view the 7 day EPG Press UP or DOWN to navigate in Channels or Programmes LEFT and RIGHT key to navigate through the channel and program list With RED GREEN keys you can change schedule time By pressing YELLOW BLUE you can advance the schedule backward forward of a day If you press info key you can see easily the detailed help information and by pressing in...

Страница 37: ...el when the reminder time is reached HOW TO RECORD USING EPG One of the special features of the unit is you can set a reminder to record in Now Next mode and in 7 Day EPG mode In Now Next mode you can only record when you choose Next mode Areminder is set from the Electronic Programme Guide screen Press the GUIDE key to display the EPG screen Press SELECT when a programme you want to watch is high...

Страница 38: ...ity of recording insert a disc in your unit When you are setting reminder for a programme if the time of the programme is in the past or there is another reminder that starts at the same time a warning message will be displayed and the reminder will not be set Also if you try to set a reminder to record on a programme whose time is in the past or coincides with another selected programme or a warn...

Страница 39: ...d Menu displayed on the TV is as follows The functional definitions of the menu items are defined below WATCH TV When you select this option you will be able to watch channels stored by the FreeView digital tuner By means of this feature the unit can switch to recent watched mode ...

Страница 40: ...If you go on a title and press Display button editing menu appears on the screen Play can be used to play any type of discs Play title Plays the current title Title Delete Title will be deleted from disc If there are other titles after the deleted one you will not be able to use this free space for recording Title Rename You can rename the title using the keyboard on screen Cancel The pop up menu ...

Страница 41: ...40 Edit Disc option will be enabled only for DVD R RW discs You need to stop playback and you can enable this item in monitor mode In DVD R disc TITLE RENAME should be done before FINALIZE DISC ...

Страница 42: ...41 ...

Страница 43: ...to activate Record Show You can make the general settings of your recordings in this menu these are 1 Record Time 4 Channel 2 Frequency 5 Quality 3 Input Source 6 Title In Record Show menu you can set the start end times and the date of the recording Firstly set your record time by pressing SELECT ...

Страница 44: ... the frequency of your recordings You can set timer for any of the Input Source FreeView input scart input front panel composite input and front panel S video input If you select the FreeView input you will also need to set the program number ...

Страница 45: ...44 Channel number setting is enabled when in Input Source FreeView is selected Set the Quality level of the recording Give a title to your recordings To activate the changes made press DONE ...

Страница 46: ...itle date and source of the timer in this list If your source is FreeView input you will see the program number in the source section You can also set timer from the EPG in Freeview Timer set from EPG menu will be displayed in My Record List You can delete via SELECT button the timer set from EPG menu using My Record List ...

Страница 47: ...ed out this means that the selection interacts with one or more other selections that are set in such a way to render the greyed out selection inoperable Setup menu item will only be active when your system is not in Playback mode With LEFT button you can exit from the menus RECORDING SETUP RECORDING QUALITY Best Extreme Play highest quality 1 hour recording High Standard Play high quality 2 hour ...

Страница 48: ...UR LPDWH RXU RXU RXU DSSUR LPDWH DSSUR LPDWH DSSUR LPDWH AUTO CHAPTER You can select different chapter insertion periods or cancelAuto Chapter function 4 periods exist 4 10 20 30 minutes If this feature is not OFF title will be automatically divided into chapters during recording The selected option on this menu determines the period of chapters DVD CONTROL ...

Страница 49: ...k option press button SELECT when DVD Control menu is highlighted On Displays a symbol to let you know when different camera angle information is available on a DVD Off You are not informed of a different camera angle information GENERAL ...

Страница 50: ...ULTS When you choose Factory Defaults option after resetting all your Setup options back to factory settings the device will switch to standby mode automatically When the standby button is pressed to switch the recorder on first time installation starts System will switch to FreeView mode and the folllowing message box will appear ...

Страница 51: ...n now watch digital terrestrial television selecting the channel you require as described in the next section If no channels are found during program search you will be prompted to set the clock If any channel is found system will adjust the time automaticallyfrom the broadcast NOTE You can not do factory defaults if any disc is in unit POWER SAVING There are two states to choose ON If you want to...

Страница 52: ...V Display controls the presentation of the picture on the screen Normal PS Display 16 9 source on normal 4 3 aspect ratio TV display as pan and scan if available on DVD PS Normal LB Display 16 9 source on normal 4 3 TV display as letter box LB Wide Display 16 9 source on special 16 9 wide screen TV ...

Страница 53: ...pports both NTSC and PAL NTSC Select this option if your TV supports only NTSC PAL Select this option if your TV supports only PAL VIDEO OUTPUT S video Set output to S video format RGB Set output to RGB video suitable also for a projector or computer monitor ...

Страница 54: ...ons to agree with the speakers installed in your home entertainment system Lt Rt Method of down mixing from 5 1 channel to 2 channel which is well suited as input to an external DolbyPro Logic Decoder 2 channel to 4 channel expansion Stereo Converts 5 1 channel information to stereo Off Downmix will be off and 5 1 channel outputs will be active Please refer to the speaker settings to adjust your s...

Страница 55: ...54 CENTER On Turn on center speaker Off Turn off center speaker REAR On Turn on Rear Speakers Off Turn off Rear Speakers SUBWOOFER On Turn on Subwoofer Off Turn off Subwoofer ...

Страница 56: ...speaker and the listener REAR DELAY Increasing or decreasing the delay setting should be done according to the rear speakers and the listener SPEAKER SETUP SPEAKER TEST On Plays a single tone in step wise fashion at each of the speakers in the clockwise direction Off Test Tone feature is not enabled ...

Страница 57: ...control is useful to turn down the level of loud passages explosions car crashes and the like while at the same time keeping soft passages loud enough to clearly hear them The setting is expressed as a fraction of the full dynamic range You can adjust the level off the dynamic range compression to different levels between off and full ...

Страница 58: ...designated on the DVD packaging conforms to your region Region encoding setting cannot be altered through Setup Menu CHANGING THE CAMERA ANGLE DVD Some DVDs provide multiple shots of a selected scene each from a different camera angel so you can choose which angle you are most interested in viewing Asmall icon appears on the screen if you set angel mark feature ON from setup menu when multiple ang...

Страница 59: ...REMOVING A DISC Press Open Close butt on the remote control or button on front panel Remove the disc and press the same button to close the tray PLAYING AT X2 X4 X6 OR X8 THE NORMAL SPEED DVD VCD AUDIO CD You play back a disc at x2 x4 x6 or x8 the normal speed 1 Press SEARCH8 or SEARCH 7 buttons during playback 2 Press the same buttons to change the speed 3 To resume the normal playback press PLAY...

Страница 60: ...n the screen highlight over your selection and press select Alternatively you can press the number of the desired chapter MOVING TO A SPECIFIC TITLE OR CHAPTER DVD Press Search Mode button and enter the number of the desired chapter To change title number press left arrow button and then enter the number MOVING TO A SPECIFIC ELAPSED TIME DVD VCD AUDIO CD At DVD to go directly to any point of the c...

Страница 61: ...2 and again x3 2 Pressing Zoom again turns zoom off 3 While zoomed you can change the viewpoint by pressing the direction buttons VIEWING JPEG PICTURES If you save JPEG pictures to a CD you can view them on a TV 1 Open the disc tray insert the JPEG disc and close the tray Open Close 2 You will see a Smart Navi menu Using arrow keys you can navigate on this menu You can enter to a folder by presing...

Страница 62: ...lease wait for a moment SMARTNAVI appears Directories and files are listed on the left part 5 Press UP 5 DOWN 6 to select file to be played In the stop mode you can navigate in all directories If an MP3 track is playing only the current directory can be used for navigation 6 Press SELECT on a file to play If a file is focused on the left part the preview of the item is displayed If a folder is foc...

Страница 63: ...ress PLAY PAUSE NOTE No sound will be heard during fast forward or reverse Skip Forward Backward Press SKIP FRAME 9 or during playback Next playable file in the current directory will be played Image Transformation For JPEG File Press PLAY PAUSE to start slide show There are four modes for transformation Invert Mirror Left Right These operations are allowed only when a picture is being displayed n...

Страница 64: ...eat Disc Single and Folder repeat modes are available Displaying the Time Information Press DISPLAY to change displayed time mode Elapsed Remaining time is displayed on screen Program Function For MP3 and JPEG Press PLAY MODE to select program mode in stop mode PROGRAM Message appears Press number buttons to select files in the current directory Alternatively you can use UP 5 DOWN 6 buttons and th...

Страница 65: ...lease checkout your setup before starting a record process and assemble the correct configurations for starting record process When the unit is turned on the recorder switches to monitor mode and the latest program that has been watched before turning the unit off will be active If the unit is switched on due to a timer recording event unit will tune to the programmed channel HOW TO INITIATE AND S...

Страница 66: ...ording your DVD recorder needs to know the date you want to make the recording the input source you want to make the recording FreeView scart in composite in s video in the program number of the TV channel if your input source is FreeView the start and stop time of the recording the recording mode recording quality You can also set timer for recording by electronic programme guide in FreeView mode...

Страница 67: ...ding 6 To complete the record time event turn off the recorder by pressing the Power Standby button on the remote At the programmed time the recorder will power up and record the selected channel and power off again once completed NOTE Very important that there is sufficient disc space to cover the recorded time HOW TO CREATE RECORDING ITEM 1 Press setup menu 2 Choose record program 3 Choose recor...

Страница 68: ...y The timer list is circular so after the maximum recording time it returns back to the beginning OTR time periods are followed as XP 30 min 60 min SP 30 min 60 min 90 min 120 min LP 30 min 60 min 90 min 120 min 150 min 180 min 210 min 240 min EP 30 min 60 min 90 min 120 min 150 min 180 min 210 min 240 min 270 min 300 min 330 min 360 min LIMITATIONSAND SOME OTHER FEATURES RECORDER FEATURES AND LIM...

Страница 69: ...TROUBLESHOOTING FOR DVB If you experience problems with the FreeView receiver or its installation in the first instance please read carefully the relevant sections of this User Guide and this Troubleshooting section ...

Страница 70: ...er recording does not work Checks 1 Make sure that the system time and record start time are set correctly Time will be displayed when the recorder switches to standby in power saving off mode 2 You will not be able to record if the program number found during automatic search does not contain an active channel Problem Can not set a recorder reminder by EPG Checks 1 Make sure the event that wanted...

Страница 71: ... 5 and UK Engine Profile1 Object carousel support compliant with ISO IEC 135818 6 and UK DTT Profile RECEPTION Frequency range 474 858MHz Signal level 82dBm Transmission standards FreeView MPEG 2 Demodulation COFDM with 2K 8K FFT mode FEC all DVB modes Video MP ML PAL 4 3 16 9 Audio MPEG Layer I II 32 44 148kHz CONNECTIONS UHF aerial input UHF aerial loop through ...

Страница 72: ...6RFNHW RPSRVLWH YLGHR LQ 5HDU 03 9LGHR 6WDQGDUG HFRGLQJ 03 VXSSRUWHG XOO 6FUHHQ 9LGHR LVSOD RI 3 176 SL HO DQG IUDPH UHIUHVK UDWHV 3 176 LJLWDO ELW VWUHDP SURFHVVLQJ UDWH XS WR 0ELWV VHF LQH UHVROXWLRQ PRUH WKDQ OLQHV 9LD 6 57 URQW LWK XVLQJ ELWV 0 YLGHR V 6 9 2 3 176 1HJDWLYH V QFKURQLVHG 9SS RKP ORDGHG 2XWSXW 9SS RKP ORDGHG 2XWSXW P9SS RKP ORDGHG 176 9 L G H R P9SS RKP ORDGHG 3 URQW 5HDU 2XWSXW ...

Страница 73: ...vailability is determined by the disc s manufacturer Title Number These numbers are recorded on DVD discs When a disc contains two or more movies these movies are numbered as title 1 title 2 etc Track Number These numbers are assigned to the tracks which are recorded on AudioCDs They enable specific tracks to be located quickly Video CD This contains recordings of pictures and sound whose quality ...

Страница 74: ...73 I RX RUJHW 7KH 3DVVZRUG XW WKLV LQIRUPDWLRQ ER RXW DQG NHHS LQ D VDIH SODFH 3UHVV 7KHQ SOHDVH VHW RXU SHUVRQDO SDVVZRUG ...

Страница 75: ...74 ...

Отзывы: