background image

318

Installatie en aansluiting van het apparaat

Gewiss

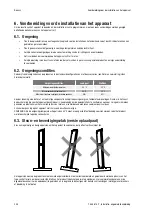
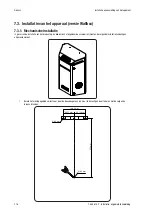
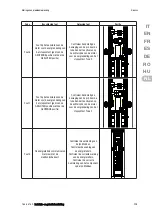
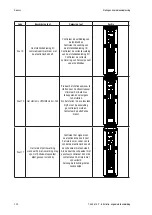
In geval van de installatie van het product op de 

paal

 (via het accessoires GW46551) moeten de volgende installatiehandelingen 

uitgevoerd worden:

1. 

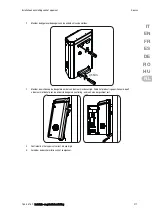
Monteer de steunbeugels aan de onderkant van de wallbox zoals is weergegeven op de afbeelding:

2. 

Positioneer de wallbox op de paal, en zet hem vast door de borgmoeren van de twee platen vast te draaien zoals 
is weergegeven op de afbeelding;

7.55.4.515.2 - Installatie- en gebruikshandleiding

Содержание JOINON

Страница 1: ...so Installation and Operation Manual Manuel d installation et usage Manual de instalación y uso Installations und Bedienungsanleitung Manual de instalare și utilizare Telepítési és használati útmutató Installatie en gebruikshandleiding ...

Страница 2: ......

Страница 3: ...Italiano IT English EN Français FR Español ES Deutsch DE Romanian RO Hungarian HU Nederlands NL ...

Страница 4: ...4 Gewiss 7 55 4 515 2 Manuale d installazione e uso ...

Страница 5: ...ll alimentazione del dispositivo 18 7 3 Installazione del dispositivo versione WallBox 22 7 3 1 Installazione meccanica 22 7 3 2 Collegamento dell alimentazione del dispositivo 26 8 Funzionamento 27 8 1 Autostart 27 8 2 Stand Alone con lettore di tessere RFID 27 8 3 Stand Alone con Restart e lettore di tessere RFID 27 8 4 Via mobile APP e piattaforma cloud OCPP 27 9 Indicazioni di stato 28 9 1 LED...

Страница 6: ...e norme le direttive e le leggi in materia di sicurezza applicabili agli interventi di installazione e funzionamento di questo dispositivo La selezione del personale qualificato è sempre responsabilità della società che effettua l intervento in quanto unica responsbile di decidere se il lavoratore è idoneo adatto a svolgere un determinato lavoro tutelandone così la sicurezza e rispettando la legge...

Страница 7: ...O NN EC TTH EPLUG DO WNL OA D JO INON AP PLICATION AN DSIGN UP dow nloa dthe App the QR code isund er the plug ww w joinon com 1 2 3 4 SC AN TH EQR CO DE BE LOW RE FIL LYO UR WALLET CO NN EC TTH EPLUG DO WNL OA D JO INON AP PLICATION AN DSIGN UP dow nloa dthe App the QR code isund er the plug Legenda a Top g Serratura con chiave di sicurezza m MT b Led RGB stato prese h Etichetta tecnica n Contato...

Страница 8: ...ments for conductive connection to an AC DC supply EMC requirements for off board electric vehicle charging systems EN 61000 6 1 Compatibilità elettromagnetica Parte 6 1 Norme generiche Immunità per gli ambienti residenziali commerciali e dell industria leggera EN 61000 6 3 Compatibilità elettromagnetica Parte 6 3 Norme generiche Emissioni per gli ambienti residenziali commerciali e dell industria...

Страница 9: ...emporaneo della presa Tipo 2 e della Schuko dello stesso lato ma solo 1 presa per lato Le prese Schuko in questi modelli sono montate sulla parte frontale del pannello NOTA L accesso e l utilizzo delle prese IEC 60884 1 e norme nazionali è permesso solo in contesti privati o con limitazioni di accesso Anche per la variante I ON Wallbox è disponibile uno specifico modello dotato di una presa Tipo 2...

Страница 10: ...che riguardino l apparecchiatura elettrica L apertura dell involucro non implica l assenza di tensione all interno Intervenire sull apparecchiatura solo dopo avere tolto tensione all impianto mediante un apparecchio idoneo a garantire la funzione di isolamento Può essere aperta solo da personale qualificato seguendo le istruzioni riportate nel presente manuale È obbligatorio leggere e comprendere ...

Страница 11: ...Non disinserire né collegare alcun terminale mentre il dispositivo è in funzione Disinserire e verificare l assenza di tensione prima di eseguire qualsiasi operazione 3 2 Dispositivo di protezione individuale DPI Quando si lavora sul dispositivo utilizzare almeno le seguenti dotazioni di sicurezza Denominazione Spiegazione Calzature di sicurezza In conformità alla norma UNE EN ISO 20345 2012 o ult...

Страница 12: ...to per evitarne il deterioramento occorre procedere come indicato di seguito Per la corretta conservazione delle stazioni di ricarica non rimuovere l imballaggio originale fino al momento dell installazione Il deterioramento dell imballaggio tagli fori ecc impedisce una corretta conservazione delle stazioni di ricarica prima dell installazione Mantenere pulito il dispositivo eliminare polvere truc...

Страница 13: ...portarlo verticalmente senza l imballaggio ma solo per una breve distanza Movimentazione del dispositivo disimballato Devono essere rispettate almeno le seguenti prescrizioni 1 Seguire i consigli ergonomici fondamentali per evitare lesioni sollevando pesi 2 Non rilasciare il dispositivo finché non è perfettamente fissato o appoggiato 3 Seguire le indicazioni di un altra persona che faccia da guida...

Страница 14: ...to 25 C 25 C Temperatura massima di funzionamento 50 C 50 C Umidità relativa massima senza condensa 95 95 È opportuno ricordare che occasionalmente si potrebbe produrre una condensa moderata come conseguenza degli sbalzi di temperatura Perciò oltre alla protezione di cui dispone l apparato è necessario monitorare le stazioni di ricarica quando vengono messe in servizio in luoghi in cui è probabile...

Страница 15: ...e configurazione permette di tracciare una sola linea di alimentazione e di realizzare un unico plinto su cui installare due prodotti come di seguito illustrato FRONT FRONT 2 cm Le due unità di ricarica devono garantire una distanza minima di 2 cm tra le pareti di fondo NOTA La superficie sulla quale verrà installata la stazione di ricarica deve essere opportunamente progettata e realizzata in con...

Страница 16: ...urezza omologati per i rischi elettrici Tutte le operazioni di installazione devono essere eseguite rispettando le normative e le leggi in vigore in materia di sicurezza e seguendo il manuale di istruzioni 7 1 Requisiti generali di installazione Il dispositivo deve essere installato in un ambiente adatto che soddisfi le indicazioni descritte nel capitolo 6 Preparazione per l installazione del disp...

Страница 17: ...nteriore con apertura a chiave per rendere più facile l installazione ed i collegamenti Aprire l accesso mediante la chiave fornita La chiave di sicurezza è rimovibile solo con la completa chiusura della porta 3 Accoppiare il basamento di fissaggio preventivamente fissato a terra con la stazione di ricarica 4 Fissare la colonnina sul basamento serrando i dadi sui perni indicati in figura La coppia...

Страница 18: ...sacavo idoneo I pressacavi disponibili sono M50 M40 M32 per i cavi di potenza evidenziati in giallo e M16 per i cavi dati evidenziato in rosso A seconda della versione di unità di ricarica i pressacavi e tappi forniti in dotazione sono i seguenti Versione Pressacavi forniti Tappi forniti Monofase 7 4 kW M40 M32 M50 Trifase 11 kW M32 M40 M50 Trifase 22 kW M40 M32 M50 2 Collegare i cavi di alimentaz...

Страница 19: ...re le protezioni differenziali e magnetotermiche in posizione ON e alimentare la colonnina 3 1 Per la colonnina con Restart procedere con l attivazione del dispositivo come illustrato di seguito 2 1 Alimentare la colonnina e verificare che il led del dispositivo sia acceso LED verde 4 Verificare il corretto funzionamento delle protezione differenziali premendo l apposito tasto di test RESTART 7 55...

Страница 20: ...zzato il messaggio di stato a seconda del modello La stazione è pronta e resta in attesa di identificazione dell utente per procedere alla ricarica versione backend e RFID o di un avvio ricarica versione Autostart Se la stazione individua qualche difetto di funzionamento l illuminazione della presa corrispondente o di entrambe cambia colore a seconda del difetto riscontrato vedi capitolo Guasti e ...

Страница 21: ...21 Installazione e collegamento del dispositivo Gewiss 7 55 4 515 2 Manuale d installazione e uso Manuale d installazione e uso IT EN FR ES DE RO HU NL ...

Страница 22: ...caso di installazione del prodotto a muro tramite accessorio fornito in dotazione le operazioni di installazione sono le seguenti 1 Preparare opportunamente l area di montaggio fissando la staffa di supporto al muro forando con i seguenti interassi 189 5 mm 513 mm 94 75 mm 94 75 mm Ø6 5 mm Ø6 5 mm 7 55 4 515 2 Manuale d installazione e uso ...

Страница 23: ...amente fissata al muro Una volta posizionato il prodotto forare la parete utilizzando come centraggio la staffa inferiore e avvitare la vite di blocco 4 Verificare che il dispositivo sia stato fissato in modo corretto 5 Rimuovere la pellicola protettiva dal pannello frontale 7 55 4 515 2 Manuale d installazione e uso Manuale d installazione e uso IT EN FR ES DE RO HU NL ...

Страница 24: ... accessorio GW46551 le operazioni di installazione sono le seguenti 1 Montare sul fondo della wallbox le staffe di supporto come indicato in figura 2 Posizionare la wallbox sul palo ed assicurarla stringendo i dadi di blocco delle due piastre come indicato in figura 7 55 4 515 2 Manuale d installazione e uso ...

Страница 25: ...avi idonei I pressacavi disponibili sono M25 e M32 per i cavi di potenza evidenziati in giallo e M16 per il cavo dati evidenziato in rosso A seconda della versione di unità di ricarica i pressacavi e tappi forniti in dotazione sono i seguenti Versione Pressacavi forniti Tappi forniti Monofase 7 4 kW 2x M25 2x M32 Trifase 11 kW 2x M25 2x M32 Trifase 22 kW 2x M32 2x M25 NOTA qualsiasi sia il tipo di...

Страница 26: ...2 S2 T2 N2 R S T Fasi R S T N Neutro PE Terra Stazione di ricarica trifase 3 Per quanto riguarda il collegamento del circuito ausiliario che alimenta la scheda ed i dispositivi elettronici ci sono due morsetti dedicati L7 N3 È possibile collegare una terza linea appoggiandosi ad una linea di continuità oppure realizzare un cavallotto tra L1 R1 e L7 e tra N1 e N3 Eventualmente è possibile realizzar...

Страница 27: ...di tessere RFID La funzione di Restart permette la richiusura automatica della protezione differenziale in caso di intervento intempestivo In caso di intervento dell interruttore differenziale 1 la torretta segnala l anomalia e blocca la ricarica del veicolo 2 l utente deve disconnettere il veicolo dalla colonnina 3 Restart effettua una verifica di isolamento del circuito interno della colonnina 4...

Страница 28: ...ali azioni sono richieste PROCESSO DI RICARICA Testo a display Descrizione PASSA LA TESSERA PER RICARICARE La stazione nella modalità RFID è in attesa della lettura di una tessera RFID per verificarne l idoneità ed iniziare il processo di ricarica CARTA ABILITATA ATTENDERE La tessera RFID è stata riconosciuta dal sistema ATTENZIONE TESSERA NON VALIDA La tessera RFID non è stata riconosciuta e non ...

Страница 29: ...tore la stazione entra in modalità cancellazione È necessario passare una tessera RFID alla volta per cancellarla dalla white list locale 9 3 Illuminazione all interno della presa Tipo 2 I modelli dotati di presa T2 antivandalo e con modalità di funzionamento Stand Alone con RFID e via mobile APP e piattaforma cloud OCPP contengono all interno una illuminazione a LED che si accende in modo intermi...

Страница 30: ...mpeggiante RICARICA IN CORSO Ts 0000 Tc 0000 8 Rimuovere la spina dalla presa inserita nella stazione di ricarica Da verde lampeggiante a verde fisso CARICA TERMINATA RIMUOVERE IL CAVO RIEPILOGO SESSIONE Ts 0000 Tc 0000 9 Se la stazione non riscontra errori ritorna nello stato di stand by Verde fisso INSERIRE SPINA PER AVVIARE LA RICARICA NOTA Per terminare la ricarica sarà necessario interrompere...

Страница 31: ...ID2 UID3 6 Una volta creata la struttura e salvato il file nella microSD inserire nuovamente la microSD nella scheda elettronica 7 Alimentare nuovamente la stazione di ricarica 8 Se la procedura è stata realizzata senza errori la stazione importerà il file e i dati in esso contenuto Sul display sarà mostrato il messaggio CONFIGURAZIONE COMPLETATA Al termine della procedura di importazione il file ...

Страница 32: ... errori ritorna nello stato di stand by Verde fisso PASSA LA TESSERA PER RICARICARE 10 3 Stand Alone con Restart e con lettore di tessere RFID Vedi sezione 10 2 10 4 Via Mobile APP e piattaforma cloud OCPP La stazione di ricarica in questa modalità è connessa ad una piattaforma di controllo utilizzando il protocollo OCPP Il protocollo OCPP permette alla stazione di collegarsi a qualsiasi piattafor...

Страница 33: ...l lavoratore è idoneo adatto a svolgere un determinato lavoro tutelandone così la sicurezza e rispettando la legge applicabile in materia di sicurezza sul lavoro Tali società devono impartire una formazione adeguata sui dispositivi elettrici al proprio personale e fare in modo che questo prenda dimestichezza con il contenuto del presente manuale Codice Descrizione errore Risoluzione errore Posizio...

Страница 34: ...ircuito interno della colonnina in tal caso è necessario verificare il circuito tra l interruttoredifferenziale e il contattore Errore 4 Il contattore risulta essere operativo quando non deve esserlo La presa Tipo 2 risulta essere alimentata in condizione di standby Verificare il segnale dalla scheda elettronica al contattore per accertarsi che la scheda elettronica non stia pilotando il contattor...

Страница 35: ... blocco della presa da posizione di CHIUSO non va in posizione di APERTO Verificare manualmente la mobilità del perno azionando la leva rossa posta sul retro del motore di blocco della presa Tipo 2 Errore 8 I contatori di energia non comunicano più con la scheda elettronica Verificare collegamento della linea Modbus Verificare alimentazione dei contatori di energia Verificare corretto funzionamen ...

Страница 36: ...a stazione togliendo alimentazione per almeno 3 minuti dopodichè ripristinarla Se la stazione permane in questo state è necessario verificare la connessione Rivolgersi al service di riferimento Errore 11 Il contattore risulta essere operativo quando non deve esserlo La presa Schuko risulta essere alimentata in condizione di standby Verificare il segnale dalla scheda elettronica al contattore per a...

Страница 37: ...a elettronica non riceve alimentazione necessaria al suo funzionamento Verificare alimentazione a mon te della stazione Verificare funzionamento della protezione magnetotermica presente all interno del quadro a protezione della scheda elettronica Verificare funzionamento dell al imentatore 12V della scheda elettronica Nel caso di prodotti connessi alla piattaforma JOINON e nel caso in cui sia stat...

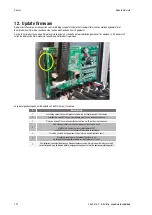
Страница 38: ...endo sul dispositivo principale 2 Rimuovere la scheda microSD dal relativo slot posto sulla scheda elettronica 3 Inserire la scheda microSD nello specifico slot del proprio PC per aprire la cartella 4 Incollare all interno della cartella principale della micro SD card il file di aggiornamento NOTA Contattare il servizio assistenza SAT di GEWISS per ottenere il file più aggiornato 5 Inserire nuovam...

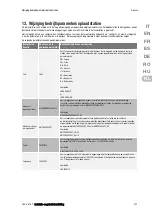
Страница 39: ...te in ingresso MAXAMPEREAVAILABLE È possibile impostare una corrente di ingresso diversa da quella impostata in fabbrica in funzione della reale disponibilità ed evitare problematiche durante la fase di ricarica Per farlo è necessario agire sul parametro MAXAMPEREAVAILABLE Esempio MAXAMPEREAVAILABLE 64 Massima corrente per presa AMPERESOCKET È possibile impostare una corrente di ricarica per ogni ...

Страница 40: ...40 Dimensionali di prodotto Gewiss 16 Dimensionali di prodotto COLONNINA Max 50 Kg Kg METTERE DXF DELLA VERSIONE 2 2 serve dxf 7 55 4 515 2 Manuale d installazione e uso ...

Страница 41: ...41 Dimensionali di prodotto Gewiss 430 mm 231 mm 33 5 mm 500 mm 152 mm 614 mm WALLBOX Max 23 Kg Kg 7 55 4 515 2 Manuale d installazione e uso Manuale d installazione e uso IT EN FR ES DE RO HU NL ...

Страница 42: ...ire l ordine delle operazioni qui riportato 14 1 Processo di scollegamento del dispositivo Per spegnere completamente la stazione versioni a colonnina aprirla frontalmente con la chiave in dotazione intervenire sul sezionatore Per spegnere completamente la stazione versione Wallbox disalimentare la stazione intervenendo sugli interruttori a monte dell impianto e solo successivamente aprire l invol...

Страница 43: ...enziale evitando il contatto con qualsiasi altro dispositivo o cavo accessibile L operatore che acceda alle protezioni dovrà aver ricevuto l opportuna formazione dall impresario operatore della stazione di ricarica ed essere da esso autorizzato ad eseguire queste operazioni 15 2 Solo per colonnina con Restart L interruttore differenziale deve essere testato almeno ogni 6 mesi come mostrato di segu...

Страница 44: ...viene richiuso automaticamente significa che è stato rilevato un problema di isolamento nel circuito interno della colonnina perciò è necessario verificare il circuito tra l interruttore differenziale e il contattore La porta frontale deve essere aperta solo per eseguire il test di entrambi i dispositivi di corrente differenziale evitando il contatto con qualsiasi altro dispositivo o cavo accessib...

Страница 45: ...terra dell impianto e la scatola e gli altri componenti metallici posti all esterno della stazione di ricarica L operatore che acceda alle protezioni dovrà aver ricevuto l opportuna formazione dall impresario operatore della stazione di ricarica ed essere da esso autorizzato ad eseguire queste operazioni 15 4 Stato di conservazione del connettore Si raccomanda un controllo periodico dello stato di...

Страница 46: ...46 Gewiss 7 55 4 515 2 Installation and Operation Manual ...

Страница 47: ...tion of the device power supply 60 7 3 Device installation WallBox version 64 7 3 1 Mechanical installation 64 7 3 2 Connection of the device power supply 68 8 Operation 69 8 1 Autostart 69 8 2 Stand Alone with RFID card reader 69 8 3 Stand Alone with Restart and RFID card reader 69 8 4 Via mobile app and OCPP cloud platform 69 9 Status indicators 70 9 1 RGB LED 70 9 2 Alphanumerical display 70 9 ...

Страница 48: ...s personnel complying with all the standards directives and laws concerning safety as applicable to the installation and operation of this device The selection of qualified personnel is always the responsibility of the company that carries out the work which is the only party that can decide whether a worker is capable of doing a certain job thereby ensuring their safety and respecting the applica...

Страница 49: ... TTH EPLUG DO WNL OA D JO INON AP PLICATION AN DSIGN UP dow nloa dthe App the QR code isund er the plug ww w joinon com 1 2 3 4 SC AN TH EQR CO DE BE LOW RE FIL LYO UR WALLET CO NN EC TTH EPLUG DO WNL OA D JO INON AP PLICATION AN DSIGN UP dow nloa dthe App the QR code isund er the plug Key a Top g Lock with safety key m MT b RGB socket outlet status LED h Technical label n MID energy meter c Side ...

Страница 50: ...r off board electric vehicle charging systems EN 61000 6 1 Electromagnetic Compatibility Part 6 1 Generic standards Immunity for residential commercial and light industrial environments EN 61000 6 3 Electromagnetic Compatibility Part 6 3 Generic standards Emissions for residential commercial and light industrial environments Fulfilment with this standard requires compliance with the requirements a...

Страница 51: ...ously on the same side only 1 socket outlet per side On these models the Schuko socket outlets are fitted on the front part of the panel NB the socket outlets complying with IEC 60884 1 and national standards can only be accessed and used in private contexts or those with limited access There is a specific model with a type 2 socket outlet and a Schuko socket outlet for the I ON Wallbox version to...

Страница 52: ... location country or other circumstances that concern the device The opening of the casing does not imply the absence of voltage inside Interventions must only be carried out once the voltage supply to the system has been cut off using a device that can guarantee insulation It may only be opened by qualified personnel following the instructions given in this manual It is mandatory to read and unde...

Страница 53: ... is operating Disconnect and check for the absence of voltage before performing any operation 3 2 Personal protective equipment PPE When working on the device use at least the following items of safety equipment Name Explanation Safety footwear In accordance with Standard UNE EN ISO 20345 2012 or the latest edition published Helmet In accordance with Standard EN 397 1995 or the latest edition publ...

Страница 54: ...roceed as indicated below To correctly conserve the charging station do not remove the original packaging until the moment it is installed Deterioration of the packaging cuts holes etc prevents the correct conservation of the charging station prior to installation Keep the device clean remove dust chips grease etc and avoid the presence of rodents Protect it against water spray welding sparks etc ...

Страница 55: ... this point it can be transported vertically and without its packaging but only for a short distance Handling the unpackaged device At least the following provisions must be observed 1 Follow the fundamental ergonomic recommendations to avoid injuries when lifting weights 2 Do not release the device until it is perfectly fastened or positioned 3 Follow the instructions of another person who guides...

Страница 56: ...heater Environmental conditions Column WallBox Minimum operating temperature 25 C 25 C Maximum operating temperature 50 C 50 C Maximum relative humidity without condensation 95 95 Remember that it could occasionally produce a small amount of condensation as a result of temperature changes Despite their built in protection therefore the charging stations must be monitored when used in areas where a...

Страница 57: ... particular configuration requires only one power supply line and a single plinth for the installation of two devices as shown below FRONT FRONT 2 cm There must be a minimum distance of 2cm between the back panels of the two charging units NB the surface on which the charging station is to be installed must be designed and built in accordance with the standards and the regulations in force to ensu...

Страница 58: ...electrical risks All the installation operations must be carried out respecting the safety regulations and laws in force and following the instruction manual 7 1 General installation requirements The device must be installed in a suitable environment that satisfies the information described in chapter 6 Preparation for device installation Furthermore the elements used in the rest of the installati...

Страница 59: ...front access door with key opening to facilitate installation and connections Open the door using the key supplied The safety key can only be removed when the door is fully closed 3 Couple the fixing base already fixed to the ground with the charging station 4 Fix the column on the base tightening the nuts on the pins indicated in the figure The maximum tightening torque is 20 Nm NB it s important...

Страница 60: ...0 M40 M32 for the power cables highlighted in yellow and M16 for the data cables highlighted in red Depending on the charging unit version the cable glands and caps supplied are as follows Version Cable glands supplied Caps supplied Single phase 7 4 kW M40 M32 M50 Three phase 11 kW M32 M40 M50 Three phase 22 kW M40 M32 M50 2 Connect the power supply cables L N PE PE T N R S R S R S phases N Neutra...

Страница 61: ...and PE 3 Switch ON the residual current protection and circuit breaker protection and power the column 3 1 For the column with Restart activate the device as shown below 2 1 Power the column and make sure the device LED is lit up green 4 Check the residual current protection is working properly by pressing the relative test button key RESTART 7 55 4 515 2 Installation and Operation Manual Installa...

Страница 62: ...play shows the status message according to the model The station is ready and in standby either for user identification in order to begin the recharge backend and RFID version or for a recharge request Autostart version If the station encounters an operating defect the light on the corresponding socket outlet or both will change colour according to the defect noted refer to Faults and troubleshoot...

Страница 63: ...63 Device installation and connection Gewiss 7 55 4 515 2 Installation and Operation Manual Installation and Operation Manual IT EN FR ES DE RO HU NL ...

Страница 64: ...the product is to be installed on the wall using the accessory supplied the procedure is as follows 1 Prepare the assembly area by fixing the support bracket to the wall drilling holes with the centre distances shown below 189 5 mm 513 mm 94 75 mm 94 75 mm Ø6 5 mm Ø6 5 mm 7 55 4 515 2 Installation and Operation Manual ...

Страница 65: ...you have already fixed to the wall After positioning the product drill the wall using the lower bracket as your centre point then tighten the locking screw 4 Check that the device is correctly fixed in place 5 Remove the protective film from the front panel 7 55 4 515 2 Installation and Operation Manual Installation and Operation Manual IT EN FR ES DE RO HU NL ...

Страница 66: ...the accessory GW46551 follow this procedure 1 Assemble the support brackets on the back plate of the WallBox as shown below 2 Position the WallBox on the pole and fix it in place by tightening the locking nuts of the two plates as shown in the figure 7 55 4 515 2 Installation and Operation Manual ...

Страница 67: ... and M32 for the power cables highlighted in yellow and M16 for the data cables highlighted in red Depending on the charging unit version the cable glands and caps supplied are as follows Version Cable glands supplied Caps supplied Single phase 7 4 kW 2x M25 2x M32 Three phase 11 kW 2x M25 2x M32 Three phase 22 kW 2x M32 2x M25 NB whatever the type of installation it s important that the socket ou...

Страница 68: ...am of the system PE R1 S1 T1 N1 R2 S2 T2 N2 R S T R S T phases N Neutral PE Earth Three phase charging station 3 There are two dedicated terminals L7 N3 for the connection of the auxiliary circuit that powers the board and the electronic devices It is possible to connect a third line using a continuity line or installing a jumper between L1 R1 and L7 and between N1 and N3 If necessary it is also p...

Страница 69: ...rd reader The Restart function enables the automatic reactivation of the residual current protection in the event of ill timed triggering If the residual current circuit breaker is triggered 1 the floor mounting charging station indicates the anomaly and stops the vehicle charging process 2 the user must disconnect the vehicle from the column 3 Restart checks the insulation of the circuit inside t...

Страница 70: ...d the station status and the actions required CHARGING PROCESS Words on the display Description SWIPE THE CARD TO RECHARGE In RFID mode the station waits for an RFID card checks it is valid and then begins the recharging process CARD ENABLED PLEASE WAIT The RFID card has been recognised by the system ATTENTION CARD NOT VALID The RFID card has not been recognised so the recharging session cannot be...

Страница 71: ...s been swiped several times the station goes into deletion mode Swipe one RFID card at a time in order to delete it from the local White List 9 3 Lighting inside the type 2 socket outlet Models with a T2 vandal proof socket outlet and Stand Alone operating mode with RFID and via mobile app and OCPP cloud platform contain a LED that flashes when the client is required to do something such as insert...

Страница 72: ...g blue to flashing green RECHARGE IN PROGRESS Ts 0000 Tc 0000 8 Remove the plug from the socket outlet on the station From flashing green to fixed green RECHARGE TERMINATED REMOVE THE CABLE SESSION SUMMARY Ts 0000 Tc 0000 9 If the station detects no errors it will return to standby Fixed green INSERT THE PLUG TO BEGIN THE RECHARGE NB To end the charging session stop it first on the car the method ...

Страница 73: ...microSD back in the electronic board 7 Power the charging station again 8 If the procedure has been completed without errors the station will import the file and the data it contains The message CONFIGURATION COMPLETED will appear on the display At the end of the import procedure the file will be renamed RFID_old csv on the microSD 9 Check the import has been completed correctly by swiping one of ...

Страница 74: ...UMMARY kW 0000 kWh 0000 11 If the station detects no errors it will return to standby Fixed green SWIPE THE CARD TO RECHARGE 10 3 Stand Alone with Restart and RFID card reader See section 10 2 10 4 Via mobile app and OCPP cloud platform In this mode the charging station is connected to a control platform via the OCPP protocol The OCPP protocol allows the station to connect to any platform which us...

Страница 75: ...ble of doing a certain job thereby ensuring their safety and respecting the applicable law with regards safety in the workplace These companies must provide suitable training regarding the electrical devices for their personnel and make sure they become familiar with the content of this manual Code Error description Solution Position Error 1 The front door is open for maintenance or because it has...

Страница 76: ...ation fault in the circuit inside the column check the circuit between the residual current circuit breaker and the contactor Error 4 The contactor is working when it shouldn t be The Type 2 socket outlet is powered in the standby condition Check the signal from the electronic board to the contactor to make sure the former isn t controlling the latter If the board isn t controlling the contactor m...

Страница 77: ...locking motor it doesn t switch from the CLOSED to the OPEN position Manually check the mobility of the pin by moving the red lever on the back of the type 2 socket outlet locking motor Error 8 The energy meters are no longer communicating with the electronic board Check the connection of the Modbus line Check the power supply to the energy meters Check the energy meters are working properly Check...

Страница 78: ... Try to restart the station by disconnecting the power supply for at least 3 minutes and then reconnecting it If the station remains in this condition check the connection Contact your aftersales service Error 11 The contactor is working when it shouldn t be The Schuko socket outlet is powered in the standby condition Check the signal from the electronic board to the contactor to make sure the for...

Страница 79: ...tion OFF The electronic board is not receiving the power supply it needs in order to work Check the power supply upstream of the station Check the circuit breaker protection in the board to protect the electronic card is working properly Check the 12V power supply unit of the electronic card is working properly In the case of products connected to the JOINON platform or if the maintenance package ...

Страница 80: ...pply to the product by means of the main device 2 Remove the microSD card from its slot on the electronic board 3 Insert the microSD card in the specific slot of your PC to open the folder 4 Paste the update file in the main folder of the microSD card NB contact GEWISS SAT Customer Service for the most recent file 5 Insert the microSD card in the slot on the electronic board 6 Power the product ag...

Страница 81: ...m input current MAXAMPEREAVAILABLE You can set an input current other than the one set in the factory to suit the real availability and avoid problems during recharging To do this use the MAXAMPEREAVAILABLE parameter Example MAXAMPEREAVAILABLE 64 Maximum current per socket outlet AMPERESOCKET You can set a recharging current for each socket outlet other than the one set in the factory to suit the ...

Страница 82: ...82 Device dimensions Gewiss 16 Device dimensions COLUMN max 50kg Kg PUT DXF OF VER SION 2 2 dxf needed 7 55 4 515 2 Installation and Operation Manual ...

Страница 83: ...83 Device dimensions Gewiss 430 mm 231 mm 33 5 mm 500 mm 152 mm 614 mm WALLBOX max 23kg Kg 7 55 4 515 2 Installation and Operation Manual Installation and Operation Manual IT EN FR ES DE RO HU NL ...

Страница 84: ... the order given here 14 1 Device disconnection process To switch the station off completely column versions open the front using the key supplied then intervene on the switch disconnector To switch the station off completely WallBox version disconnect the power supply by means of the one way switches upstream of the system Only then should you open the casing using the key supplied 7 55 4 515 2 I...

Страница 85: ...evices avoiding contact with any other accessible device or cable The operator who accesses the protection devices must have received suitable training from the contractor charging station operator and be authorised to perform these operations 15 2 Only for column with Restart The residual current circuit breaker must be tested at least every 6 months as shown below Keep a record that the test was...

Страница 86: ...reaker is not automatically switched back on this means an insulation problem has been detected in the circuit inside the column so check the circuit between the residual current circuit breaker and the contactor The front door must only be opened to carry out the test on both residual current devices avoiding contact with any other accessible device or cable 7 55 4 515 2 Installation and Operatio...

Страница 87: ... system earth conductor and the box and other metallic components outside the station The operator who accesses the protection devices must have received suitable training from the contractor charging station operator and be authorised to perform these operations 15 4 Condition of the connector The connector and cable should be checked regularly to make sure they are in good condition To avoid ove...

Страница 88: ...88 Gewiss 7 55 4 515 2 Manuel d installation et usage ...

Страница 89: ...lation du dispositif version à coffret mural 106 7 3 1 Installation mécanique 106 7 3 2 Raccordement de l alimentation du dispositif 110 8 Fonctionnement 111 8 1 Démarrage automatique AUTOSTART 111 8 2 Autonomie à lecteur de cartes RFID 111 8 3 Autonomie avec Restart et lecteur de cartes RFID 111 8 4 Par appli et plate forme nuagique OCPP 111 9 Indications d état 112 9 1 Voyants RGB 112 9 2 Affich...

Страница 90: ...épondant à tous les règlements toutes les directives et toutes les lois en matière de sécurité applicables aux interventions d installation et d exploitation de ce dispositif La sélection du personnel qualifié est toujours de la responsabilité de la société exécutant l intervention car seule responsable du fait que le travailleur soit apte à exécuter un certain travail en protégeant ainsi la sécur...

Страница 91: ...LYO UR WALLET CO NN EC TTH EPLUG DO WNL OA D JO INON AP PLICATION AN DSIGN UP dow nloa dthe App the QR code isund er the plug ww w joinon com 1 2 3 4 SC AN TH EQR CO DE BE LOW RE FIL LYO UR WALLET CO NN EC TTH EPLUG DO WNL OA D JO INON AP PLICATION AN DSIGN UP dow nloa dthe App the QR code isund er the plug Légende a Top g Serrure à clé de sécurité m MT b Voyant RGB d état des prises h Étiquette t...

Страница 92: ...r conductive connection to an AC DC supply EMC requirements for off board electric vehicle charging systems EN 61000 6 1 Compatibilité électromagnétique Partie 6 1 Normes génériques Norme d immunité pour les environnements résidentiels commerciaux et de l industrie légère EN 61000 6 3 Compatibilité électromagnétique Partie 6 3 Normes génériques Émissions pour les environnements résidentiels commer...

Страница 93: ...et de la Schuko du même côté s avère impossible utiliser une seule prise par côté Les prises Schuko de ces modèles sont montées en façade du panneau REMARQUE L accès et l utilisation des prises CEI 60884 1 et des normes nationales ne sont autorisés que dans des contextes privés ou à limitation d accès Sur la variante I ON Wallbox est également disponible un modèle spécifique muni d une prise de ty...

Страница 94: ...eu au pays ou à d autres circonstances concernant les appareils électriques L ouverture du boîtier n entraîne pas la coupure de la tension interne N intervenir sur l appareil qu après avoir coupé la tension de l installation à l aide d un appareil garantissant la fonction d isolement Il ne peut être ouvert que par un personnel qualifié en suivant les instructions reportées dans le présent manuel I...

Страница 95: ...etirer un terminal lorsque le dispositif est en marche Couper et vérifier l absence de tension avant toute opération 3 2 Équipement de protection individuelle EPI Lorsque l on opère sur le dispositif utiliser au moins les équipements de sécurité suivants Dénomination Explicitation Chaussures de sécurité Conforme à la norme UNE EN ISO 20345 2012 ou à la dernière édition publiée Casque Conforme à la...

Страница 96: ...térioration procéder comme indiqué ci dessous Pour conserver les stations de recharge ne pas retirer l emballage d origine jusqu à l installation La détérioration de l emballage entailles trous etc empêche une bonne conservation des stations de recharge avant leur installation Maintenir l état de propreté du dispositif éliminer la poussière les copeaux la graisse etc et éviter la présence de ronge...

Страница 97: ...tion de destination On pourra alors la transporter verticalement sans l emballage mais uniquement sur une courte distance Manutention du dispositif déballé Les consignes suivantes doivent au moins être respectées 1 Suivre les consignes ergonomiques fondamentales afin d éviter toute lésion en soulevant des poids 2 Ne pas relâcher le dispositif tant qu il n est pas parfaitement fixé ou en appui 3 Su...

Страница 98: ...ural Température minimale de fonctionnement 25 C 25 C Température maximale de fonctionnement 50 C 50 C Humidité relative maximale sans condensation 95 95 Ne pas oublier qu une condensation modérée peut se produire à cause des écarts de température Aussi outre la protection dont dispose l installation s avère t il nécessaire de suivre l évolution des stations de recharge lorsqu elles se trouvent da...

Страница 99: ...tion particulière permet de tracer une seule ligne d alimentation et de réaliser une seule plinthe recevant les deux produits comme illustré ci dessous FRONT FRONT 2 cm Les deux unités de recharge doivent garantir une distance minimale de 2 cm entre les parois du fond REMARQUE La surface sur laquelle sera installée la station de recharge doit être conçue et réalisée conformément aux standards et a...

Страница 100: ...sécurité homologuées pour les risques électriques Toutes les opérations d installation doivent être exécutées en respectant les réglementations et les lois en vigueur en matière de sécurité et en suivant le manuel d instructions 7 1 Conditions d installation requises Le dispositif doit être installé dans une ambiance appropriée satisfaisant aux indications décrites au chapitre 6 Préparation à l in...

Страница 101: ...uverture par clé afin de faciliter l installation et les raccordements Ouvrir l accès à l aide de la clé fournie La clé de sécurité ne peut être retirée qu après la fermeture complète de la porte 3 Accoupler le bâti de fixation préalablement fixé au sol avec la station de recharge 4 Fixer la colonne sur le bâti en serrant les écrous sur les goujons indiqués sur la figure Le couple de serrage maxim...

Страница 102: ...ondant Les passages de câbles disponibles sont M50 M40 M32 pour les câbles de puissance en jaune et M16 pour les câbles de données en rouge Selon la version de l unité de recharge les passages de câbles et les obturateurs fournis sont les suivants Révision Passages de câbles fournis Obturateurs fournis Monophasé 7 4 kW M40 M32 M50 Triphasé 11 kW M32 M40 M50 Triphasé 22 kW M40 M32 M50 2 Raccorder l...

Страница 103: ...rotections différentielles et magnétothermiques sur ON et alimenter la colonne 3 1 Pour la colonne avec redémarrage Restart procéder à l activation du dispositif comme illustré ci dessous 2 1 Alimenter la colonne et vérifier que le voyant du dispositif est allumé voyant vert 4 Vérifier le fonctionnement des protections différentielles en appuyant sur la touche de test correspondante RESTART 7 55 4...

Страница 104: ...ssage d état selon le modèle La station est prête et reste en attente d identification de l utilisateur pour procéder à la recharge version BACKEND et RFID ou d un lancement de la recharge version en démarrage automatique Si la station détecte un dysfonctionnement l éclairage de la prise correspondante ou des deux change de couleur selon le défaut rencontré voir le chapitre Dysfonctionnements et a...

Страница 105: ...105 Installation et raccordement du dispositif Gewiss 7 55 4 515 2 Manuel d installation et usage Manuel d installation et usage IT EN FR ES DE RO HU NL ...

Страница 106: ...ion mécanique En cas d installation murale à l aide de l accessoire fourni les opérations d installation sont les suivantes 1 Préparer la zone de montage en fixant la patte de support au mur et en perçant avec les entraxes suivants 189 5 mm 513 mm 94 75 mm 94 75 mm Ø6 5 mm Ø6 5 mm 7 55 4 515 2 Manuel d installation et usage ...

Страница 107: ... fixée au mur après avoir positionné le produit percer la paroi en utilisant comme centrage la patte inférieure et visser la vis de blocage 4 vérifier que le dispositif est correctement fixé 5 retirer la pellicule de protection du panneau en façade 7 55 4 515 2 Manuel d installation et usage Manuel d installation et usage IT EN FR ES DE RO HU NL ...

Страница 108: ... accessoire GWJ46551 les opérations d installation sont les suivantes 1 monter les pattes de support sur le fond du coffret comme illustré sur la figure 2 positionner le coffret sur le poteau et serrer les écrous de blocage des deux plaques comme illustré sur la figure 7 55 4 515 2 Manuel d installation et usage ...

Страница 109: ... passages de câbles disponibles sont M25 et M32 pour les câbles de puissance en jaune et M16 pour le câble des données en rouge Selon la version de l unité de recharge les passages de câbles et les obturateurs fournis sont les suivants Révision Passages de câbles fournis Obturateurs fournis Monophasé 7 4 kW 2x M25 2x M32 Triphasé 11 kW 2x M25 2x M32 Triphasé 22 kW 2x M32 2x M25 REMARQUE Quel que s...

Страница 110: ...N1 R2 S2 T2 N2 R S T Phases R S T N Neutre PE Terre Station de recharge triphasée 3 Pour ce qui concerne le raccordement du circuit auxiliaire alimentant la carte et les dispositifs électroniques deux bornes dédiées L7 N3 sont à disposition On pourra raccorder une troisième ligne en s appuyant sur une ligne de continuité ou bien en insérant un cavalier entre L1 R1 et L7 et entre N1 et N3 On pourra...

Страница 111: ...nomie avec Restart et lecteur de cartes RFID La fonction Restart permet la fermeture automatique de la protection différentielle en cas d intervention intempestive En cas d intervention de l interrupteur différentiel 1 La borne signale le défaut et bloque la recharge du véhicule 2 L utilisateur doit débrancher le véhicule de la colonne 3 Le Restart vérifie l isolement du circuit interne de la colo...

Страница 112: ...RECHARGE Texte sur l afficheur Description PASSER LA CARTE POUR RECHARGER La station en modalité RFID est en attente de la lecture d une carte RFID afin d en vérifier la validité et de lancer le processus de recharge CARTE HABILITÉE ATTENDRE La carte RFID a été reconnue par le système ATTENTION CARTE NON VALABLE La carte RFID n a pas été reconnue et l on ne peut pas lancer une session de recharge ...

Страница 113: ...ion entre en modalité d effacement Il s avère nécessaire de passer une carte RFID à la fois pour l effacer de la liste locale 9 3 Éclairage à l intérieur de la prise de type 2 Les modèles munis d une prise T2 anti vandalisme avec les modalités de fonctionnement Autonomie avec RFID ou via appli et plate forme nuagique contiennent un éclairage à LED s allumant par intermittence lorsqu une action du ...

Страница 114: ...xe ou clignotant à vert clignotant RECHARGE EN COURS Ts 0000 Tc 0000 8 Retirer la fiche de la prise insérée dans la station de recharge De vert clignotant à vert fixe RECHARGE TERMINÉE RETIRER LE CÂBLE RÉCAPITULATIF DE LA SESSION Ts 0000 Tc 0000 9 Si la station ne détecte pas de défaut elle retourne en attente stand by Vert fixe INSÉRER LA FICHE POUR LANCER LA RECHARGE REMARQUE Pour achever la rec...

Страница 115: ...t le fichier sauvegardé sur la micro SD insérer de nouveau la micro SD sur la carte électronique 7 Alimenter de nouveau la station de recharge 8 Si la procédure a été exécutée sans aucune erreur la station importera le fichier et les données qui y sont contenues le message CONFIGURATION ACHEVÉE sera visualisé sur l afficheur Au terme de la procédure d importation le fichier sera renommé RFID_old c...

Страница 116: ...de défaut elle retourne en attente stand by Vert fixe PASSER LA CARTE POUR RECHARGER 10 3 Autonomie avec Restart et lecteur de cartes RFID Voir la section 10 2 10 4 Par appli et plate forme nuagique OCPP Dans cette modalité la station de recharge est connectée à une plate forme de contrôle utilisant le protocole OCPP Le protocole OCPP permet à la station de se raccorder à tout type de plate forme ...

Страница 117: ...vailleur soit apte à exécuter un certain travail en protégeant ainsi la sécurité et en respectant la loi applicable en matière de sécurité sur le lieu de travail Ces sociétés doivent fournir à leur personnel une formation appropriée sur les dispositifs électriques et faire en sorte que ce personnel puisse se familiariser avec le contenu du présent manuel Code Description de l erreur Résolution de ...

Страница 118: ...ent sur le circuit interne de la colonne dans ce cas vérifier le circuit entre l interrupteur différentiel et le contacteur Erreur 4 Le contacteur est opérationnel alors qu il ne devrait pas l être La prise de type 2 est alimentée dans la condition d attente Vérifier le signal de la carte électronique au contacteur afin de s assurer que la carte électronique ne pilote pas le contacteur Si la carte...

Страница 119: ...du moteur de blocage de la prise ne passe pas de la position d ouverture à la position de fermeture Vérifier manuellement la mobilité du goujon en actionnant le levier rouge monté sur l arrière du moteur de blocage de la prise de type 2 Erreur 8 Les compteurs d énergie ne communiquent plus avec la carte électronique Vérifier le raccordement de la ligne Modbus Vérifier l alimentation des compteurs ...

Страница 120: ...ion est hors ligne OFFLINE depuis plus de 24 h Essayer de redémarrer la station en coupant l alimentation 3 minutes au moins puis la restaurer Si la station reste dans cet état vérifier la connexion S adresser au service de référence Erreur 11 Le contacteur est opérationnel alors qu il ne devrait pas l être La prise Schuko est alimentée en condition de pause STANDBY Vérifier le signal de la carte ...

Страница 121: ...e Station éteinte La carte électronique ne reçoit pas l alimentation nécessaire à son fonctionnement Vérifier l alimentation en amont de la station Vérifier le fonctionnement de la protection magnétothermique montée à l intérieur du tableau en protection de la carte électronique Vérifier le fonctionnement de l alimentation en 12 V de la carte électronique En cas de produits raccordés à la plate fo...

Страница 122: ...du produit en agissant sur le dispositif principal 2 Retirer la carte micro SD de la fente de la carte électronique 3 Insérer la carte micro SD dans la fente de son propre ordinateur pour ouvrir le répertoire 4 Coller le fichier de mise à jour à l intérieur du répertoire principal de la carte micro SD REMARQUE Contacter le service d assistance SAT de GEWISS pour obtenir le fichier à jour 5 Insérer...

Страница 123: ...en entrée MAXAMPEREAVAILABLE On pourra imposer une intensité d entrée différente de celle d usine en fonction de la disponibilité réelle afin d éviter toute problématique lors de la phase de recharge À cet effet agir sur le paramètre MAXAMPEREAVAILABLE Exemple MAXAMPEREAVAILABLE 64 Intensité maximale par prise AMPERESOCKET On pourra imposer une intensité de recharge pour chaque prise différente de...

Страница 124: ...124 Dimensions du produit Gewiss 16 Dimensions du produit COLONNE 50 kg max Kg METTRE DXF DE LA VERSION 2 2 sert dxf 7 55 4 515 2 Manuel d installation et usage ...

Страница 125: ...125 Dimensions du produit Gewiss 430 mm 231 mm 33 5 mm 500 mm 152 mm 614 mm COFFRET 23 kg max Kg 7 55 4 515 2 Manuel d installation et usage Manuel d installation et usage IT EN FR ES DE RO HU NL ...

Страница 126: ... l ordre des opérations reporté ci dessous 14 1 Procédure de débranchement du dispositif Pour éteindre complètement la station version à colonne ouvrir la façade à l aide de la clé fournie et intervenir sur le sectionneur Pour éteindre complètement la station version à coffret mural couper l alimentation à l aide des interrupteurs montés en amont de l installation et uniquement après ouvrir l enve...

Страница 127: ...ntielle en évitant le contact avec tout autre dispositif ou câble accessible L opérateur accédant aux protections devra avoir reçu une formation spécifique de la part de l entrepreneur opérateur de la station de recharge et être autorisé à l exécution de ces opérations 15 2 Uniquement sur la colonne avec Restart L interrupteur différentiel doit être testé au moins tous les six mois comme indiqué c...

Страница 128: ...eferme pas automatiquement c est qu un défaut d isolement a été relevé sur le circuit interne de la colonne aussi faudra t il vérifier le circuit entre l interrupteur différentiel et le contacteur La porte en façade ne doit être ouverte que pour exécuter le test des deux dispositifs d intensité différentielle en évitant le contact avec tout autre dispositif ou câble accessible 7 55 4 515 2 Manuel ...

Страница 129: ...de l installation et le boîtier ainsi que les autres composants métalliques montés à l extérieur de la station de recharge L opérateur accédant aux protections devra avoir reçu une formation spécifique de la part de l entrepreneur opérateur de la station de recharge et être autorisé à l exécution de ces opérations 15 4 État de conservation du connecteur Il est recommandé de contrôler périodiquemen...

Страница 130: ...130 Gewiss 7 55 4 515 2 Manual de instalación y uso ...

Страница 131: ...xión de la alimentación del dispositivo 144 7 3 Instalación del dispositivo versión WallBox 148 7 3 1 Instalación mecánica 148 7 3 2 Conexión de la alimentación del dispositivo 152 8 Funcionamiento 153 8 1 Autostart 153 8 2 Stand Alone con lector de tarjetas RFID 153 8 3 Stand Alone con Restart y lector de tarjetas RFID 153 8 4 Mediante aplicación móvil y plataforma cloud OCPP 153 9 Indicaciones d...

Страница 132: ... personal que cumple todas las normas las directivas y las leyes en materia de seguridad aplicables a las intervenciones de instalación y funcionamiento de este dispositivo La empresa que realiza la intervención es la responsable de seleccionar el personal cualificado ya que es quien califica la idoneidad aptitud del trabajador para un determinado trabajo tutelando la seguridad y respetando la ley...

Страница 133: ...EC TTH EPLUG DO WNL OA D JO INON AP PLICATION AN DSIGN UP dow nloa dthe App the QR code isund er the plug ww w joinon com 1 2 3 4 SC AN TH EQR CO DE BE LOW RE FIL LYO UR WALLET CO NN EC TTH EPLUG DO WNL OA D JO INON AP PLICATION AN DSIGN UP dow nloa dthe App the QR code isund er the plug Leyenda a Top g Cerradura con llave de seguridad m MT b Led RGB estado tomas h Etiqueta técnica n Contador de e...

Страница 134: ...ction to an AC DC supply EMC requirements for off board electric vehicle charging systems EN 61000 6 1 Compatibilidad electromagnética Parte 6 1 Normas genéricas Inmunidad de los ambientes residenciales comerciales y de la industria ligera EN 61000 6 3 Compatibilidad electromagnética Parte 6 3 Normas genéricas Emisiones para los ambientes residenciales comerciales y de la industria ligera La adecu...

Страница 135: ...ente la toma Tipo 2 y la toma Schuko en el mismo lado sino solo 1 toma por lado Las tomas Schuko en estos modelos están montadas en la parte frontal del panel NOTA El acceso y el uso de las bases IEC 60884 1 y normas nacionales se permite solo en ámbitos privados o con limitaciones de acceso Incluso para la variante I ON Wallbox se encuentra disponible un modelo específico provisto de una toma Tip...

Страница 136: ...ubierta no implica la ausencia de tensión en su interior Intervenir en el equipo solo después de haber cortado la tensión de la instalación con un aparato idóneo que garantice la función de aislamiento La cubierta puede ser abierta solo por personal cualificado que cumpla con las instrucciones que se detallan en el presente manual Es obligatorio haber leído y entendido completamente el presente ma...

Страница 137: ...minal mientras el dispositivo está en funcionamiento Desconectar y asegurarse de que no haya tensión antes de iniciar cualquier operación 3 2 Equipos de protección individual EPI Cuando se trabaja en el dispositivo utilizar al menos los siguientes equipos de seguridad Denominación Explicación Calzados de seguridad En conformidad con la norma UNE EN ISO 20345 2012 o última edición publicada Casco C...

Страница 138: ...epción proceder como se indica a continuación para evitar su deterioro Para conservar correctamente las estaciones de carga no retirarlas de su embalaje hasta el momento de la instalación El deterioro del embalaje cortes orificios etc impide que las estaciones de carga se conserven correctamente hasta el momento de la instalación Mantener la limpieza del dispositivo eliminar polvo virutas grasa et...

Страница 139: ...En este momento se lo puede transportar verticalmente sin el embalaje pero solo por una distancia corta Manipulación del dispositivo desembalado Se deben respetar como mínimo las siguientes indicaciones 1 Seguir los consejos ergonómicos básicos para evitar lesiones al levantar pesos 2 No soltar el dispositivo hasta que no esté perfectamente fijado o apoyado 3 Seguir las indicaciones de otra person...

Страница 140: ...nima de funcionamiento 25 C 25 C Temperatura máxima de funcionamiento 50 C 50 C Humedad relativa máxima sin condensación 95 95 Recordar que a veces los cambios de temperatura pueden generar una condensación moderada Por lo tanto además de la protección de la cual dispone el aparato es necesario controlar las estaciones de carga cuando se instalan en lugares donde es probable que no se respeten tod...

Страница 141: ...al permite trazar una sola línea de alimentación y realizar un único plinto sobre el cual instalar dos productos como se ilustra a continuación FRONT FRONT 2 cm Las dos unidades de carga deben garantizar una distancia mínima de 2 cm entre las paredes de fondo NOTA La superficie sobre la cual se instalará la estación de carga debe estar adecuadamente diseñada y realizada en conformidad con los está...

Страница 142: ...ón deben realizarse respetando las normativas y las leyes vigentes en materia de seguridad y siguiendo el manual de instrucciones 7 1 Requisitos generales de instalación Instalar el dispositivo en un ambiente adecuado que cumpla con todos los requisitos indicados en el capítulo 6 Preparación para la instalación del dispositivo Además los elementos utilizados en el resto de la instalación deben ser...

Страница 143: ...ceso delantero con apertura de llave para simplificar la instalación y las conexiones Abrir el acceso con la llave suministrada La llave de seguridad puede retirarse solo al cerrar completamente la puerta 3 Acoplar la base de fijación previamente fijada al suelo con la estación de carga 4 Fijar la columna en la base apretando las tuercas en los pernos indicados en la figura El par de apriete máxim...

Страница 144: ...os prensacables disponibles son M50 M40 M32 para los cables de potencia evidenciados en amarillo y M16 para los cables de datos evidenciado en rojo Según la versión de unidad de carga los prensacables y los tapones suministrados en dotación son los siguientes Versión Prensacables suministrados Tapones suministrados Monofásico 7 4 kW M40 M32 M50 Trifásico 11 kW M32 M40 M50 Trifásico 22 kW M40 M32 M...

Страница 145: ...tecciones diferenciales y magnetotérmicas en posición ON y dar alimentación a la columna 3 1 Para la columna con Restart proceder con la activación del dispositivo como se ilustra a continuación 2 1 Dar alimentación a la columna y verificar que el led del dispositivo esté encendido LED verde 4 Controlar que las protecciones diferenciales funcionen correctamente presionando la tecla específica de p...

Страница 146: ... y en el display se visualiza el mensaje de estado según el modelo La estación está lista y en espera de identificación del usuario para realizar la carga versión backend y RFID o de un inicio de carga versión Autostart Si la estación identifica algún defecto de funcionamiento la base correspondiente o ambas cambian de color según el defecto detectado véase el capítulo Averías y resolución de prob...

Страница 147: ...147 Instalación y conexión del dispositivo Gewiss 7 55 4 515 2 Manual de instalación y uso Manual de instalación y uso IT EN FR ES DE RO HU NL ...

Страница 148: ...n del producto en la pared con el accesorio suministrado en dotación las operaciones de instalación son las siguientes 1 Preparar adecuadamente el área de montaje fijando el estribo de soporte a la pared perforando con las siguientes distancias entre ejes 189 5 mm 513 mm 94 75 mm 94 75 mm Ø6 5 mm Ø6 5 mm 7 55 4 515 2 Manuale d installazione e uso ...

Страница 149: ...previamente fijado a la pared Una vez posicionado el producto perforar la pared utilizando como centrado el estribo inferior y enroscar el tornillo de bloqueo 4 Controlar que el dispositivo haya sido fijado correctamente 5 Retirar la película de protección del panel frontal 7 55 4 515 2 Manual de instalación y uso Manual de instalación y uso IT EN FR ES DE RO HU NL ...

Страница 150: ... GW46551 las operaciones de instalación son las siguientes 1 Montar en el fondo de la wallbox los estribos de soporte como se indica en la figura 2 Colocar la wallbox en el poste y asegurarla apretando las tuercas de bloqueo de las dos placas como se indica en la figura 7 55 4 515 2 Manuale d installazione e uso ...

Страница 151: ...sponibles son M25 y M32 para los cables de potencia evidenciados en amarillo y M16 para los cables de datos evidenciado en rojo Según la versión de unidad de carga los prensacables y los tapones suministrados en dotación son los siguientes Versión Prensacables suministrados Tapones suministrados Monofásico 7 4 kW 2x M25 2x M32 Trifásico 11 kW 2x M25 2x M32 Trifásico 22 kW 2x M32 2x M25 NOTA cualqu...

Страница 152: ...nador línea arriba de la instalación PE R1 S1 T1 N1 R2 S2 T2 N2 R S T Fases R S T N Neutro PE Tierra Estación de carga trifásica 3 En lo que respecta a la conexión del circuito auxiliar que alimenta a la tarjeta y a los dispositivos electrónicos hay dos bornes específicos L7 N3 Es posible conectar una tercera línea apoyándose en una línea de continuidad o bien realizar un puente entre L1 R1 y L7 y...

Страница 153: ...estart y lector de tarjetas RFID La función de Restart permite el cierre automático de la protección diferencial en caso de intervención imprevista En caso de intervención del interruptor diferencial 1 la torre indica la anomalía y bloquea la carga del vehículo 2 el usuario debe desconectar el vehículo de la columna 3 Restart realiza un control de aislamiento del circuito interno de la columna 4 S...

Страница 154: ...quieren PROCESO DE CARGA Texto en el display Descripción PASAR LA TARJETA PARA CARGAR La estación en la modalidad RFID se encuentra en espera de la lectura de una tarjeta RFID para corroborar su idoneidad e iniciar el proceso de carga TARJETA HABILITADA AGUARDAR La tarjeta RFID ha sido reconocida por el sistema ATENCIÓN TARJETA INVÁLIDA La tarjeta RFID no ha sido reconocida y no es posible iniciar...

Страница 155: ...r la estación entra en modalidad de borrado Se debe pasar una tarjeta RFID a la vez para borrarla de la lista blanca local 9 3 Iluminación dentro de la base Tipo 2 Los modelos provistos de base T2 antivandálicas y con modalidad de funcionamiento Stand Alone con RFID y mediante aplicación móvil y plataforma cloud OCPP disponen en su interior de una iluminación mediante LED que se enciende de modo i...

Страница 156: ...ul fijo o intermitente a verde intermitente CARGA EN CURSO Ts 0000 Tc 0000 8 Retirar la clavija de la base ubicada en la estación de carga De verde intermitente a verde fijo CARGA FINALIZADA RETIRAR EL CABLE RESUMEN SESIÓN Ts 0000 Tc 0000 9 Si la estación no presenta errores vuelve al estado de stand by Verde fijo CONECTAR LA CLAVIJA PARA INICIAR LA CARGA NOTA Para finalizar la carga se deberá int...

Страница 157: ...troducir nuevamente la microSD en la tarjeta electrónica 7 Suministrar nuevamente alimentación a la estación de carga 8 Si el procedimiento ha concluido sin errores la estación importará el fichero con los datos que contiene En la pantalla se mostrará el mensaje CONFIGURACIÓN FINALIZADA Al concluir el procedimiento de importación el nombre del fichero cambiará a RFID_old csv en la microSd 9 Contro...

Страница 158: ...y Verde fijo PASAR LA TARJETA PARA CARGAR 10 3 Stand Alone con Restart y con lector de tarjetas RFID Véase la sección 10 2 10 4 Mediante aplicación móvil y plataforma cloud OCPP La estación de carga en esta modalidad está conectada a una plataforma de control utilizando el protocolo OCPP El protocolo OCPP permite que la estación se conecte a cualquier plataforma que utilice dicho protocolo Para ap...

Страница 159: ...a la idoneidad aptitud del trabajador para un determinado trabajo tutelando la seguridad y respetando la ley aplicable en materia de seguridad laboral Estas empresas deben impartir capacitación adecuada sobre dispositivos eléctricos a su personal y familiarizarlos con el contenido de este manual Código Descripción del error Resolución del error Posición Error 1 La puerta frontal está abierta por m...

Страница 160: ...islamiento en el circuito interno de la columna en este caso se debe controlar el circuito entre el interruptor diferencial y el contactor Error 4 El contactor está operativo cuando no debe estarlo La base Tipo 2 está alimentada en standby Controlar la señal de la tarjeta electrónica al contactor para asegurarse de que la tarjeta no esté dirigiendo el contactor Si la tarjeta no está dirigiendo el ...

Страница 161: ...e la base desde posición de CERRADO no pasa a posición de ABIERTO Controlar manualmente la mo vilidad del perno accionando la palanca roja ubicada en la parte trasera del motor de bloqueo de la base 2 Error 8 Los contadores de energía ya no comunican con la tarjeta electrónica Controlar la conexión de la línea Modbus Controlar la alimentación de los contadores de energía Controlar el funcionamient...

Страница 162: ... FUERA DE LÍNEA desde 24h Intentar reiniciar la estación cortando la alimentación por al menos 3 minutos luego restablecerla Si la estación permanece en este estado se debe controlar la conexión Dirigirse al servicio de referencia Error 11 El contactor está operativo cuando no debe estarlo La base Schuko está alimentada en standby Controlar la señal de la tarjeta electrónica al contactor para aseg...

Страница 163: ...ción apagada La tarjeta electrónica no recibe alimentación necesaria para su funcionamiento Controlar la alimentación antes de la estación Controlar el funcionamiento de la protección magnetotérmica presente dentro del cuadro para proteger la tarjeta electrónica Controlar el funcionamiento de la fuente de alimentación 12V de la tarjeta electrónica En el caso de productos conectados a la plataforma...

Страница 164: ... en el dispositivo principal 2 Retirar la tarjeta microSD de la ranura situada en la tarjeta electrónica 3 Introducir la tarjeta microSD en la ranura específica del ordenador para abrir la carpeta 4 Pegar dentro de la carpeta principal de la tarjeta micro SD el fichero de actualización NOTA Contactar con el servicio de asistencia SAT de GEWISS para obtener el fichero más actualizado 5 Introducir n...

Страница 165: ...E IT or LANGUAGE EN Corriente máxima de entrada MAXAMPEREAVAILABLE Se puede configurar una corriente de entrada diferente de la configurada de fábrica en función de la disponibilidad real y evitar problemáticas durante la fase de carga Para ello intervenir en el parámetro MAXAMPERAVAILABLE Ejemplo MAXAMPEREAVAILABLE 64 Máxima corriente para base AMPERESOCKET Se puede configurar una corriente de ca...

Страница 166: ...166 Dimensiones del producto Gewiss 16 Dimensiones del producto COLUMNA Máx 50 kg Kg COLOCAR DXF DE LA VERSIÓN 2 2 se requiere dxf 7 55 4 515 2 Manuale d installazione e uso ...

Страница 167: ...167 Dimensiones del producto Gewiss 430 mm 231 mm 33 5 mm 500 mm 152 mm 614 mm WALLBOX Máx 23 kg Kg 7 55 4 515 2 Manual de instalación y uso Manual de instalación y uso IT EN FR ES DE RO HU NL ...

Страница 168: ...iones que aquí se indica 14 1 Proceso de desconexión del dispositivo Para apagar completamente la estación versión de columna abrirla por su parte frontal con la llave suministrada e intervenir en el seccionador Para apagar completamente la estación versión Wallbox cortar la alimentación de la estación interviniendo en los interruptores ubicados línea arriba de la instalación y solo luego abrir la...

Страница 169: ... diferencial evitando el contacto con cualquier otro dispositivo o cable accesible El operador que acceda a las protecciones deberá haber recibido la formación necesaria del empresario operador de la estación de carga y estar autorizado para efectuar estas operaciones 15 2 Solo para columna con Restart El interruptor diferencial debe probarse al menos cada 6 meses como se indica a continuación El ...

Страница 170: ...tor no se cierra automáticamente significa que se ha detectado un problema de aislamiento en el circuito interno de la columna por lo tanto se debe controlar el circuito entre el interruptor diferencial y el contactor La puerta frontal debe abrirse solo para realizar la prueba de ambos dispositivos de corriente diferencial evitando el contacto con cualquier otro dispositivo o cable accesible 7 55 ...

Страница 171: ... conductor de tierra de la instalación y la caja y los demás componentes metálicos ubicados fuera de la estación de carga El operador que acceda a las protecciones deberá haber recibido la formación necesaria del empresario operador de la estación de carga y estar autorizado para efectuar estas operaciones 15 4 Estado de conservación del conector Se recomienda un control periódico del estado de co...

Страница 172: ...172 Gewiss 7 55 4 515 2 Handbuch für Montage und Betrieb ...

Страница 173: ...hluss der Stromversorgung der Vorrichtung 186 7 3 Installation der Vorrichtung WallBox Ausführung 190 7 3 1 Mechanische Installation 190 7 3 2 Anschluss der Stromversorgung der Vorrichtung 194 8 Längerer 195 8 1 Autostart 195 8 2 Stand Alone mit RFID Kartenlesegerät 195 8 3 Stand Alone mit Restart und RFID Kartenlesegerät 195 8 4 Über Mobil APP und Cloud Plattform OCPP 195 9 Statusanzeigen 196 9 1...

Страница 174: ...le für die Installation und den Betrieb dieses Geräts geltenden Sicherheitsvorschriften Richtlinien und Gesetze einhält Die Auswahl des Fachpersonals liegt immer in der Verantwortung der Gesellschaft die den Eingriff vornimmt da diese die alleinige Verantwortung für die Entscheidung trägt ob der Mitarbeiter für die Durchführung einer bestimmten Arbeit befähigt geeignet ist und damit die Sicherheit...

Страница 175: ...E FIL LYO UR WALLET CO NN EC TTH EPLUG DO WNL OA D JO INON AP PLICATION AN DSIGN UP dow nloa dthe App the QR code isund er the plug ww w joinon com 1 2 3 4 SC AN TH EQR CO DE BE LOW RE FIL LYO UR WALLET CO NN EC TTH EPLUG DO WNL OA D JO INON AP PLICATION AN DSIGN UP dow nloa dthe App the QR code isund er the plug Zeichenerklärung a Top g Schloss mit Sicherheitsschlüssel m MT b RGB Statusleds der B...

Страница 176: ... Electric vehicle requirements for conductive connection to an AC DC supply EMC requirements for off board electric vehicle charging systems EN 61000 6 1 Elektromagnetische Verträglichkeit Teil 6 1 Fachgrundnormen Störfestigkeit für Wohnbereich Geschäfts und Gewerbebereiche sowie Kleinbetriebe EN 61000 6 3 Elektromagnetische Verträglichkeit Teil 6 3 Fachgrundnormen Störaussendung für Wohnbereich G...

Страница 177: ...eckdose gleichzeitig auf der gleichen Seite zu verwenden sondern nur eine Steckdose pro Seite Bei diesen Modellen sind die Schukosteckdosen an der Frontseite der Tafel angebracht HINWEIS Der Zugriff auf und die Verwendung der Steckdosen IEC 60884 1 und nationaler Normen ist nur im privaten Umfeld und mit Zugriffsbeschränkungen erlaubt Auch für die Ausführung I ON Wallbox ist ein spezielles Modell ...

Страница 178: ...htlich des elektrischen Geräts betreffen Wenn die Verkleidung geöffnet wird bedeutet das nicht dass keine Spannung im Inneren anliegt Erst am Gerät arbeiten nachdem die Anlage über ein Gerät spannungslos geschaltet wurde das für die Gewährleistung der Isolierungsfunktion geeignet ist Das Gerät darf nur durch Fachpersonal unter Beachtung der Anweisungen in diesem Handbuch geöffnet werden Dieses Han...

Страница 179: ...en während die Vorrichtung in Betrieb ist Vor der Durchführung aller Arbeiten die Spannung abtrennen und sich vergewissern dass keine Spannung anliegt 3 2 Persönliche Schutzausrüstung PSA Wenn an der Vorrichtung gearbeitet wird muss mindestens die folgende Schutzausrüstung verwendet werden Bezeichnung Erklärung Sicherheitsschuhe In Übereinstimmung mit der Norm UNE EN ISO 20345 2012 oder der zuletz...

Страница 180: ...ird muss zur Vermeidung von Schäden wie folgt vorgegangen werden Für die korrekte Aufbewahrung der Ladestation die Originalverpackung bis zur Installation nicht entfernen Eine Beschädigung der Verpackung Schnitte Löcher usw verhindert eine korrekte Aufbewahrung der Ladestationen vor der Installation Die Vorrichtung sauber halten Staub Späne Fett usw beseitigen und die Anwesenheit von Nagetieren ve...

Страница 181: ...ng transportiert werden jedoch nur für kurze Strecken Transport der ausgepackten Vorrichtung Es müssen mindestens die folgenden Vorschriften beachtet werden 1 Die Ergonomieempfehlungen beachten die zur Vermeidung von Verletzungen durch Anheben von Gewichten unverzichtbar sind 2 Die Vorrichtung nicht loslassen bis sie perfekt befestigt oder abgestützt ist 3 Die Anweisungen einer anderen Person beac...

Страница 182: ... Betriebstemperatur 50 C 50 C Maximale relative Feuchtigkeit ohne Kondensat 95 95 Es muss daran erinnert werden dass sich gelegentlich aufgrund von Temperaturschwankungen etwas Kondensat bilden könnte Daher müssen die Ladestationen abgesehen von der Schutzeinrichtung über die das Gerät verfügt kontrolliert werden wenn sie an Orten in Betrieb genommen werden an denen die Nichteinhaltung aller zuvor...

Страница 183: ...on gestattet es nur eine Stromversorgungsleitung zu verlegen und eine einzige Fundamentplatte zu schaffen auf der beide Produkte wie nachstehend gezeigt installiert werden FRONT FRONT 2 cm Die beiden Ladevorrichtungen müssen einen Mindestabstand von 2 cm zwischen den Rückwänden gewährleisten HINWEIS Die Oberfläche auf der die Ladestation installiert wird muss angemessen geplant und in Übereinstimm...

Страница 184: ...nd für Elektrorisiken zugelassenen Schutzbrillen vorgeschrieben Alle Installationsarbeiten müssen unter Einhaltung der Richtlinien und geltenden Arbeitssicherheitsgesetze und unter Beachtung des Handbuchs vorgenommen werden 7 1 Allgemeine Installationsanforderungen Die Vorrichtung muss in einer geeigneten Umgebung installiert werden die die im Kapitel 6 Vorbereitung der Vorrichtung für die Install...

Страница 185: ...rderseite zugegriffen werden um die Installation und die Anschlüsse zu erleichtern Die Zugriffstür mit dem mitgelieferten Schlüssel öffnen Der Sicherheitsschlüssel kann nur abgezogen werden wenn die Tür vollkommen geschlossen ist 3 Den zuvor am Boden befestigten Untersatz mit der Ladestation verbinden 4 Die Säule am Untersatz befestigen indem man die Muttern auf den auf der Abbildung gezeigten Zap...

Страница 186: ...nd M32 für die Leistungskabel gelb gekennzeichnet und M16 für die Datenkabel rot gekennzeichnet Je nach Ausführung des Ladegeräts sind die folgenden Kabelverschraubungen und Stopfen im Lieferumfang enthalten Ausführung Gelieferte Kabelverschraubungen Gelieferte Stopfen einphasig 7 4 kW M40 M32 M50 Dreiphasig 11 kW M32 M40 M50 Dreiphasig 22 kW M40 M32 M50 2 Die Versorgungskabel L N PE anschließen P...

Страница 187: ...wendet werden 3 Den Leitungsschutzschalter in die Stellung ON bringen um die Ladesäule zu versorgen 3 1 Für die Ladesäule mit Restart die Vorrichtung wie unten beschrieben aktivieren 2 1 Die Ladesäule einschalten und überprüfen ob die LED der Vorrichtung leuchtet grüne LED 4 Die hierfür vorgesehene Testtaste drücken um die Funktion des Fehlerstromschutzes zu prüfen RESTART 7 55 4 515 2 Handbuch fü...

Страница 188: ...tusmeldung angezeigt abhängig vom Modell Die Station ist betriebsbereit und wartet auf die Authentifizierung des Benutzers um mit dem Laden zu beginnen Ausführung Backend und RFID oder auf den Start des Ladevorgangs Ausführung Autostart Wenn die Station irgendeine Betriebsstörung erkennt wechselt die Beleuchtung der entsprechenden Steckdose oder beider je nach vorliegendem Defekt Farbe siehe Kapit...

Страница 189: ...189 Installation und Anschluss der Vorrichtung Gewiss 7 55 4 515 2 Handbuch für Montage und Betrieb Handbuch für Montage und Betrieb IT EN FR ES DE RO HU NL ...

Страница 190: ...le einer Wandinstallation des Produkts mit dem mitgelieferten Zubehör muss wie folgt vorgegangen werden 1 Den Montagebereich angemessen vorbereiten indem der Haltebügel an der Wand befestigt wird Dazu Bohrungen mit den folgenden Abständen ausführen 189 5 mm 513 mm 94 75 mm 94 75 mm Ø6 5 mm Ø6 5 mm 7 55 4 515 2 Handbuch für Montage und Betrieb ...

Страница 191: ... montieren Nachdem das Produkt positioniert wurde die Bohrungen an der Wand ausführen Dabei zur Zentrierung den unteren Bügel verwenden Dann die Arretierschraube anziehen 4 Sicherstellen dass die Vorrichtung korrekt befestigt wurde 5 Den Schutzfilm von der Frontblende entfernen 7 55 4 515 2 Handbuch für Montage und Betrieb Handbuch für Montage und Betrieb IT EN FR ES DE RO HU NL ...

Страница 192: ... GW46551 zur Installation wie folgt vorgehen 1 Auf der Rückseite der Wallbox die Haltebügel wie auf der Abbildung gezeigt montieren 2 Die Wallbox am Mast positionieren und sie durch Anziehen der Arretiermuttern der beiden Platten wie auf der Abbildung gezeigt sichern 7 55 4 515 2 Handbuch für Montage und Betrieb ...

Страница 193: ...bungen sind M25 und M32 für die Leistungskabel gelb gekennzeichnet und M16 für das Datenkabel rot gekennzeichnet Je nach Ausführung des Ladegeräts sind die folgenden Kabelverschraubungen und Stopfen im Lieferumfang enthalten Ausführung Gelieferte Kabelverschraubungen Gelieferte Stopfen einphasig 7 4 kW 2x M25 2x M32 Dreiphasig 11 kW 2x M25 2x M32 Dreiphasig 22 kW 2x M32 2x M25 HINWEIS Unabhängig v...

Страница 194: ... R S T Phasen R S T N Nullleiter PE Erde Dreiphasige Ladestation 3 Für den Anschluss des Hilfstromkreises der die Platine und die elektronischen Vorrichtungen speist gibt es zwei eigene Klemmen L7 N3 Es kann eine dritte Leitung mit Hilfe einer unterbrechungsfreien Leitung oder durch eine Drahtbrücke zwischen L1 R1 und L7 und zwischen N1 und N3 angeschlossen werden Eventuell kann eine doppelte Drah...

Страница 195: ...e mit Restart und RFID Kartenlesegerät Die Restart Funktion ermöglicht die automatische Rücksetzung des Fehlerstromschutzes bei vorzeitiger Auslösung Wenn der Fehlerstromschutzschalter auslöst 1 die Säule meldet die Störung und unterbricht den Ladevorgang des Fahrzeugs 2 der Benutzer muss das Fahrzeug von der Säule abkoppeln 3 Restart prüft ob die Schaltung in der Ladesäule isoliert ist 4 Wenn die...

Страница 196: ...ss LADEVORGANG Displaytext Beschreibung ZUM LADEN KARTE VORHALTEN Die Station in der Betriebsart RFID wartet auf das Lesen einer RFID Karte um deren Berechtigung zu prüfen und den Ladevorgang zu starten KARTE BERECHTIGT BITTE WARTEN Die RFID Karte wurde vom System erkannt ACHTUNG KARTE UNGÜLTIG Die RFID Karte wurde nicht erkannt und es kann kein Ladevorgang gestartet werden KARTE BERECHTIGT KABEL ...

Страница 197: ...rde geht die Ladestation in die Betriebsart Löschen Es muss eine RFID Karte nach der anderen vorgehalten werden um sie aus der lokalen Whitelist zu löschen 9 3 Beleuchtung im Inneren der Typ 2 Steckdose Mit T2 Steckdose mit Vandalenschutz und mit Betriebsart Stand Alone mit RFID und per Handy App und Cloud Plattform OCPP ausgestatteten Modelle verfügen über LEDs die zu blinken beginnen wenn eine H...

Страница 198: ...Tc 0000 8 Den Stecker aus der Steckdose in der Ladestation entfernen Von grün blinkend bis grün fest leuchtend AUFLADUNG ABGESCHLOSSEN KABEL ENTFERNEN ÜBERSICHT LADEVORGANG Ts 0000 Tc 0000 9 Wenn die Station keine Fehler erfasst kehrt sie in den Standby Status zurück Dauerhaft grün STECKER EINSTECKEN UM AUFLADEN ZU STARTEN HINWEIS Zur Beendigung des Ladevorgangs muss die Ladesitzung zuerst in Auto...

Страница 199: ... und die Datei in der MicroSD Karte gespeichert wurde die MicroSD Karte wieder in die Platine einstecken 7 Die Ladestation wieder speisen 8 Wenn das Verfahren ohne Fehler durchgeführt wurde importiert die Station die Datei und die darin enthaltenen Daten Am Display wird die Meldung KONFIGURATION ABGESCHLOSSEN angezeigt Am Ende des Importverfahrens wird die Datei auf der MicroSD Karte in RFID_old c...

Страница 200: ...Standby Status zurück Dauerhaft grün ZUM LADEN KARTE VORHALTEN 10 3 Stand Alone mit Restart und RFID Kartenlesegerät Siehe Abschnitt 10 2 10 4 Über Mobil APP und Cloud Plattform OCPP In dieser Betriebsart ist die Ladestation über das Protokoll OCPP an eine Verwaltungsplattform angeschlossen Das Protokoll OCPP gestattet der Ladestation den Anschluss an jede Plattform die dieses Protokoll verwendet ...

Страница 201: ...mten Arbeit befähigt geeignet ist und damit die Sicherheit gewährleistet und die anwendbaren Arbeitssicherheitsgesetze einhält Diese Unternehmen müssen ihren Mitarbeitern eine angemessene Einweisung in elektrische Geräte erteilen und dafür sorgen dass diese sich mit dem Inhalt dieses Handbuchs vertraut machen Artikelnummer Fehlerbeschreibung Fehlerbeseitung Position Fehler 1 Die frontseitige Tür i...

Страница 202: ...er internen Schaltung der Ladesäule festgestellt hat in diesem Fall muss die Schaltung zwischen dem Fehlerstromschutzschalter und dem Schaltschutz geprüft werden Fehler 4 Der Schaltschutz ist in Betrieb wenn er es nicht sein soll Die Typ 2 Steckdose wird im Standby gespeist Das Signal von der Platine zum Schaltschütz prüfen um sicherzustellen dass die Platine den Schaltschütz nicht steuert Wenn di...

Страница 203: ...uerung des Sperrmotors der Steckdose er schaltet nicht von GESCHLOSSEN auf GEÖFFNET Von Hand sicherstellen dass sich der Zapfen bewegen kann indem man den roten Hebel auf der Rückseite des Motors für die Verriegelung der Typ 2 Steckdose betätigt Fehler 8 Die Stromzähler kommunizieren nicht mehr mit der Platine Den Anschluss der Modbus Leitung prüfen Die Speisung der Stromzähler prüfen Den korrekte...

Страница 204: ...u starten indem man die Versorgung für mindestens 3 Minuten abtrennt und dann wieder anschließt Wenn die Station in diesem Zustand bleibt muss der Anschluss kontrolliert werden Den zuständigen Servicedienst kontaktieren Fehler 11 Der Schaltschutz ist in Betrieb wenn er es nicht sein soll Die Schukosteckdose wird im Standby gespeist Das Signal von der Platine zum Schaltschütz prüfen um sicherzustel...

Страница 205: ...teht das Kabel ersetzen Station aus geschaltet Die Platine erhält die für ihren Betrieb notwendige Stromversorgung nicht Stromversorgung vor der Station prüfen Betrieb des Schutzschalters im Inneren des Schaltkastens zum Schutz der Platine prüfen Betrieb des 12V Netzteils der Platine prüfen Für Produkte die mit der JOINON Plattform verbunden sind und falls das Wartungspaket erworben wurde bei Beda...

Страница 206: ...uptschalters von der Stromversorgung trennen 2 Die MicroSD Karte aus ihrem Steckplatz auf der Platine entfernen 3 Die MicroSD Karte in den vorgesehenen Steckplatz am PC einsetzen um den Ordner zu öffnen 4 Die Aktualisierungsdatei in den Hauptordner der MicroSD Karte kopieren HINWEIS Den SAT Kundendienst von GEWISS für die aktuellste Datei kontaktieren 5 Die MicroSD Karte wieder in den Steckplatz a...

Страница 207: ...AGE IT or LANGUAGE EN Maximaler Eingangsstrom MAXAMPEREAVAILABLE Der ab Werk eingestellte Eingangsstrom kann entsprechend der tatsächlichen Verfügbarkeit geändert werden und um Probleme während des Ladevorgangs zu vermeiden Dazu muss der Parameter MAXAMPEREAVAILABLE geändert werden Beispiel MAXAMPEREAVAILABLE 64 Maxmaler Strom pro Steckdose AMPERESOCKET Für jede Steckdose kann der ab Werk eingeste...

Страница 208: ...208 Abmessungen des Produkts Gewiss 16 Abmessungen des Produkts SÄULE Max 50 kg Kg DXF IN DER 2 2 VER SION EIN FÜGEN dxf not wendig 7 55 4 515 2 Handbuch für Montage und Betrieb ...

Страница 209: ...209 Abmessungen des Produkts Gewiss 430 mm 231 mm 33 5 mm 500 mm 152 mm 614 mm WALLBOX Max 23 kg Kg 7 55 4 515 2 Handbuch für Montage und Betrieb Handbuch für Montage und Betrieb IT EN FR ES DE RO HU NL ...

Страница 210: ...e hier angeführte Reihenfolge der Arbeitsschritte eingehalten werden 14 1 Vorgehensweise für die Abtrennung der Vorrichtung Um die Station vollkommen auszuschalten Säulenausführung diese frontseitig mit dem mitgelieferten Schlüssel öffnen und den Lasttrennschalter betätigen Um die Station vollkommen auszuschalten Wallbox Ausführung diese von der Spannung trennen indem man die Schalter vor der Anla...

Страница 211: ...mit jedem anderen zugänglichen Gerät oder Kabel vermieden werden Ein Mitarbeiter der auf die Schutzschalter zugreift muss vom Arbeitgeber angemessen geschult worden sein Bediener der Ladestation und von diesem zur Durchführung dieser Arbeit autorisiert worden sein 15 2 Nur für Ladesäule mit Restart Der Fehlerstromschutzschalter muss mindestens alle 6 Monate wie unten beschrieben geprüft werden Der...

Страница 212: ...ter nicht automatisch schließt wurde ein Isolationsfehler in der internen Schaltung der Ladesäule festgestellt weshalb die Schaltung zwischen dem Fehlerstromschutzschalter und dem Schaltschutz überprüft werden muss Die frontseitige Tür darf nur geöffnet werden um die beiden Fehlerstromschutzschalter zu testen Dabei muss der Kontakt mit jedem anderen zugänglichen Gerät oder Kabel vermieden werden 7...

Страница 213: ...t des Erdungsleiters der Anlage und dem Schaltkasten und den anderen Metallkomponenten außerhalb der Ladestation zu testen Ein Mitarbeiter der auf die Schutzschalter zugreift muss vom Arbeitgeber angemessen geschult worden sein Bediener der Ladestation und von diesem zur Durchführung dieser Arbeit autorisiert worden sein 15 4 Erhaltungszustand des Steckers Wir empfehlen den Zusand des Steckers und...

Страница 214: ...214 Gewiss 7 55 4 515 2 Manual de instalare și utilizare ...

Страница 215: ...228 7 3 Instalarea dispozitivului versiunea WallBox 232 7 3 1 Instalarea mecanică 232 7 3 2 Conectarea alimentării dispozitivului 236 8 Funcţionare 237 8 1 Autostart 237 8 2 Stand Alone cu cititor de carduri RFID 237 8 3 Stand Alone cu aplicaţie Restart şi cititor de carduri RFID 237 8 4 Prin intermediul aplicaţiei mobile şi a platformei cloud OCPP 237 9 Informaţii despre stare 238 9 1 LED RGB 238...

Страница 216: ...sonalul care corespunde tuturor normelor directivelor şi legilor în materie de siguranţă aplicabile în cazul intervenţiilor de instalare şi funcţionare a acestui dispozitiv Selectarea personalului calificat reprezintă exclusiv responsabilitatea societăţii care efectuează intervenţia deoarece aceasta este unica responsabilă care decide dacă operatorul este calificat potrivit pentru a desfăşura o an...

Страница 217: ...O UR WALLET CO NN EC TTH EPLUG DO WNL OA D JO INON AP PLICATION AN DSIGN UP dow nloa dthe App the QR code isund er the plug ww w joinon com 1 2 3 4 SC AN TH EQR CO DE BE LOW RE FIL LYO UR WALLET CO NN EC TTH EPLUG DO WNL OA D JO INON AP PLICATION AN DSIGN UP dow nloa dthe App the QR code isund er the plug Legendă a Partea superioară g Dispozitiv de închidere cu cheie de siguranţă m MT b LED RGB st...

Страница 218: ...ic vehicle requirements for conductive connection to an AC DC supply EMC requirements for off board electric vehicle charging systems EN 61000 6 1 Compatibilitate electromagnetică Partea 6 1 Norme generale Imunitatea la medii rezidenţiale comerciale şi ale industriei uşoare EN 61000 6 3 Compatibilitate electromagnetică Partea 6 3 Norme generale Emisiile pentru medii rezidenţiale comerciale şi ale ...

Страница 219: ...zei tip 2 ş ia prizei Schuko pe aceeaşi parte ci doar a câte unei singure prize pe o parte Prizele Schuko de la aceste modele sunt montate pe partea frontală a panoului NOTĂ Accesarea şi utilizarea prizelor IEC 60884 1 şi a normelor naţionale sunt permise doar în contexte private sau cu restricţii de acces Şi pentru varianta I ON Wallbox este disponibil un model specific dotat cu o priză tip 2 şi ...

Страница 220: ...ii electrice Deschiderea carcasei nu implică absenţa tensiunii în interior Intervenţiile pe echipament pot avea loc doar după ce aţi deconectat instalaţia de la sursele de tensiune sau prin intermediul unui dispozitiv adecvat care să asigure funcţia de izolare Poate fi deschisă doar de personal calificat urmând instrucţiunile din prezentul manual Este obligatoriu să se citească şi să se înţeleagă ...

Страница 221: ... deconectaţi şi nu conectaţi terminalele cât timp dispozitivul este în funcţiune Deconectaţi şi verificaţi absenţa tensiunii înainte de efectuarea oricărei operaţiuni 3 2 Dispozitiv de protecţie individuală DPI Când se acţionează asupra dispozitivului utilizaţi cel puţin următoarele echipamente de siguranţă Denumire Explicaţie Încălţăminte de protecţie Conform normei UNE EN ISO 20345 2012 sau a ul...

Страница 222: ... a se evita deteriorarea acestuia trebuie să se procedeze în felul următor Pentru o corectă depozitare a staţiilor de încărcare nu îndepărtaţi ambalajul original până în momentul instalării Deteriorarea ambalajului tăieturi găuri etc împiedică depozitarea corespunzătoare a staţiilor de încărcare înainte de instalare Păstraţi dispozitivul curat eliminaţi praful talaşul grăsimea etc si evitaţi preze...

Страница 223: ...naţie În acest moment poate fi transportată vertical fără ambalaj dar numai pe distanţe scurte Manipularea dispozitivului dezambalat Trebuie să se respecte cel puţin următoarele prevederi 1 Urmaţi recomandările ergonomice de bază pentru a preveni accidentele la ridicarea greutăţilor 2 Nu eliberaţi dispozitivul până când nu este perfect fixat sau sprijinit 3 Urmaţi instrucţiunile unei alte persoane...

Страница 224: ... de funcţionare 50 C 50 C Umiditate relativă maximă fără condens 95 95 Trebuie să se ţină cont că ocazional se poate produce un condens moderat ca şi consecinţă a salturilor de temperatură De aceea în afară de protecţia cu care este prevăzut aparatul este necesară o monitorizare a staţiilor de reîncărcare atunci când acestea sunt activate în locuri în care există probabilitatea de a nu fi îndeplin...

Страница 225: ... specială permite trasarea unei linii unice de alimentare şi realizarea unei plinte unice pe care se pot instala două produse după cum se arată în continuare FRONT FRONT 2 cm Cele două unităţi de reîncărcare trebuie să asigure o distanţă minimă de 2 cm între pereţii inferiori NOTĂ Suprafaţa pe care va fi instalată staţia de reîncărcare trebuie să fie proiectată şi realizată în conformitate cu stan...

Страница 226: ...şi ochelari de protecţie împotriva riscurilor electrice Toate operaţiunile de instalare trebuie efectuate cu respectarea normelor şi legilor în materie de siguranţă conform manualului de instrucţiuni 7 1 Dispoziţii generale privind instalarea Dispozitivul trebuie să fie instalat într un mediu adecvat care respectă indicaţiile descrise la capitolul 6 Pregătirea dispozitivului pentru instalare În pl...

Страница 227: ...or cu deschidere cu cheie pentru a uşura instalarea şi conexiunile Deschideţi portiţa de acces cu ajutorul cheii aferente Cheia de siguranţă este detaşabilă doar în urma închiderii complete a portiţei 3 Cuplaţi suportul de fixare deja fixat la sol la staţia de reîncărcare 4 Fixaţi coloana de reîncărcare pe suport prin strângerea tijelor indicate în imagine Cuplul de strângere maximă este de 20 Nm ...

Страница 228: ...le sunt M50 M40 M32 pentru cablurile de alimentare evidenţiate cu galben şi M16 pentru cablurile de date evidenţiate cu roşu În funcţie de versiunea unităţii de reîncărcare presetupele şi mufele furnizate sunt următoarele Versiune Presetupe furnizate Mufe furnizate Monofazic 7 4 kW M40 M32 M50 Trifazic 11 kW M32 M40 M50 Trifazic 22 kW M40 M32 M50 2 Conectaţi cablurile de alimentare L N PE PE T N R...

Страница 229: ...iile diferenţiale şi întrerupătoarele magnetotermice în poziţia ON şi alimentaţi coloana 3 1 Pentru coloana cu aplicaţie Restart continuaţi cu activarea dispozitivului conform următoarei ilustraţii 2 1 Alimentaţi coloana şi verificaţi dacă LED ul dispozitivului este aprins LED ul verde 4 Verificaţi dacă protecţiile diferenţiale funcţionează corect apăsând tasta de testare corespunzătoare RESTART 7...

Страница 230: ...e model Staţia este gata şi se află în stare de aşteptare în vederea identificării utilizatorului pentru a continua operaţiunea de reîncărcare versiunea backend şi RFID sau pentru a începe reîncărcarea versiunea Autostart Dacă staţia detectează o defecţiune de funcţionare iluminarea prizei corespunzătoare sau a ambelor prize îşi schimbă culoarea în funcţie de defecţiunea identificată vezi capitolu...

Страница 231: ...231 Instalarea şi conectarea dispozitivului Gewiss 7 55 4 515 2 Manual de instalare și utilizare Manual de instalare și utilizare IT EN FR ES DE RO HU NL ...

Страница 232: ...că În cazul instalării produsului pe perete cu accesoriul din dotare operaţiunile de instalare sunt următoarele 1 Se pregăteşte în mod adecvat zona de montare prin fixarea suportului de sprijin pe perete la următoarele intervale 189 5 mm 513 mm 94 75 mm 94 75 mm Ø6 5 mm Ø6 5 mm 7 55 4 515 2 Manual de instalare și utilizare ...

Страница 233: ...xat pe perete Odată produsul poziţionat daţi o gaură în perete utilizând ca şi punct de centrare suportul inferior şi strângeţi şuruburile de blocare 4 Verificaţi dacă dispozitivul este fixat corect 5 Îndepărtaţi folia de protecţie de pe panoul frontal 7 55 4 515 2 Manual de instalare și utilizare Manual de instalare și utilizare IT EN FR ES DE RO HU NL ...

Страница 234: ...6551 operaţiunile de instalare sunt următoarele 1 Montaţi pe fundul wallbox ului dispozitivele de sprijin aşa cum se arată în imagine 2 Poziţionaţi wallbox ul pe perete şi asiguraţi l strângând şuruburile de blocare ale celor două plăci aşa cum se arată în imagine 7 55 4 515 2 Manual de instalare și utilizare ...

Страница 235: ... Presetupele disponibile sunt M25 şi M32 pentru cablurile de putere evidenţiate cu galben şi M16 pentru cablul de date evidenţiat cu roşu În funcţie de versiunea unităţii de reîncărcare presetupele şi mufele furnizate sunt următoarele Versiune Presetupe furnizate Mufe furnizate Monofazic 7 4 kW 2x M25 2x M32 Trifazic 11 kW 2x M25 2x M32 Trifazic 22 kW 2x M32 2x M25 NOTĂ oricare ar fi tipul de inst...

Страница 236: ...ispozitivului PE R1 S1 T1 N1 R2 S2 T2 N2 R S T Fazele R S T N Nul PE De sol Staţie de reîncărcare trifazică 3 În ceea ce priveşte conectarea circuitului auxiliar care alimentează fişa şi dispozitivele electronice există două borne aferente L7 N3 Se poate conecta o a treia linie în baza unei linii de continuitate sau se poate realiza un jumper între L1 R1 şi L7 şi între N1 şi N3 Eventual se poate r...

Страница 237: ...cititor de carduri RFID Funcţia aplicaţiei Restart permite reînchiderea automată a protecţiei diferenţiale în cazul intervenţiei neprevăzute În cazul intervenţiei întrerupătorului diferenţial 1 Turela semnalează anomalia şi blochează reîncărcarea vehiculului 2 Utilizatorul trebuie să deconecteze vehiculul de la coloană 3 Aplicaţia Restart efectuează o verificare a izolaţiei circuitului intern al c...

Страница 238: ...ntul să înţeleagă în ce stare se află staţia şi ce acţiuni sunt necesare PROCESUL DE REÎNCĂRCARE Text afişaj Descriere TRECEŢI CARDUL PENTRU A REÎNCĂRCA Staţia în modul RFID se află în stare de aşteptare citire a unui card RFID pentru a verifica starea de eligibilitate şi pentru a începe procesul de reîncărcare CARD ACTIVAT AŞTEPTARE Cardul RFID a fost recunoscut de sistem ATENŢIE CARD INVALID Car...

Страница 239: ...r staţia intră în modul anulare Trebuie să se treacă câte un card RFID pe rând pentru a l anula din lista albă locală 9 3 Iluminarea în interiorul prizei Tip 2 Modelele prevăzute cu priză T2 antivandalizare şi cu mod de funcţionare Stand Alone cu RFID e prin intermediul aplicaţiei mobile şi a platformei cloud OCPP conţin în interior un sistem de iluminare cu LED cu aprindere intermitentă atunci câ...

Страница 240: ... la verde intermitent REÎNCĂRCARE ÎN CURS Ts 0000 Tc 0000 8 Scoateţi ştecherul din priza staţiei de reîncărcare De la verde intermitent la verde continuu ÎNCĂRCARE FINALIZATĂ SCOATEŢI CABLUL REZUMAT SESIUNE Ts 0000 Tc 0000 9 În cazul în care staţia nu detectează erori revine la starea de stand by Verde continuu INTRODUCEŢI MUFA PENTRU A ÎNCEPE REÎNCĂRCAREA NOTĂ Pentru a finaliza încărcarea va fi n...

Страница 241: ... creată structura şi a fost salvat fişierul pe cardul microSD introduceţi din nou cardul microSD în placa electronică 7 Alimentaţi din nou staţia de încărcare 8 Dacă procedura a fot realizată fără erori staţia va importa fişierul şi datele pe care acesta le conţine Pe afişaj se va putea citi mesajul CONFIGURAŢIE TERMINATĂ CONFIGURAZIONE COMPLETATA La sfârşitul procedurii de import fişierul va fi r...

Страница 242: ...ctează erori revine la starea de stand by Verde continuu TRECEŢI CARDUL PENTRU A REÎNCĂRCA 10 3 Stand Alone cu aplicaţie Restart şi cu cititor de carduri RFID Consultaţi secţiunea 10 2 10 4 Prin intermediul aplicaţiei mobile şi a platformei cloud OCPP Staţia de reîncărcare în acest mod este conectată la o platformă de control utilizând protocolul OCPP Protocolul OCPP face posibil ca staţia să se c...

Страница 243: ... este calificat potrivit pentru a desfăşura o anumită activitate în deplină siguranţă şi cu respectarea legislaţiei aplicabile în materie de protecţia muncii Aceste societăţi trebuie să asigure propriului personal o instruire adecvată cu privire la dispozitivele electrice şi să se asigure că acesta este familiarizat cu conţinutul prezentului manual Cod Descriere eroare Depanare Poziţie Eroare 1 Po...

Страница 244: ...iune la izolaţia circuitul intern al coloanei fiind astfel necesară verificarea circuitului dintre întrerupătorul diferenţial şi contactor Eroare 4 Contorul este operaţional când nu ar trebui să fie Priza Tip 2 este alimentată în starea stand by Verificaţi semnalul de la placa electronică la contactor pentru a vă asigura că placa electronică nu pilotează contactorul Dacă placa nu pilotează contact...

Страница 245: ...care a prizei de pe poziţia ÎNCHIS nu trece pe poziţia DECHIS Verificaţi manual mobilitatea tijei acţionând maneta roşie poziţionată în spatele motorului de blocare al prizei Tip 2 Eroare 8 Contoarele de energie nu mai comunică cu placa electronică Verificaţi conexiunea liniei Modbus Verificaţi alimentarea contoarelor de energie Verificaţi corecta funcţionare a contoarelor de energie Verificaţi nu...

Страница 246: ...niţi staţia întrerupând alimentarea cel puţin 3 minute iar apoi reconectaţi sursa de alimentare Dacă staţia rămâne în această stare este nevoie să verificaţi conexiunea Adresaţi vă serviciului de referinţă Eroare 11 Contorul este operaţional când nu ar trebui să fie Priza Schuko reiese că este alimentată în condiţie de standby Verificaţi semnalul de la placa electronică la contactor pentru a vă as...

Страница 247: ...nu primeşte alimentarea necesară funcţionării Verificaţi alimentarea în amonte a staţiei Verificaţi funcţionarea protecţiei termomagnetice din interiorul cadrului de protecţie a plăcii electronice Verificaţi funcţionarea dispozitivului de alimentare de 12 V al plăcii electronice În cazul produselor conectate la platforma JOINON şi în cazul în care a fost achiziţionat pachetul de întreţinere în caz...

Страница 248: ... de alimentare acţionând asupra dispozitivului principal 2 Scoateţi cardul microSD din fanta aferentă situată pe placa electronică 3 Introduceţi cardul microSD în fanta propriului computer pentru a deschide fişierul 4 Lipiţi fişierul de actualizare în fişierul principal al cardului microSD NOTĂ Contactaţi serviciul asistenţă SAT al GEWISS pentru a obţine fişierul cel mai actualizat 5 Introduceţi d...

Страница 249: ...ntrare diferit de cel setat din fabrică în funcţie de disponibilitatea reală şi pentru a se evita problemele din faza de reîncărcare Pentru a face acest lucru trebuie să se acţioneze parametrul MAXAMPEREAVAILABLE Exemplu MAXAMPEREAVAILABLE 64 Curentul maxim pentru priză AMPERESOCKET Pentru fiecare priză se poate seta un curent de reîncărcare diferit de cel setat din fabrică în funcţie de disponibi...

Страница 250: ...250 Dimensiuni produs Gewiss 16 Dimensiuni produs COLOANĂ Max 50 Kg Kg APLICA REA DXF LA VERSI UNEA 2 2 serve dxf 7 55 4 515 2 Manual de instalare și utilizare ...

Страница 251: ...251 Dimensiuni produs Gewiss 430 mm 231 mm 33 5 mm 500 mm 152 mm 614 mm WALLBOX Max 23 Kg Kg 7 55 4 515 2 Manual de instalare și utilizare Manual de instalare și utilizare IT EN FR ES DE RO HU NL ...

Страница 252: ... să se respecte ordinea operaţiunilor după cum se arată în continuare 14 1 Procesul de deconectare a dispozitivului Pentru a opri complet staţia versiunile cu coloană deschideţi frontal cu cheia din dotare şi interveniţi asupra separatorului Pentru a opri complet staţia versiunea Wallbox deconectaţi staţia intervenind asupra întrerupătoarelor în amonte ale dispozitivului şi doar apoi deschideţi ca...

Страница 253: ...itând contactul cu orice alt dispozitiv sau cablu accesibil Operatorul care are acces la protecţii trebuie să fie instruit corespunzător de manager operatorul staţiei de reîncărcare şi să fie autorizat de acesta să efectueze respectivele operaţiuni 15 2 Numai pentru coloana cu aplicaţie Restart Întrerupătorul diferenţial trebuie să fie testat cel puţin o dată la 6 luni după cum este descris în con...

Страница 254: ...că întrerupătorul nu se închide automat înseamnă că există o problemă la izolaţia din circuitul intern al coloanei fiind astfel necesară verificarea circuitului dintre întrerupătorul diferenţial şi contactor Uşa din faţă trebuie să fie deschisă doar pentru efectuarea testului ambelor dispozitive de curent diferenţial evitând contactul cu orice alt dispozitiv sau cablu accesibil 7 55 4 515 2 Manual...

Страница 255: ... conductorului de împământare al dispozitivului şi cutie şi alte componente metalice situate în exteriorul staţiei de reîncărcare Operatorul care are acces la protecţii trebuie să fie instruit corespunzător de manager operatorul staţiei de reîncărcare şi să fie autorizat de acesta să efectueze respectivele operaţiuni 15 4 Starea de păstrare a conectorului Se recomandă un control periodic al stării...

Страница 256: ...256 Gewiss 7 55 4 515 2 Használati és karbantartási kézikönyv ...

Страница 257: ...beszerelés 269 7 2 2 A berendezés betáplálásának csatlakoztatása 270 7 3 A berendezés beszerelése WallBox verzió 274 7 3 1 Gépészeti beszerelés 274 7 3 2 A berendezés betáplálásának csatlakoztatása 278 8 Működés 279 8 1 Autostart 279 8 2 Stand Alone RFID kártyaleolvasóval 279 8 3 Stand Alone Restarttal RFID kártyaleolvasóval 279 8 4 Mobile APP és OCPP cloud platform segítségével 279 9 Állapotjelzé...

Страница 258: ...lunk aki megfelel az eszköz telepítésére és működtetésére vonatkozó összes biztonsági szabványnak irányelvnek és törvénynek A szakemberek kiválasztása mindig a beavatkozást végző cég felelőssége mivel az egyetlen felelős annak eldöntésében hogy a munkavállaló megfelelő e alkalmas e egy adott munka elvégzésére így megóvja biztonságát és tiszteletben tartja a munkahelyi biztonságról szóló vonatkozó ...

Страница 259: ...C TTH EPLUG DO WNL OA D JO INON AP PLICATION AN DSIGN UP dow nloa dthe App the QR code isund er the plug ww w joinon com 1 2 3 4 SC AN TH EQR CO DE BE LOW RE FIL LYO UR WALLET CO NN EC TTH EPLUG DO WNL OA D JO INON AP PLICATION AN DSIGN UP dow nloa dthe App the QR code isund er the plug Jelmagyarázat a Top g Zár biztonsági kulccsal m MT b Aljzatok állapotának RGB ledje h Műszaki címke n MID Energi...

Страница 260: ...for conductive connection to an AC DC supply EMC requirements for off board electric vehicle charging systems EN 61000 6 1 Elektromágneses összeférhetőség 6 1 rész Általános szabványok A lakóhelyi a kereskedelmi és a kisipari környezet zavartűrése EN 61000 6 3 Elektromágneses összeférhetőség 6 3 rész Általános szabványok A lakóhelyi a kereskedelmi és a kisipari környezet zavarkibocsátási szabványa...

Страница 261: ...yidejű használata ugyanazon az oldalon nem lehetséges csak oldalanként 1 aljzat Ezekben a modellekben a Schuko aljzatok a panel elején találhatók MEGJEGYZÉS Az MSZ IEC 60884 1 aljzatok és az országos szabványok elérése és használata csak magánjellegű szövegben vagy hozzáférési korlátozásokkal engedélyezett A Wallbox I ON változathoz is kapható egy speciális modell amely el van látva egy Schuko alj...

Страница 262: ...etartása alól A burkolat kinyitása nem jelenti hogy belül áramtalanítva van A készüléken csak akkor végezzen munkát ha a rendszert áramtalanította egy megfelelő eszközzel amely garantálja az elszigetelését Csak szakember nyithatja ki a kézikönyvben megadott utasítások szerint A készülék kezelése telepítése vagy használata előtt kötelező elolvasni és megérteni a kézikönyvet A Gewiss nem vállal fele...

Страница 263: ...és ne is csatlakoztasson semmilyen csatlakozót Bármely művelet elvégzése előtt válassza le és ellenőrizze hogy áramtalanítva van e 3 2 Egyéni védőfelszerelések Ha a készülékkel dolgozik használja legalább az alábbi biztonsági felszereléseket Megnevezés Magyarázat Biztonsági cipő Az EN ISO 20345 2012 szabványnak vagy legutolsó kiadott változatának megfelelően Védősisak Az MSZ EN 397 1995 szabványna...

Страница 264: ... szerint járjon el A töltőállomások megfelelő tárolásához ne távolítsa el az eredeti csomagolást a telepítés időpontjáig Ha a csomagolás megsérül vágások lyukak stb ez megakadályozza a töltőállomások helyes tárolását a telepítés előtt Tartsa tisztán a készüléket távolítsa el a port forgácsot zsírt stb gondoskodjon a rágcsálókkal szembeni védelemről is Védje a felfröccsenő víztől hegesztés közben k...

Страница 265: ...t függőlegesen szállítani csomagolás nélkül de csak rövid távolságra A kicsomagolt készülék mozgatása Legalább a következő előírásokat be kell tartani 1 Kövesse az alapvető ergonómiai tanácsokat hogy elkerülje a sérüléseket amikor súlyokat emel 2 Ne engedje el az eszközt amíg nincs tökéletesen rögzítve vagy megtámasztva 3 Kövesse egy másik személy utasításait aki irányítja a végrehajtandó mozgások...

Страница 266: ... C 25 C Maximális üzemelési hőmérséklet 50 C 50 C A maximális relatív páratartalom kondenzvíz nélkül 95 95 Emlékeztetünk arra hogy a hőmérsékleti ingadozások miatt időnként mérsékelt kondenzvíz csapódhat ki Ezért a készüléken meglévő védelem mellett a töltőállomásokat is figyelni kell ha olyan helyeken helyezik üzembe azokat ahol valószínű hogy a fent leírt feltételek nem teljesülnek Soha ne helye...

Страница 267: ...ges konfiguráció lehetővé teszi egyetlen tápvezeték nyomon követését és egy alapzat kialakítását amelyre két terméket lehet felszerelni az alábbiaknak megfelelően FRONT FRONT 2 cm A két töltőegység esetén az alsó falak közötti legalább 2 cm távolságot kell biztosítani MEGJEGYZÉS A töltőállomás telepítési helyéül szolgáló felületet megfelelő módon kell megtervezni és kiépíteni a hatályos előírásokn...

Страница 268: ...os veszélyek elleni védelemhez Minden beszerelési műveletet a hatályos biztonsági előírásoknak és törvényeknek valamint a használati utasításnak megfelelően kell elvégezni 7 1 A beszerelés általános követelményei A berendezést megfelelő környezetbe kell telepíteni melyek eleget tesznek a 6 A berendezés telepítésének előkészítése Ezen kívül a telepítés többi részében használt eszközöknek kompatibil...

Страница 269: ...l nyitható elülső hozzáféréssel rendelkeznek a telepítés és a csatlakozások megkönnyítése érdekében Nyissa ki az ajtót a kapott kulccsal A biztonsági kulcs csak akkor távolítható el ha az ajtó teljesen be van zárva 3 Csatlakoztassa a korábban a talajhoz rögzített rögzítő talpat a töltőállomáshoz 4 Rögzítse az oszlopot a talpon az ábrán látható csapok anyáinak meghúzásával A maximálisan megengedett...

Страница 270: ...éhez Rendelkezésre álló kábeltömszelencék M50 M40 M32 az áramkábelekhez sárgával jelölve és M16 az adatkábelekhez pirossal jelölve A töltőegység verziójától függően a kapott tömszelencék és dugók a következők Verzió Kapott tömszelencék Kapott dugók Egyfázisú 7 4 kW M40 M32 M50 Háromfázisú 11 kW M32 M40 M50 Háromfázisú 22 kW M40 M32 M50 2 Csatlakoztassa az L N PE tápkábeleket PE T N R S R S Fázisok...

Страница 271: ... kell használni 3 Állítsa a differenciál és termikus mágneses védelmet ON helyzetbe és táplálja be az oszlopot 3 1 Az oszlophoz Restarttal folytassa a készülék aktiválásával az alábbiak szerint 2 1 Táplálja be az oszlopot és ellenőrizze hogy a készülék ledje világít e zöld LED 4 Ellenőrizze a differenciálvédelem megfelelő működését a megfelelő tesztgombot megnyomva RESTART 7 55 4 515 2 Használati ...

Страница 272: ...apotüzenet jelenik meg a kijelzőn típustól függően Az állomás üzemkész és a felhasználó azonosítására vár hogy továbblépjen a feltöltésre backend és RFID verzió vagy újratöltést indítson Autostart verzió Ha az állomás működési hibát észlel akkor a megfelelő csatlakozóaljzat vagy mindkettő világítása a megállapított hibától függően változtatja meg a színét lásd a Hibák és problémamegoldás fejezetet...

Страница 273: ...273 Készülék telepítése és csatlakoztatása Gewiss 7 55 4 515 2 Használati és karbantartási kézikönyv IT EN FR ES DE RO HU NL ...

Страница 274: ...rendezés falon történő beszerelése esetén a szállított kiegészítő segítségével a következő lépéseket kell megtenni 1 Készítse elő a beszerelési területet úgy hogy a tartókonzolt a falhoz rögzíti a következő távolságokat fúrva 189 5 mm 513 mm 94 75 mm 94 75 mm Ø6 5 mm Ø6 5 mm 7 55 4 515 2 Használati és karbantartási kézikönyv ...

Страница 275: ...az előzetesen falra rögzített konzolra Miután elhelyezte a terméket fúrjon lyukat a falba az alsó konzolt középre helyezve és csavarozza be a rögzítőcsavart 4 Ellenőrizze hogy a berendezés megfelelően legyen rögzítve 5 Távolítsa el az elülső panelről a védőfóliát 7 55 4 515 2 Használati és karbantartási kézikönyv IT EN FR ES DE RO HU NL ...

Страница 276: ...kiegészítő segítségével a beszerelési műveletek a következők 1 Szerelje fel a wallbox aljára a tartókonzolt az alábbi ábrán látható módon 2 Helyezze a wallboxot az oszlopra és rögzítse a két alátét rögzítőanyáinak megszorításával a képen látható módon 7 55 4 515 2 Használati és karbantartási kézikönyv ...

Страница 277: ...ékbe dugjuk Rendelkezésre álló kábeltömszelencék M25 és M32 az áramkábelekhez sárgával jelölve és M16 az adatkábelekhez pirossal jelölve A töltőegység verziójától függően a kapott tömszelencék és dugók a következők Verzió Kapott tömszelencék Kapott dugók Egyfázisú 7 4 kW 2x M25 2x M32 Háromfázisú 11 kW 2x M25 2x M32 Háromfázisú 22 kW 2x M32 2x M25 MEGJEGYZÉS függetlenül a telepítés típusától fonto...

Страница 278: ... Fázisok R S T N Semleges PE Föld Háromfázisú töltőállomás 3 A kártyát és az elektronikus eszközöket ellátó kiegészítő áramkör csatlakoztatását illetően két külön kapocsléc található L7 N3 Csatlakoztatni lehet egy harmadik vezetéket is egy egyenáramú vezetéket használva vagy átkötést készíteni az L1 R1 és az L7 valamint az N1 és az N3 között Szükség esetén kialakítható kettős átkötés az L1 R1 L2 R...

Страница 279: ...e Restarttal RFID kártyaleolvasóval A Restart funkció lehetővé teszi a differenciálvédelem automatikus visszazárását alkalmatlan beavatkozás esetén A differenciálkapcsoló közbelépése esetén 1 a torony jelzi a rendellenességet és blokkolja a jármű feltöltését 2 a felhasználó kapcsolja le a járművet az oszlopról 3 A Restart elvégzi az oszlop belső körének szigetelési ellenőrzését 4 Ha a szigetelés e...

Страница 280: ...ndői vannak az ügyfélnek TÖLTÉSI FOLYAMAT Kijelző szövege Leírás HÚZZA LE A KÁRTYÁT A TÖLTÉSHEZ Az RFID módban lévő állomás várakozik az RFID kártya leolvasására az azonosság ellenőrzéséhez és a töltési folyamat megkezdésére ENGEDÉLYEZETT KÁRTYA VÁRJON Az RFID kártyát felismerte a rendszer FIGYELEM A KÁRTYA NEM ÉRVÉNYES Az RFID kártyát nem ismerte fel a rendszer és nem lehet megkezdeni a töltést E...

Страница 281: ...tán ismételten lehúzta a MASTER kártyát az olvasón az állomás törlésre áll Egy RFID kártyát kell lehúzni a helyi engedélyezett listáról való letörléshez 9 3 Világítás a 2 típusú csatlakozóaljzaton belül A T2 csatlakozóaljzattal ellátott modelleket aktiválva Stand Alone RFID üzemmódban és mobil alkalmazáson és OCPP felhőplatformon keresztül villog a LED es megvilágításuk ha az ügyféltől a töltő dug...

Страница 282: ... 0000 8 Távolítsa el a töltőállomásba behelyezett csatlakozódugót a csatlakozóaljzatból Villogó zöldből folyamatos zöld A TÖLTÉS BEFEJEZŐDÖTT VEGYE KI A KÁBELT A MŰVELET ÖSSZEFOGLALÁSA Ts 0000 Tc 0000 9 Ha az állomás nem talál hibákat visszatér készenléti állapotba Zölden világít HELYEZZE BE A CSATLAKOZÓDUGÓT A TÖLTÉS INDÍTÁSÁHOZ MEGJEGYZÉS A töltés befejezéséhez meg kell szakítani a töltést elősz...

Страница 283: ... fájlt a microSD re helyezze vissza a microSD t az elektronikus kártyába 7 Helyezze feszültség alá újra a töltőállomást 8 Ha az eljárást hibátlanul hajtották végre az állomás importálja a fájlt és az abban található adatokat A kijelzőn megjelenik a BEFEJEZETT KONFIGURÁCIÓ felirat Az importálás végén a fájl át van nevezve RFID_old csv nek a microSD kártyán 9 Ellenőrizze a helyes importálást az imén...

Страница 284: ...alál hibákat visszatér készenléti állapotba Zölden világít HÚZZA LE A KÁRTYÁT A TÖLTÉSHEZ 10 3 Stand Alone Restarttal RFID kártyaleolvasóval Lásd a 10 2 szakasz 10 4 Mobile APP és OCPP cloud platform segítségével Ebben az üzemmódban a töltőállomás az OCPP protokoll segítségével egy vezérlőplatformhoz csatlakozik Az OCPP protokoll lehetővé teszi az állomás számára hogy csatlakozzon bármely platform...

Страница 285: ...elő e alkalmas e egy adott munka elvégzésére így megóvja biztonságát és tiszteletben tartja a munkahelyi biztonságról szóló vonatkozó törvényt Ezeknek a társaságoknak megfelelő képzést kell biztosítaniuk munkatársaik számára az elektromos készülékekről és meg kell ismertetni velük a kézikönyv tartalmát Kód Hiba leírása Hiba megoldása Pozíció 1 hiba Az elülső ajtó karbantartás vagy rongálás miatt n...

Страница 286: ...ő körében ebben az esetben ellenőrizni kell a differenciálkapcsoló és a kontaktor közti kört 4 hiba A kontaktor akkor működik amikor nem kellene A 2 típusú aljzat készenléti állapotban van betáplálva Ellenőrizze az elektronikus kártyáról a kontaktorra érkező jelet hogy megbizonyosodjon arról hogy az elektronikus kártya nem vezérli a kontaktort Ha a kártya nem vezérli a kontaktort ellenőrizze hogy ...

Страница 287: ...k vezérlésében a ZÁRT helyzetből nem lép át a NYITOTT helyzetbe Ellenőrizze kézzel a csap mozgását a 2 típusú csatlakozóaljzat blokk motor hátulján elhelyezett piros kart megemelve 8 hiba Az energiamérők már nem kommunikálnak az elektronikus kártyával A Modbus vezeték csatlakozásának ellenőrzése Ellenőrizze az energiafogyasztás mérők betáplálását Ellenőrizze az energiafogyasztás mérők helyes működ...

Страница 288: ...lomást úgy hogy legalább 3 percre áramtalanítja majd állítsa vissza Ha az állomás ebben az állapotban marad ellenőrizni kell a kapcsolatot Vegye fel a kapcsolatot a megfelelő szervizzel 11 hiba A kontaktor akkor működik amikor nem kellene A Schuko aljzat készenléti állapotban van Ellenőrizze az elektronikus kártyáról a kontaktorra érkező jelet hogy megbizonyosodjon arról hogy az elektronikus kárty...

Страница 289: ...cserélje ki a kábelt Kikap csolt állomás Az elektronikus kártya nem kapja meg a működéséhez szükséges betáplálást Ellenőrizze az állomás forrásoldali betáplálását Ellenőrizze a mágneses hővédelem működését az elektronikus kártya védőpaneljén belül Ellenőrizze az elektronikus kártya 12 V os tápegységének működését A JOINON platformhoz csatlakoztatott termékek esetén és ha megvásárolták a karbantart...

Страница 290: ...ást a termékről a főberendezés segítségével 2 Vegye ki a microSD kártyát az elektronikus kártyán található slot ból 3 Helyezze be a microSD kártyát a számítógép slot jába a mappa megnyitásához 4 Illessze be a frissítési fájlt a microSD kártya fő mappájába MEGJEGYZÉS Vegye fel a kapcsolatot a GEWISS SAT ügyfélszolgálattal hogy megkapja a legfrissebb fájlt 5 Illessze be újra a microSD kártyát az ele...

Страница 291: ...MPEREAVAILABLE Beállítható a gyári beállítástól eltérő bemeneti áramerősség a tényleges rendelkezésre állás függvényében és elkerülendő a töltési folyamat alatt fellépő problémákat Ennek elvégzéséhez állítson a MAXAMPEREAVAILABLE paraméteren Példa MAXAMPEREAVAILABLE 64 Csatlakozóaljzat maximum áramerőssége AMPERESOCKET A töltési áramerősséget minden egyes csatlakozóaljzathoz be lehet állítani a gy...

Страница 292: ...292 A termék méretei Gewiss 16 A termék méretei OSZLOP Max 50 kg Kg TEGYE BE A 2 2 VÁLTOZAT DXF ET dxf re van szükség 7 55 4 515 2 Használati és karbantartási kézikönyv ...

Страница 293: ...293 A termék méretei Gewiss 430 mm 231 mm 33 5 mm 500 mm 152 mm 614 mm WALLBOX Max 23 kg Kg 7 55 4 515 2 Használati és karbantartási kézikönyv IT EN FR ES DE RO HU NL ...

Страница 294: ...tt lépéseket kell elvégezni 14 1 A berendezés lecsatlakoztatásának folyamata Az állomás teljes kikapcsolásához oszlopos verziók a kapott kulccsal nyissa ki elöl és a szakaszolóval kapcsolja le Az állomás teljes kikapcsolásához Wallbox verzió kapcsolja le az állomást a berendezés áramforrás oldali részén található megszakítókkal és csak ezt követően nyissa ki a burkolatot a kapott kulccsal 7 55 4 5...

Страница 295: ...lkerülve az érintkezést bármilyen más hozzáférhető készülékkel vagy kábellel A gépkezelőnek aki hozzáfér a védőfelszerelésekhez megfelelő felkészítést kell kapnia a vállalkozótól a töltőállomás üzemeltetőjétől és engedélyt kell kapnia ezen műveletek végrehajtására 15 2 Csak Restartos oszlophoz A differenciálkapcsolót legalább 6 havonta tesztelni kell az alábbiakban láthatók szerint A teszt helyes ...

Страница 296: ...kapcsoló nem záródik automatikusan azt jelenti hogy szigetelési problémát észlelt az oszlop belső körében ezért ellenőrizni kell a differenciálkapcsoló és a kontaktor közötti kört Az elülső ajtót csak mindkét differenciál áram felszerelés tesztelése miatt szabad kinyitni elkerülve az érintkezést bármilyen más hozzáférhető készülékkel vagy kábellel 7 55 4 515 2 Használati és karbantartási kézikönyv...

Страница 297: ...ja és a doboz és a töltőállomáson kívül elhelyezkedő többi fémrész közötti folytonossági vizsgálat elvégzéséhez szabad kinyitni A gépkezelőnek aki hozzáfér a védőfelszerelésekhez megfelelő felkészítést kell kapnia a vállalkozótól a töltőállomás üzemeltetőjétől és engedélyt kell kapnia ezen műveletek végrehajtására 15 4 A csatlakozó állapota Javasoljuk rendszeresen ellenőrizze a kábel és a csatlako...

Страница 298: ...298 Gewiss 7 55 4 515 2 Installatie en gebruikshandleiding ...

Страница 299: ...echanische installatie 311 7 2 2 Aansluiting van de stroomtoevoer van het apparaat 312 7 3 Installatie van het apparaat versie Wallbox 316 7 3 1 Mechanische installatie 316 7 3 2 Aansluiting van de stroomtoevoer van het apparaat 320 8 Werking 321 8 1 Autostart 321 8 2 Stand Alone met RFID kaartlezer 321 8 3 Stand Alone met Restart en RFID kaartlezer 321 8 4 Via mobile APP en cloud platform OCPP 32...

Страница 300: ...dat voldoet aan alle normen richtlijnen en wetten met betrekking tot de veiligheid die van toepassing zijn op de installatie en de werking van dit apparaat De selectie van gekwalificeerd personeel is altijd de verantwoordelijkheid van het bedrijf dat de interventie uitvoert gezien dit de enige verantwoordelijke is om te beslissen of de werknemer geschikt is voor het uitvoeren van een bepaalde taak...

Страница 301: ...DE BE LO W RE FIL LYO UR WALLET CO NN EC TTH EPLUG DO WNL OA D JO INON AP PLICATION AN DSIGN UP dow nloa dthe App the QR code isund er the plug ww w joinon com 1 2 3 4 SC AN TH EQR CO DE BE LOW RE FIL LYO UR WALLET CO NN EC TTH EPLUG DO WNL OA D JO INON AP PLICATION AN DSIGN UP dow nloa dthe App the QR code isund er the plug Legenda a Top g Slot met veiligheidssleutel m MT b Led RGB status stopcon...

Страница 302: ...requirements for conductive connection to an AC DC supply EMC requirements for off board electric vehicle charging systems EN 61000 6 1 Elektromagnetische compatibiliteit Deel 6 1 Generieke normen Immuniteit voor huishoudelijke handels en lichtindustriële omgevingen EN 61000 6 3 Elektromagnetische compatibiliteit Deel 6 3 Algemene normen Emissienormen voor huishoudelijke handels en lichtindustriël...

Страница 303: ...tact op dezelfde zijde te gebruiken U kunt slechts 1 stopcontact per zijde gebruiken De Schuko stopcontacten in deze modellen zijn op de voorkant van het paneel gemonteerd OPMERKING De toegang tot en het gebruik van de stopcontacten IEC 60884 1 en de nationale normen is alleen toegestaan in privé contexten of met toegangsbeperkingen Ook voor de variant I ON Wallbox is er een specifiek model verkri...

Страница 304: ... of andere omstandigheden met betrekking tot elektrische apparatuur De opening van de behuizing impliceert niet de afwezigheid van interne spanning Werk alleen aan de apparatuur nadat u het systeem heeft losgekoppeld van de spanning via een geschikt apparaat om de isolatiefunctie te garanderen Ze mag alleen worden geopend door gekwalificeerd personeel volgens de aanwijzingen in deze handleiding He...

Страница 305: ... apparaat in werking is Schakel de spanning uit of controleer dat de spanning is uitgeschakeld voordat eender welke handeling wordt verricht 3 2 Persoonlijke Beschermingsmiddelen PB Wanneer op het apparaat wordt gewerkt moeten minstens de volgende veiligheidsvoorzieningen gedragen worden Benaming Uitleg Veiligheidsschoenen In overeenstemming met de norm UNE EN ISO 20345 2012 of de laatst gepublice...

Страница 306: ...alleerd gaat u als volgt te werk om aantasting ervan te voorkomen Verwijder voor de correcte bewaring van de oplaadstations de originele verpakking pas op het moment van de installatie Schade aan de verpakking sneden gaten enz verhindert een correcte bewaring van de oplaadstations vóór de installatie Houd het apparaat schoon verwijder stof spanen vet enz en vermijd de aanwezigheid van knaagdieren ...

Страница 307: ...er de verpakking maar slechts voor een korte afstand Verplaatsing van het uitgepakte apparaat Er moet minstens aan de volgende eisen worden voldaan 1 Volg het fundamentele ergonomische advies op om letsels te voorkomen die te wijten zijn aan het tillen van gewichten 2 Laat het apparaat pas los als het perfect is bevestigd of ondersteund 3 Volg de aanwijzingen van een andere persoon om u te begelei...

Страница 308: ...ratuur 50 C 50 C Maximum relatieve vochtigheid zonder condens 95 95 Houd er rekening mee dat er af en toe matige condensatie kan optreden als gevolg van temperatuurwisselingen Daarom is het naast de bescherming die voor het apparaat beschikbaar is noodzakelijk om de oplaadstations te controleren wanneer ze in gebruik worden genomen op plaatsen waar het waarschijnlijk is dat niet aan alle hierboven...

Страница 309: ...ijk om slechts één voedingslijn te traceren en om één plint te creëren waarop twee producten kunnen worden geïnstalleerd zoals hieronder is geïllustreerd FRONT FRONT 2 cm De twee units moeten een minimum afstand van 2 cm tussen de achterwanden garanderen OPMERKING Het oppervlak waarop het oplaadstation zal worden geïnstalleerd moet correct ontworpen en gerealiseerd zijn in overeenstemming met de g...

Страница 310: ...elektrische risico s Alle installatiehandelingen moeten worden uitgevoerd in overeenstemming met de geldende veiligheidsvoorschriften en wetten en volgens de instructiehandleiding 7 1 Algemene installatievereisten Het apparaat moet worden geïnstalleerd in een geschikte omgeving die voldoet aan de aanwijzingen die worden beschreven in hoofdstuk 6 Voorbereiding voor de installatie van het apparaat B...

Страница 311: ...lopening om de installatie en de aansluitingen te vergemakkelijken Open de toegang met de bijgeleverde sleutel De veiligheidssleutel kan alleen worden verwijderd als de deur helemaal gesloten is 3 Koppel de eerder op de grond bevestigde bevestigingssokkel aan het oplaadstation 4 Bevestig de paal op de sokkel door de moeren vast te draaien op de pennen die zijn aangeduid op de afbeelding Het maximu...

Страница 312: ...chikbare kabelwartels zijn M50 M40 M32 voor de vermogenskabels geel gemarkeerd en M16 voor de gegevenskabels rood gemarkeerd Afhankelijk van de versie van de oplaadunit zijn de bijgeleverde kabelwartels en doppen de volgende Versie Bijgeleverde kabelwartels Bijgeleverde doppen Eenfase 7 4 kW M40 M32 M50 Driefase 11 kW M32 M40 M50 Driefase 22 kW M40 M32 M50 2 Sluit de voedingskabels L N PE aan PE T...

Страница 313: ...en vacuümvermogenschakelaars in de stand ON en voorzie de oplaadpaal van stroom 3 1 Voor de oplaadpaal met Restart activeert u het apparaaat zoals hieronder beschreven 2 1 Sluit de oplaadpaal aan op de stroomtoevoer en controleer of de led van het apparaat brandt groene led 4 Controleer of de aardlekbeschermingen goed werken door op de daarvoor voorziene testknop te drukken RESTART 7 55 4 515 2 In...

Страница 314: ...ven op de display afhankelijk van het model Het station is klaar en wacht op de identificatie van de gebruiker om verder te gaan met opladen versie backend en RFID of te beginnen met opladen versie Autostart Als het station een storing detecteert verandert de verlichting van het relatieve stopcontact of van beide afhankelijk van het gevonden defect zie hoofdstuk Storingen en probleemoplossing Lijn...

Страница 315: ...315 Installatie en aansluiting van het apparaat Gewiss 7 55 4 515 2 Installatie en gebruikshandleiding Installatie en gebruikshandleiding IT EN FR ES DE RO HU NL ...

Страница 316: ...llatie van het product op de muur via het bijgeleverde accessoires moeten de volgende installatiehandelingen uitgevoerd worden 1 Bereid het montagegebied correct voor door de steunbeugel aan de muur te bevestigen door te boren met de volgende tussenafstanden 189 5 mm 513 mm 94 75 mm 94 75 mm Ø6 5 mm Ø6 5 mm 7 55 4 515 2 Installatie en gebruikshandleiding ...

Страница 317: ...rder aan de muur was bevestigd Zodra het product is gepositioneerd boort u de muur met behulp van de onderste beugel als centrering en draait u de borgschroef vast 4 Controleer dat het apparaat correct is bevestigd 5 Verwijder de beschermfolie van het voorpaneel 7 55 4 515 2 Installatie en gebruikshandleiding Installatie en gebruikshandleiding IT EN FR ES DE RO HU NL ...

Страница 318: ...en de volgende installatiehandelingen uitgevoerd worden 1 Monteer de steunbeugels aan de onderkant van de wallbox zoals is weergegeven op de afbeelding 2 Positioneer de wallbox op de paal en zet hem vast door de borgmoeren van de twee platen vast te draaien zoals is weergegeven op de afbeelding 7 55 4 515 2 Installatie en gebruikshandleiding ...

Страница 319: ... zijn M25 en M32 voor de vermogenskabels geel gemarkeerd en M16 voor de gegevenskabel rood gemarkeerd Afhankelijk van de versie van de oplaadunit zijn de bijgeleverde kabelwartels en doppen de volgende Versie Bijgeleverde kabelwartels Bijgeleverde doppen Eenfase 7 4 kW 2x M25 2x M32 Driefase 11 kW 2x M25 2x M32 Driefase 22 kW 2x M32 2x M25 OPMERKING ongeacht het type van installatie is het belangr...

Страница 320: ...het systeem PE R1 S1 T1 N1 R2 S2 T2 N2 R S T Fasen R S T N Neutraal PE Aarde Driefase oplaadstation 3 Voor de aansluiting van het hulpcircuit dat de kaart en de elektronische apparaten van stroom voorziet zijn er twee specifieke terminals L7 N3 Het is mogelijk om een derde lijn aan te sluiten door gebruik te maken van een continuïteitslijn of door een jumper te maken tussen L1 R1 en L7 en tussen N...

Страница 321: ...t Restart en RFID kaartlezer Met de functie Restart wordt de aardlekbescherming automatisch opnieuw gesloten bij een ontijdige tussenkomst Bij een tussenkomst van de aardlekschakelaar 1 het torentje meldt de storing en stopt het opladen van het voertuig 2 de gebruiker moet het voertuig loskoppelen van de oplaadpaal 3 Restart controleert de isolatie van het interne circuit van de oplaadpaal 4 Als h...

Страница 322: ...s nodig zijn OPLAADPROCES Tekst op display Beschrijving LEES DE KAART OM OP TE LADEN Het station in RFID modus wacht op het lezen van een RFID kaart om de geschiktheid ervan te controleren en het laadproces te starten KAART GELDIG WACHTEN AUB De RFID kaart werd herkend door het systeem OPGELET KAART NIET GELDIG De RFID kaart werd niet herkend en het is niet mogelijk om een laadsessie te starten KA...

Страница 323: ...tion in de modus van het wissen gesteld Het is noodzakelijk om één RFID kaart per keer te naderen om ze te verwijderen van de lokale White List 9 3 Verlichting in stopcontact Type 2 De modellen voorzien van stopcontact T2 met bescherming tegen vandalisme en met bedrijfsmodus Stand Alone met RFID en via mobile APP en cloud platform OCPP hebben een interne LED verlichting die knippert wanneer er een...

Страница 324: ...c 0000 8 Verwijder de stekker uit het stopcontact van het oplaadstation Van knipperend groen naar vast groen OPLADEN VOLTOOID VERWIJDER DE KABEL OVERZICHT SESSIE Ts 0000 Tc 0000 9 Als het station geen fouten detecteert wordt het in stand by gesteld Vast groen PLAATS DE STEKKER OM HET OPLADEN TE STARTEN OPMERKING Om het opladen te beëindigen moet u de oplaadsessie eerst op de auto onderbreken de me...

Страница 325: ... het bestand is opgeslagen in de microSD plaatst u de microSD terug in de elektronische kaart 7 Schakel het laadstation opnieuw in 8 Als de procedure zonder fouten is uitgevoerd importeert het station het bestand en de gegevens die het bevat Op de display zal het bericht CONFIGURATIE VOLTOOID getoond worden Op het einde van de procedure van de import wordt het bestand hernoemd naar RFID_old csv op...

Страница 326: ...n geen fouten detecteert wordt het in stand by gesteld Vast groen LEES DE KAART OM OP TE LADEN 10 3 Stand Alone met Restart en RFID kaartlezer Zie hoofdstuk 10 2 10 4 Via mobile APP en cloud platform OCPP In deze modus is het laadstation via het OCPP protocol verbonden met een controleplatform Met het OCPP protocol kan het station een verbinding maken met elk platform dat dit protocol gebruikt Om ...

Страница 327: ...delijke is om te beslissen of de werknemer geschikt is voor het uitvoeren van een bepaalde taak waardoor zijn veiligheid wordt beschermd en de toepasselijke wet van de veiligheid op het werk wordt gerespecteerd Deze bedrijven moeten hun personeel een gepaste opleiding geven in elektrische apparaten en moeten hen vertrouwd maken met de inhoud van deze handleiding Code Beschrijving fout Oplossing fo...

Страница 328: ...an de oplaadpaal in dat geval moet u het circuit tussen de aardlekschakelaar en het relais controleren Fout 4 Het relais blijkt in werking wanneer hij niet in werking mag zijn Het stopcontact Type 2 blijkt gevoed in standby Controleer het signaal van de elektronische kaart naar het relais om er zeker van te zijn dat de elektronische kaart de schakelaar niet aanstuurt Als de kaart de schakelaar nie...

Страница 329: ...vergrendeling van het stopcontact gaat van de GESLOTEN positie niet naar de GEOPENDE positie Controleer handmatig de beweging van de pin door de rode hendel te activeren op de achterzijde van de motor voor de vergrendeling van het stopcontact Type 2 Fout 8 De energietellers communiceren niet meer met de elektronische kaart Controleer de verbinding van de lijn Modbus Controleer de voeding van de en...

Страница 330: ...arten door de stroomtoevoer minimaal 3 minuten los te koppelen en vervolgens te herstellen Als het station in deze toestand blijft moet de aansluiting gecontroleerd worden Contacteer de betreffende dienst Fout 11 Het relais blijkt in werking wanneer hij niet in werking mag zijn Het Schuko stopcontact blijkt gevoed in standby Controleer het signaal van de elektronische kaart naar het relais om er z...

Страница 331: ... elektronische kaart ontvangt niet de voeding die noodzakelijk is voor de werking ervan Controleer de voeding stroomopwaarts het station Controleer de werking van de stroomonderbreker in het paneel dat de elektronische kaart beschermt Controleer de werking van de voeding 12V van de elektronische kaart In geval van producten die zijn aangesloten op het JOINON platform en als het onderhoudspakket is...

Страница 332: ...r op het hoofdapparaat te handelen 2 Verwijder de microSD kaart uit de relatieve sleuf van de elektronische kaart 3 Plaats de microSD kaart in de specifieke sleuf van uw PC om de map te openen 4 Plak het updatebestand in de hoofdmap van de microSD kaart OPMERKING Contacteer de assistentiedienst SAT van GEWISS om het laatst bijgewerkte bestand te verkrijgen 5 Plaats de microSD kaart opnieuw in de s...

Страница 333: ...troom MAXAMPEREAVAILABLE Het is mogelijk om een ingaande stroom in te stellen die verschilt van de fabrieksinstelling in functie van de werkelijke beschikbaarheid om problemen tijdens het opladen te voorkomen Handel hiervoor op de parameter MAXAMPEREAVAILABLE Voorbeeld MAXAMPEREAVAILABLE 64 Maximum stroom per stopcontact AMPERESOCKET Het is mogelijk om voor elk stopcontact een oplaadstroom in te s...

Страница 334: ...334 Productafmetingen Gewiss 16 Productafmetingen PAAL Max 50 kg Kg DXF VAN DE VER SIE 2 2 PLAATSEN dient voor dxf 7 55 4 515 2 Installatie en gebruikshandleiding ...

Страница 335: ...335 Productafmetingen Gewiss 430 mm 231 mm 33 5 mm 500 mm 152 mm 614 mm WALLBOX Max 23 kg Kg 7 55 4 515 2 Installatie en gebruikshandleiding Installatie en gebruikshandleiding IT EN FR ES DE RO HU NL ...

Страница 336: ...gorde van handelingen te volgen 14 1 Loskoppelingsproces apparaat Om het station versie paal volledig uit te schakelen opent u het vanaf de voorkant met de bijgeleverde sleutel en handelt u op de scheidingsschakelaar Om het station volledig uit te schakelen versie Wallbox ontkoppelt u het station door op de schakelaars stroomopwaarts de installatie te drukken en opent u dan pas de behuizing met de...

Страница 337: ...pparaten of kabels wordt vermeden De operator die toegang heeft tot de beveiligingen moet hiervoor specifiek zijn opgeleid door de verantwoordelijke van het oplaadstation en moet door hem gemachtigd zijn om deze handelingen uit te voeren 15 2 Enkel voor oplaadpalen met Restart De aardlekschakelaar moet minstens iedere 6 maanden getest worden zoals hieronder getoond De registratie van de correct ve...

Страница 338: ...0s Als de schakelaar niet automatisch opnieuw sluit dan wijst dat op een fout in de isolatie van het interne circuit van de oplaadpaal Dan moet u het circuit tussen de aardlekschakelaar en het relais controleren De frontale deur mag alleen geopend worden om beide aardleksystemen te testen zodat contact met andere bereikbare apparaten of kabels wordt vermeden 7 55 4 515 2 Installatie en gebruikshan...

Страница 339: ... de installatie en de behuizing en de andere metalen componenten die zich buiten het oplaadstation bevinden De operator die toegang heeft tot de beveiligingen moet hiervoor specifiek zijn opgeleid door de verantwoordelijke van het oplaadstation en moet door hem gemachtigd zijn om deze handelingen uit te voeren 15 4 Status van bewaring van de connector Er wordt een periodieke controle aanbevolen va...

Страница 340: ......

Страница 341: ...6 260 sat gewiss com www gewiss com 24h Punto di contatto indicato in adempimento ai fini delle direttive e regolamenti UE applicabili Contact details according to the relevant European Directives and Regulations GEWISS S p A Via A Volta 1 IT 24069 Cenate Sotto BG Italy tel 39 035 946 111 E mail qualitymarks gewiss com ...

Отзывы: