background image

5

www.geiger.de

EN

EN

6.  Installation instructions


I

Before fixing, the strength of the masonry or of the subsurface is to be 

checked.


I

Prior to installation please check to ensure there is no visible damage 

to the motor like cracks or open cables.


I

Caution: If the tube is screwed/riveted to the drive, the measure must 

be taken from the tube end to the center of the drive and marked on 

the tube.

When drilling the winding shaft 

never

 drill into the  

area of the tubular motor!
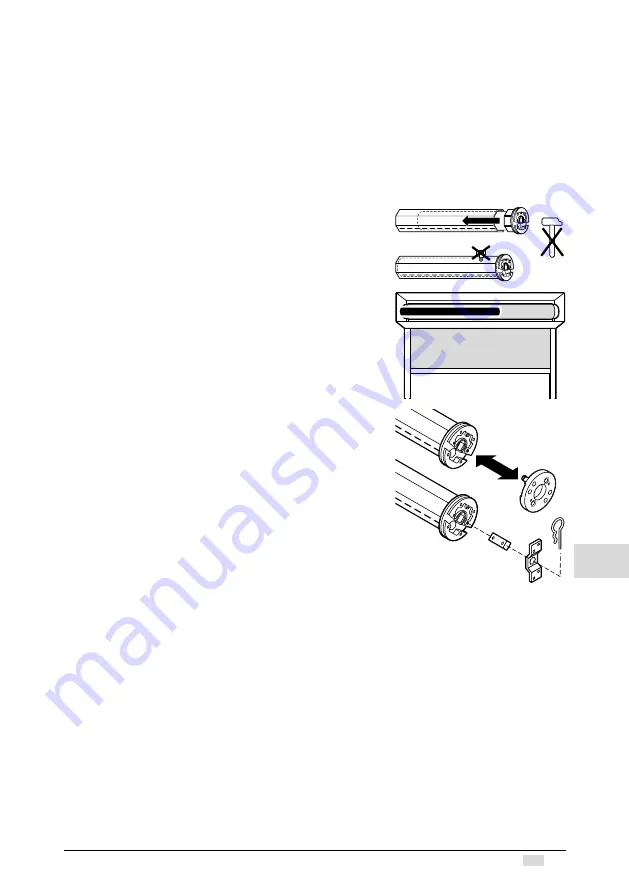
When inserting into the shaft, the tubular motor must 

not


be struck and must 

not

 be allowed to fall into the shaft.

Installation into the screen:

Insert motor with a suitable adapter and drive into the shaft 

up to the stop of the shaft adapter.
Fix the motor support on the side piece. 
Fix the motor together with the shaft on the motor support. 

Depending on the selected motor head, 

different fixation systems can be used:


– Place the motor with square insert in the star-shaped 

bearer and lock with pin


– Place the motor into the existing engine bearer and 

lock


– Place the motor in a compatible engine bearer with clip 

system and lock with spring or rotating lever


I

The Geiger-SOLIDline motor is suitable 

for shaft diameters from 50 mm!

Содержание GEIGER-Easy-ZIP 1.x

Страница 1: ...ons Notice originale de montage et d utilisation Instrucciones originales de instalación y funcionamiento Istruzioni originali di installazione e funzionamento EN FR ES IT Tubular motor GEIGER SOLIDline GEIGER SOLIDline 55 Motor control GEIGER Easy ZIP 1 x 2 x and 3 x GU45 E10 for screens with ZIP guidance ...

Страница 2: ...structions and or constructional modification the legal and contractual guarantee for property damage and product liability lapses Index 1 General information 2 2 Guarantee 2 3 Intended use 3 4 Safety instructions 3 5 Safety instructions for assembly 4 6 Installation instructions 5 7 Information for the specialist electrician 6 8 Connection of the setting switch 6 9 Control options 7 10 Setting of...

Страница 3: ...s such as for example window cleaning are being carried out in the vicinity f f During operation observe the danger zone f f Do not use the installation if people or objects are in the danger zone f f Urgently shut down damaged installations until repair f f Unconditionally shut down the unit during maintenance and cleaning operations f f Pinching and shearing points are to be avoided and must be ...

Страница 4: ...d any other fixed element f f The rated speed and the rated torque of the motor must be compatible with the device f f The mounting accessories that are used must be designed in accordance with the selected rated torque f f Good technical knowledge and good mechanical skills are necessary for the motor installation Incorrect installation can lead to serious injury Electrical work must be carried o...

Страница 5: ... shaft the tubular motor must not be struck and must not be allowed to fall into the shaft Installation into the screen Insert motor with a suitable adapter and drive into the shaft up to the stop of the shaft adapter Fix the motor support on the side piece Fix the motor together with the shaft on the motor support Depending on the selected motor head different fixation systems can be used Place t...

Страница 6: ... connectors of the Hirschmann Company are tested and approved with couplings of the Hirschmann Company In order to prevent a malfunction caused by coupling the supply line ref NYM from the actuator switch to the motor must not exceed 100 m in case of motors with electronic end stops 8 Connection of the setting switch I I In order to set the end positions on SOLIDline motors any setting switch can ...

Страница 7: ...n X Geiger Powertronic power level X X X Geiger locking force reduction X X X 10 Setting of the end positions with Easy ZIP 1 x Following installation types are possible Screen is equipped with A Lower and upper end positions with stop torque shutoff Upper and lower stops B Lower end position with stop Upper end position freely adjustable Lower stop Upper stop not necessary C Lower end position fr...

Страница 8: ...mming is completed and the motor returns to normal mode Variant B lower end position with stop upper end position freely adjustable To open the learning mode for end positions press the PROG key or the UP and DOWN keys simultaneously until the motor confirms 1 x clac clac The motor jerks start stop start at each run command to confirm the learning mode activation Lower end position Press the UP or...

Страница 9: ... motor returns to normal mode Variant D lower and upper end positions freely adjustable To open the learning mode for end positions press the PROG key or the UP and DOWN keys simultaneously until the motor confirms 1 x clac clac The motor jerks start stop start at each run command to confirm the learning mode activation Lower end position Press the UP or DOWN key until the sun protection system ha...

Страница 10: ... activated 3 x click click Storing of the upper end position is confirmed Easy ZIP 1 x variant C 1 x click click Learning mode for end positions activated 2 x click click Storing of the lower end position is confirmed Easy ZIP 1 x variant D 1 x click click Learning mode for end positions activated 2 x click click Storing of the lower end position is confirmed 3 x click click Storing of the upper e...

Страница 11: ...ting mode Motor feedback Easy ZIP 2 x 1 x click click Learning mode for end positions activated 12 Setting of the end positions with Easy ZIP 3 x automatic mode I I The distance between the upper and lower end stops must be about 25 cm which corresponds to one tube rotation at least Programming the end positions 1 To open the learning mode for end positions press the PROG key or the UP and DOWN ke...

Страница 12: ...oning of the installation I I When using a wind sensor the correct functioning of the retract command under wind load should be checked by the manufacturer of the sun protection before commissioning Total weight kg Winding diameter mm 50 55 60 65 70 75 80 85 90 95 100 105 110 115 120 3 4 5 7 5 10 12 5 15 17 5 20 22 5 25 27 5 30 32 5 35 37 5 40 42 5 45 47 5 50 0 9 1 2 1 5 2 2 2 9 3 7 4 4 5 2 5 9 6 ...

Страница 13: ... run the motor automatically identifies the torque necessary to close the screen and closes it with the lowest possible power so that the fabric is optimally protected 17 What to do if Problem Solution Motor does not run Motor not plugged in Please check the plug connection Check connecting cable for possible damage Check the mains voltage and allow the cause of the voltage break down to be tested...

Страница 14: ...ds DIN EN 60335 1 VDE 0700 1 2012 10 EN 60335 1 2012 DIN EN 60335 1 Ber 1 VDE 0700 1 Ber 1 2014 04 EN 60335 1 2012 AC 2014 EN 60335 1 2012 A11 2014 DIN EN 60335 2 97 VDE 0700 97 2017 05 EN 60335 2 97 2006 A11 2008 A2 2010 A12 2015 DIN EN 62233 VDE 0700 366 2008 11 EN 62233 2008 DIN EN 62233 Ber 1 VDE 0700 366 Ber 1 2009 04 EN 62233 Ber 1 2008 DIN EN ISO 12100 2011 03 EN ISO 12100 2010 DIN EN 55014...

Страница 15: ... 10 seconds There is no reference to any specific test standard Subject to technical modifications Please find information to the ambient temperature range of our Geiger motors under www geiger de D E V geprüfte Sicherheit 21 Technical data for SOLIDline motors with 55 revolutions per minute Technical data of tubular motor SOLIDline KS GU45 GU4503 55 GU4506 55 GU4509 55 GU4512 55 Voltage 230V 50Hz...

Страница 16: ... F 49 0 7142 938 230 info geiger de www geiger de 22 Notes on waste disposal Recycling of packaging materials In the interest of environmental protection please contact your local government s recycling or solid waste management department to learn more about the services it provides Waste disposal of electric and electronic equipment Electrical and electronic equipment must be collected and dispo...

Отзывы: