1.
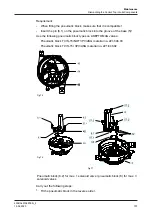
Remove the adapter module (47) – if provided –, see chapter “Removing the
Adapter Module“.
2.
Disconnect all cables from the connection terminals of the interface module
(43).
3.
Unscrew and remove all screws (57, 56.2).
4.
Remove the interface module (43) from the base (5).
®
The interface module has been removed
Hint!
Fit in the reverse order, in this case tighten screw (56.2) first.
10.4.8 Removing the pneumatic block
Requirement:
•
If only the O-rings (42) and (55) must be changed then the solenoid valves
(63)/control plate (65) and element NOT (64) can remain on the pneumatic
block (8).
Carry out the following steps:
1.
Undo the screws (57.1, 57.2).
Fig.74
2.
Pull off the pneumatic block (8).
3.
Change the 6 O-rings (42) of the base (5).
4.
Replace the O-ring (55).
®
Done
10.4.9 Fitting the Pneumatic Block
Maintenance
Dismantling the Control Top into its Components
430BAL010697EN_2
100
15.04.2020
Содержание T.VIS M-15
Страница 6: ...430BAL010697EN_2 6 15 04 2020...
Страница 53: ...Fig 27 Assembly and installation Electrical connections 430BAL010697EN_2 15 04 2020 53...
Страница 55: ...Fig 28 Assembly and installation Electrical connections 430BAL010697EN_2 15 04 2020 55...
Страница 111: ...14 Spare parts list Switch bar T VIS M 15 Fig 82 Spare parts list Switch bar T VIS M 15 430BAL010697EN_2 15 04 2020 111...
Страница 119: ...Appendix 430BAL010697EN_2 15 04 2020 119...
Страница 120: ......


