background image

103

Antes de comenzar

Cocina profesional de combustible dual 

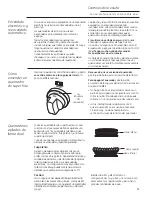
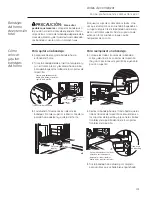
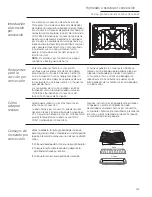
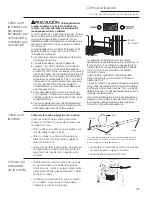
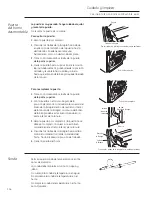
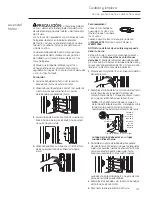
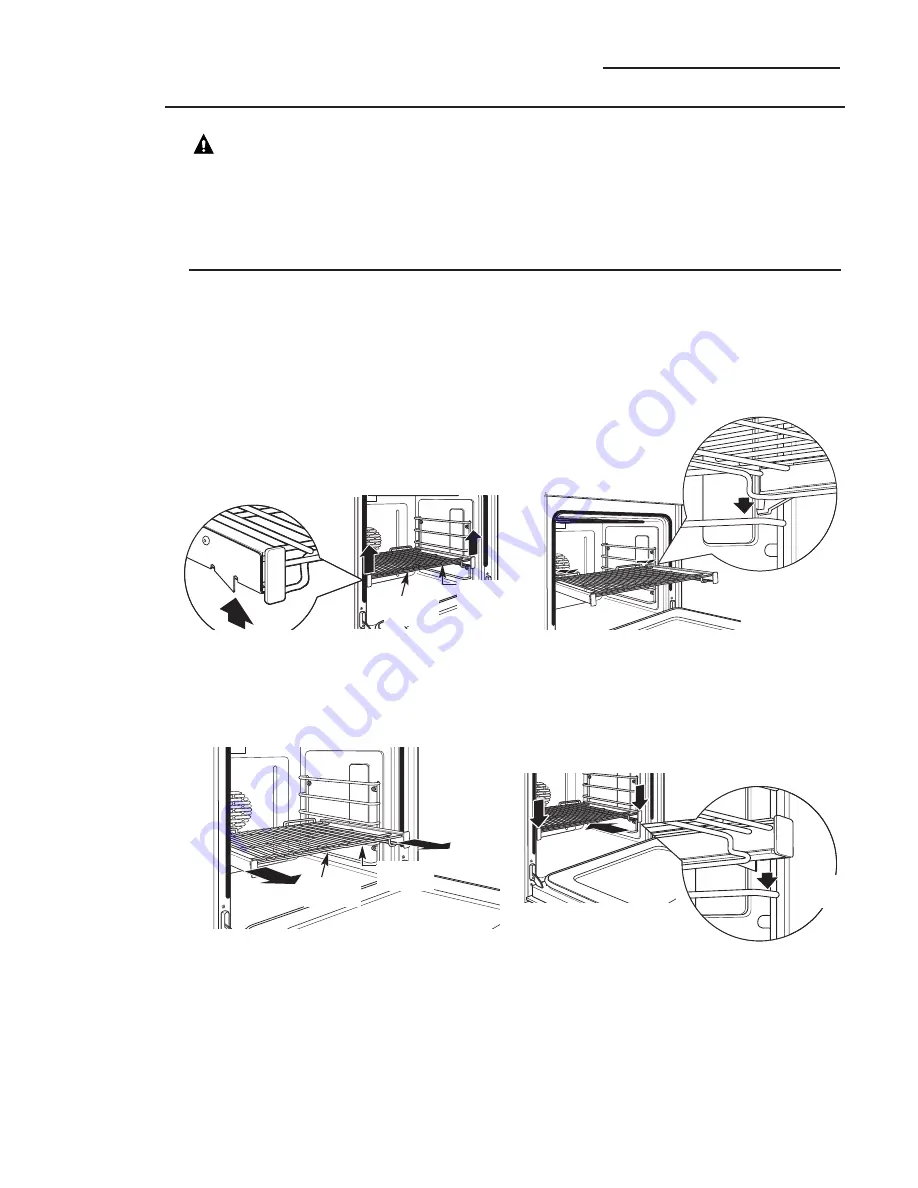
Para quitar una bandeja:

1. 

Asegúrese de empujar la bandeja hasta 
el fondo del horno. 

2. 

Tome la bandeja desde el riel frontal superior y
su riel frontal inferior y levántela hacia arriba
para desbloquear las trabas de los soportes de
la parrilla.

3. 

Sosteniendo firmemente los rieles de las
bandejas frontales superior e inferior, tire de la
parrilla hacia adelante y quítela del horno.

Para reemplazar una bandeja:

1. 

Coloque las trabas traseras de la bandeja
sobre y dentro de los soportes de la parrilla
(hay cinco posiciones de parrilla incluyendo la
posición superior). 

2. 

Deslice la bandeja hacia el fondo hasta que las
trabas traseras de la parrilla se encuentren en
los soportes de la parrilla y presione las trabas
frontales de la parrilla dentro de los soportes
frontales de la parrilla. 

3. 

Tire la bandeja hacia afuera por completo
para verificar que se halle bien enganchada. 

Bandejas 
del horno 
de extensión
total 

Deslice la bandeja hasta el fondo
y presione hacia abajo para
bloquear las trabas frontales
dentro de los soportes frontales

Levante para desbloquear las
trabas de la bandeja frontal del
soporte de la parrilla

Riel frontal
superior

Riel frontal
inferior

Riel frontal
superior

Riel frontal
inferior

Traba frontal de la bandeja 

Traba frontal
de la bandeja 

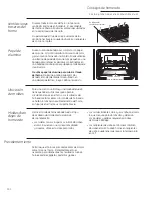
PRECAUCIÓN: 

Para evitar

posibles quemaduras,

coloque las bandejas en

la posición correcta antes de encender el horno.
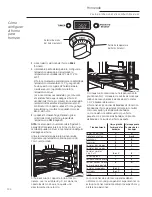
La posición correcta de la bandeja depende de la
clase de alimento y del nivel de dorado deseado.

Las bandejas cuentan con un armazón que

bloquea los soportes sobre ambos lados.  Una
vez que el armazón se encuentra bloqueado en
su lugar, siempre tire de la bandeja hacia fuera,
de su riel frontal superior, hasta su posición de
extensión total, cuando coloque o quite
recipientes de cocción.

Cómo
colocar 
y quitar
bandejas
del horno

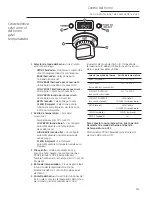
Содержание Monogram ZDP304NPSS

Страница 1: ...ges Manuel du propri taire 76 cm 30 po 91 cm 36 po et 121 cm 48 po Cuisini res mixtes professionnelles La section fran aise commence la page 45 Manual del propietario 30 36 y 48 Cocinas profesionales...

Страница 2: ...34 35 Self Cleaning Oven Racks 30 Stainless Steel 33 Consumer Services Important Phone Numbers 42 Model and Serial Number 3 Problem Solver 38 40 Safety Instructions 2 4 8 Warranty 44 Do not store or u...

Страница 3: ...es page in the back of this manual We re proud of our service and want you to be pleased If for some reason you are not happy with the service you receive here are the steps to follow for further help...

Страница 4: ...the following Have the installer show you the location of the range gas shut off valve and how to turn it off if necessary Be sure all packing materials are removed from the range before operating it...

Страница 5: ...ing or overheating of the appliance Never wear loose fitting or hanging garments while using the appliance Be careful when reaching for items stored over the range Flammable material could be ignited...

Страница 6: ...a qualified service technician Never use an open flame to locate a leak If by some chance a burner goes out and gas escapes open a window or a door to let the room air out Do not attempt to use the ap...

Страница 7: ...oxide poisoning overheating of the cooktop surfaces or a potential fire hazard Use proper pan size avoid pans that are unstable or easily tipped Select cookware having flat bottoms large enough to pro...

Страница 8: ...r food in the oven when not in use Do not allow anyone to climb stand or hang on the door They could damage the oven or cause severe personal injury Do not use aluminum foil to line oven bottom Foil m...

Страница 9: ...r Control Knob with Lighted Bezel 10 29 12 Oven Display 16 13 Mini Knob to select PROBE TIMER or Special Features 16 29 14 Oven Mode Selector 16 15 Oven Temperature Knob 16 16 Kitchen Timer 16 27 17 L...

Страница 10: ...ever the griddle or IR grill is in use to ensure the burner always stays lit In case of a power outage you can light the surface burners on your cooktop with a match Hold a lighted match to the burner...

Страница 11: ...heat settings between HI and X HI Surface Cooking Professional Dual Fuel Range Wok cooking The burner grates are uniquely designed to cook on either side The flat side accommodates flat bottom cookwa...

Страница 12: ...the IR grill Remove the cover before lighting the burner The cover must be removed when using the IR grill Set the control knob to PREHEAT The longer the grill is preheated the darker the grill marks...

Страница 13: ...le end toward the front of the cooktop The grate will change color when subjected to the heat and as oils cook onto the surface This is normal and does not affect the cooking performance The porcelain...

Страница 14: ...dle has not been used for a period of time it should be reseasoned 1 Clean the griddle thoroughly with hot soapy water to remove any protective coating 2 Wipe the surface using a solution of 1 quart w...

Страница 15: ...n Lights 32 8 Oven Rack Supports 19 23 5 positions in large oven 4 positions in small oven 9 Bake Elements 2 under oven floor 29 10 Oven Door Seal 33 11 Oven Frame Seal 33 12 Temperature Probe Outlet...

Страница 16: ...mperature is automatically set CLEAN The self clean temperature is automatically set 3 Mini Knob Turn to select and push to enter PROBE or TIMER settings Also to adjust CLEAN cycle time 4 Timer Button...

Страница 17: ...um foil to line oven bottom Foil may trap heat from the bottom heating element resulting in a risk of electrical shock fire or product damage Rear oven vents An internal cooling fan operates during al...

Страница 18: ...nt rack locks onto the front rack supports 3 Pull the rack all the way out to check that it is properly engaged Full extension oven racks Slide the rack all the way in and push down to lock the front...

Страница 19: ...rature is important See Using the probe When baking four cake layers at the same time use racks B and D Stagger the pans so that one pan is not directly above another How to set the oven for baking C...

Страница 20: ...I BROIL LO or HI will appear in the display NOTE Always broil with the door closed If the door is left open the display will scroll CLOSE door and the elements will not turn on until the door is shut...

Страница 21: ...1 lb fillets 1 4 to 1 2 thick Kabobs 5 skewers D LO 5 Minutes Sliced Vegetables D LO 5 Minutes Suggested shelf positions are intended as general guidelines Experiment with these positions for specific...

Страница 22: ...in CONV BAKE See Baking Tips section It is recommended that when baking cookies the best results are attained with a flat cookie sheet instead of a pan with sides For recipes like oven baked chicken...

Страница 23: ...Temperature knob to OFF when convection cooking is finished NOTE A cooling fan will turn on to cool internal parts This is normal and the fan may continue to run even after the oven is turned off Use...

Страница 24: ...exact doneness you want The probe can be used with the BAKE CONV BAKE and CONV ROAST 1 Push the tip of the probe into the thickest part of the meat 2 Place the rack in the desired rack position 3 Set...

Страница 25: ...mall oven The proofing feature automatically provides the optimum temperature for the proofing process therefore the Temperature knob does not affect the proof temperature The oven interior lights cyc...

Страница 26: ...n cycle in both ovens at the same time The last oven set will automatically delay its start until the end of the first oven s clean cycle On double oven models you can bake in one oven and self clean...

Страница 27: ...IMER button 2 Turn the Mini Knob to 00 and push to select To adjust the timer after start 1 Push the TIMER button 2 Turn the Mini Knob to a new desired time and push to select NOTE The timer cannot be...

Страница 28: ...djustment will be retained in memory after a power failure Do not use thermometers such as those found in grocery stores to check the temperature setting of your oven These thermometers may vary 20 40...

Страница 29: ...ting rack are all dishwasher safe However baked on foods may require washing by hand with a commercial oven cleaner or abrasive detergent Do not store a soiled broiler pan or grid anywhere in the oven...

Страница 30: ...n the slide tracks wipe it away using a paper towel NOTE Any graphite lubricant wiped away must be replaced 4 Shake the graphite lubricant before opening it Starting with left slide mechanism of the r...

Страница 31: ...the indentation of the hinge arm into the bottom edge of the hinge slot The notch in the hinge arm must be fully seated into the bottom of the slot 3 Fully open the door If the door will not fully ope...

Страница 32: ...may be purchased by calling 800 626 2002 Order Part Number WB25T10064 NOTE Higher wattage bulbs will damage your oven Using gloves or a dry cloth remove the bulb from its packaging Do not touch the b...

Страница 33: ...seal becomes worn frayed damaged or displaced it must be replaced by a qualified technician Care and Cleaning Professional Dual Fuel Range Do not use a steel wool pad it will permanently scratch the s...

Страница 34: ...rners in the same location Cleaning Lift off burner parts only when cool Wash in hot soapy water You may use a plastic scouring pad to remove burned on food particles To remove burned on food soak the...

Страница 35: ...ith an emery board Care and Cleaning Professional Dual Fuel Range Burner grates The enameled cast iron burner grates should be cleaned regularly The grates can be cleaned inside the oven during a self...

Страница 36: ...llage in the trough basin with a soft cloth For stability the troughs have rubber pads at the front Be careful not to damage the pads when removing for cleaning Care and Cleaning Professional Dual Fue...

Страница 37: ...ter or in the dishwasher 4 Clean the Pan Surround Wire Mesh The pan surround and wire mesh cannot be removed Clean them in place Use a soft damp cloth to clean the pan surround Gently brush food parti...

Страница 38: ...ack position being used Cookware is not suited for broiling Use the broiling pan and grid that came with your oven Aluminum foil used on the broiling pan and grid has not been fitted properly and slit...

Страница 39: ...t breaker tripped Replace the fuse or reset the circuit breaker UNABLE TO GET The TIMER and the MINI KNOB buttons must be pushed at the THE DISPLAY TO same time and held for 4 seconds SHOW SF PROBE AP...

Страница 40: ...k like B or C depending on the type of gas BURNER FLAMES The range may be connected to the wrong fuel type Contact the VERY LARGE person who installed your range or made the conversion OR YELLOW BURNE...

Страница 41: ...41 Notes Professional Dual Fuel Range...

Страница 42: ...m EDST Service Contracts In the USA 800 626 2224 In Canada 800 561 3344 You can have the secure feeling that GE Consumer Service will still be there after your warranty expires Purchase a GE contract...

Страница 43: ...43 Notes Professional Dual Fuel Range...

Страница 44: ...ages so the above limitation or exclusion may not apply to you This warranty gives you specific legal rights and you may also have other rights which vary from state to state To know what your legal r...

Страница 45: ...ons de commande 72 Planche trancher 79 Plaque chauffante 79 Porte du four d montage vertical 74 76 Sonde 74 Soutien au consommateur Consignes de s curit 45 47 51 Garantie 86 Guide de d pannage 81 83 N...

Страница 46: ...fiers de notre service et nous veillons r pondre vos attentes Si pour quelque raison que ce soit vous n tes pas satisfait du service fourni vous trouverez ci dessous les tapes suivre pour obtenir de l...

Страница 47: ...d arriv e de gaz et qu il vous montre comment le fermer si cela devait s av rer n cessaire Assurez vous que tout le mat riel d emballage soit retir de l appareil avant de l utiliser pour viter tout i...

Страница 48: ...e vous prenez des objets rang s au dessus de la cuisini re faites le avec pr caution Les mati res inflammables pourraient prendre feu si celles ci venaient entrer en contact avec la surface des br leu...

Страница 49: ...r MARCHE N utilisez jamais une flamme nue pour localiser une fuite S il arrive qu un br leur se d monte et que le gaz s chappe ouvrez une fen tre ou une porte pour vacuer l air de la pi ce N allumez p...

Страница 50: ...arbone une surchauffe des surfaces des tables de cuisson ou un possible risque d incendie Utilisez la casserole ad quate N utilisez pas de casseroles instables ou qui peuvent facilement se renverser S...

Страница 51: ...es aliments dans le four lorsque celui ci n est pas utilis Ne laissez personne grimper se tenir debout ou se suspendre la porte Ils pourraient endommager l appareil ou encore se blesser gri vement N u...

Страница 52: ...ndie diode LED 11 Bouton de commande du br leur avec cadran clair 53 72 12 cran de four 59 13 Mini Bouton pour s lectionner les fonctions sp ciales PROBE Sonde TIMER Minuteur 59 72 14 Bouton de s lect...

Страница 53: ...rill est en cours d utilisation pour que le br leur ne s teigne pas En cas de coupure de courant vous pouvez allumer les br leurs de votre table de cuisson l aide d une allumette Approchez une allumet...

Страница 54: ...us important Cuisson en surface Cuisini re mixte professionnelle Cuisiner au wok Les grilles des br leurs ont t sp cialement con ues pour tre utilis es sur deux faces La face plate convient aux ustens...

Страница 55: ...couvercle avant d allumer le br leur Pour votre s curit le couvercle doit tre retir lors de l utilisation du grill infrarouge R glez le bouton de commande sur PREHEAT Pr chauffer Plus la dur e de pr c...

Страница 56: ...ez l extr mit de la poign e vers l avant de la table de cuisson La grille changera de couleur sous l effet de la chaleur et pendant la cuisson des huiles sur la surface C est normal et cela n alt re p...

Страница 57: ...i doit tre assaisonn e 1 Nettoyez la plaque minutieusement l eau chaude savonneuse afin d enlever la pellicule d enduit protecteur 2 Essuyez la surface l aide d une solution base d un quart d eau et u...

Страница 58: ...9 El ments de cuisson 2 sous le sol du four 72 10 Joint de porte de four 76 11 Joint de cadre du four 76 12 Prise de sonde de temp rature 67 c t droit dans le grand four c t gauche dans le petit four...

Страница 59: ...t automatiquement r gl e 3 Mini Bouton Tournez pour s lectionner et appuyez dessus pour saisir les param tres PROBE Sonde ou TIMER Minuteur Pour ajuster galement la dur e de CLEAN Nettoyage 4 Bouton M...

Страница 60: ...a base du four La feuille risque de bloquer la chaleur de l l ment chauffant de base provoquant ainsi un risque de choc lectrique d incendie ou dommage l appareil vents de four arri re Une ventilateur...

Страница 61: ...la plaque avant sur les supports 3 Faites glisser la grille vers vous afin de v rifier si elle a t correctement introduite Grilles de cuisson extensibles Faites coulisser la grille au maximum et pouss...

Страница 62: ...iliser la sonde Comment r gler le four pour la cuisson Ou placez quatre moules sur une grille en utilisant la position centrale C Placez les moules en laissant un espace minimal de 3 8 cm 1 1 2 po aut...

Страница 63: ...HI appara tra sur l cran REMARQUE Lancez la cuisson au grill avec la porte ferm e Si la porte est ouverte l cran va faire d filer CLOSE door FERMEZ la porte et les l ments s allumeront jusqu ce que la...

Страница 64: ...sson et le degr de cuisson de votre choix auront une incidence sur la dur e de cuisson au grill Ce guide prend des viandes temp rature de r frig rateur comme exemples Le minist re am ricain l Agricult...

Страница 65: ...r la section consacr e aux Conseils pour cuisson Il est recommand lorsque vous cuisez au four des biscuits d utiliser une feuille biscuit plate plut t que des moules rebord Pour les plats tels que le...

Страница 66: ...a cuisson par convection termin e REMARQUE Un ventilateur s enclenchera pour refroidir les composants internes C est normal le ventilateur continuera fonctionner m me si le four est teint Utilisez la...

Страница 67: ...vection et CONV ROAST R tissage par convection 1 Introduisez la pointe de la sonde dans la partie la plus paisse de la viande 2 Placez le plateau sur la position souhait e 3 R glez les commandes du fo...

Страница 68: ...fonction test fournit automatiquement la temp rature optimale pour le processus de test le bouton Temp rature n affecte pas la temp rature de test Les lampes du four s teignent et se rallument success...

Страница 69: ...uvez r gler un programme de nettoyage dans les deux fours en m me temps Le dernier four r gl diff rera automatiquement son d marrage jusqu la fin du programme de nettoyage du premier four Sur les mod...

Страница 70: ...et appuyez pour s lectionner Pour r gler le minuteur apr s d marrage 1 Appuyez sur le bouton TIMER Minuteur 2 Tournez le Mini Bouton sur le d lai souhait et appuyez pour s lectionner REMARQUE Vous ne...

Страница 71: ...1 Appuyez et maintenez enfonc le bouton TIMER Minuteur et le Mini Bouton simultan ment pendant 4 secondes jusqu ce que l cran affiche SF Fonctions sp ciales 2 Tournez le Mini Bouton dans le sens inve...

Страница 72: ...de r tissage sont lavables au lave vaisselle Toutefois les plats cuits doivent tre lav s la main l aide d un nettoyant de four ou d un d tergent abrasif Ne rangez pas moule cuisson ou de grille sale d...

Страница 73: ...une serviette en papier REMARQUE Tout lubrifiant graphite essuy doit tre r appliqu 4 Secouez le lubrifiant graphite avant de l ouvrir En commen ant par le m canisme coulissant gauche de la grille app...

Страница 74: ...dans le bord inf rieur de la rainure de charni re L entaille sur le bras de charni re doit tre enti rement positionn e dans le bas de la rainure 3 Ouvrez la porte en grand Si la porte ne s ouvre pas...

Страница 75: ...one au 800 561 3344 Num ro de pi ce pour la commande WB25T10064 REMARQUE Les ampoules de puissance sup rieure endommageront votre four A l aide de gants ou d un chiffon doux retirez l ampoule de son e...

Страница 76: ...e joint est us effiloch ab m ou d plac il doit tre remplac par un technicien qualifi Entretien et nettoyage Cuisini re mixte professionnelle N utilisez pas d ponge en laine d acier vous risquez de lai...

Страница 77: ...cer les br leurs l endroit pr vu cet effet Nettoyage D montez les composants du br leur que lorsqu ils sont froids Lavez l eau chaude et savonneuse Vous pouvez utiliser un tampon r curer en plastique...

Страница 78: ...retien et nettoyage Cuisini re mixte professionnelle Grilles de br leur Nettoyez r guli rement les grilles de br leur en fonte maill e Les grilles peuvent tre nettoy s l int rieur du four en mode nett...

Страница 79: ...chiffon doux Pour davantage de stabilit les l chefrites poss dent des cales en caoutchouc sur l avant Pendant le nettoyage et l utilisation prenez soin de ne pas ab mer ou d accrocher les cales Entre...

Страница 80: ...arquette la grille m tallique Le cadre du plat et la grille m tallique ne peuvent pas tre d mont s Nettoyez les en place Utilisez un chiffon doux pour nettoyer le cadre de la barquette Brossez douceme...

Страница 81: ...ur La position de cuisson n est pas la bonne Les ustensiles ne sont adapt s pour griller Utilisez le moule plat et la grille fournis avec votre four Le papier aluminium utilis dans le plat et la grill...

Страница 82: ...clenchez le disjoncteur L CRAN NE PEUT PAS Les boutons TIMER Minuteur et MINI KNOB Mini bouton doivent tre AFFICHER SF enfonc s en m me temps et maintenus pendant 4 secondes LE MESSAGE PROBE Ceci a po...

Страница 83: ...eur L aspect normal des flammes devrait tre B ou C selon le gaz FLAMMES DE BR LEUR Le four est probablement branch sur un carburant inappropri JAUNES OU GRANDES Contactez la personne qui a install vot...

Страница 84: ...ez tre rassur de savoir que le service GE sera toujours l apr s l expiration de votre garantie Souscrivez un contrat GE pendant que votre garantie est toujours en vigueur et vous b n ficierez d une ri...

Страница 85: ...85 Notes Cuisini re mixte professionnelle...

Страница 86: ...tation ou l exclusion ne vous sont pas applicables Cette garantie vous conf re des droits sp cifiques et vous disposez de droits suppl mentaires qui varient d un tat l autre Pour en savoir plus sur le...

Страница 87: ...el quemador herm ticas 119 120 Bandejas del horno auto limpiantes 115 Acero inoxidable 118 Servicios al cliente N meros telef nicos importantes 126 N mero de modelo y de serie 88 Solucionador de probl...

Страница 88: ...en la parte trasera de este manual Estamos orgullosos de nuestro servicio y deseamos que usted quede satisfecho Si por alguna raz n no est satisfecho con el servicio que recibe incluimos aqu algunos p...

Страница 89: ...icaci n de la v lvula de cierre de gas de la cocina y c mo apagarla si fuese necesario Aseg rese de quitar de la cocina todos los materiales de empaque antes de ponerla en funcionamiento para evitar d...

Страница 90: ...enados por encima de la cocina El material inflamable puede incendiarse si entra en contacto con quemadores de superficie rejillas de los quemadores o elementos calentadores del horno los que pueden p...

Страница 91: ...abierta para localizar una p rdida Si por alguna raz n se apaga un quemador y el gas sigue saliendo abra una ventana o puerta y deje que se ventile la habitaci n No trate de utilizar el aparato hasta...

Страница 92: ...namiento por mon xido de carbono sobrecalentamiento de las superficies de la estufa o un riesgo de incendio potencial Utilice recipientes del tama o adecuado evite recipientes inestables o que se vuel...

Страница 93: ...na o alimentos en el horno cuando no lo est usando No permita que nadie se suba se pare o se cuelgue de la puerta Puede da arse el horno o provocar una lesi n personal grave No utilice papel de alumin...

Страница 94: ...rilla de control del quemador con bisel iluminado 95 114 12 Pantalla del horno 101 13 Mini perilla para seleccionar PROBE sonda TIMER temporizador 101 114 o Special Features caracter sticas especiales...

Страница 95: ...encuentran en uso para garantizar que el quemador siempre se mantenga encendido Si ocurriera un corte de energ a usted puede encender los quemadores de superficie con un cerillo Sostenga un cerillo en...

Страница 96: ...calor entre HI alta y X HI extra alta Cocci n sobre superficie Cocina profesional de combustible dual Cocci n en wok Las rejillas de los quemadores cuentan con un dise o nico para poder cocinar en am...

Страница 97: ...de encender el quemador La tapa debe quitarse cuando se utilice la parrilla IR Gire la perilla de control a la posici n PREHEAT precalentar Cuanto m s se precaliente la parrilla m s oscuras ser n las...

Страница 98: ...ble Coloque el extremo de la manija hacia el frente de la estufa La rejilla cambia de color cuando se la somete al calor y mientras los aceites se cocinan en la superficie Esto es normal y no afecta e...

Страница 99: ...izado durante un per odo prolongado sta debe volver a curarse 1 Limpie bien la plancha con agua caliente jabonosa para eliminar cualquier revestimiento protector 2 Limpie la superficie utilizando una...

Страница 100: ...tes de la bandeja del horno 104 108 5 posiciones en un horno grande 4 posiciones en un horno peque o 9 Elemento de horneado 2 bajo el piso del horno 114 10 Junta de la puerta del horno 118 11 Junta de...

Страница 101: ...nte la temperatura de auto limpieza 3 Mini perilla G rela para seleccionar y presione para ingresar las configuraciones PROBE sonda o TIMER temporizador Tambi n para ajustar el tiempo del ciclo CLEAN...

Страница 102: ...r el fondo del horno El aluminio podr a atrapar el calor del elemento de calentamiento resultando en una descarga el ctrica fuego o da o al producto Ventilaciones traseras del horno Durante todos los...

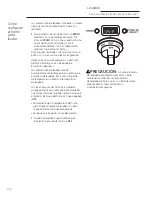
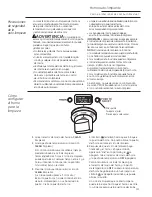
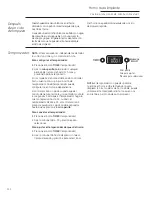
Страница 103: ...la parrilla 3 Tire la bandeja hacia afuera por completo para verificar que se halle bien enganchada Bandejas del horno de extensi n total Deslice la bandeja hasta el fondo y presione hacia abajo para...

Страница 104: ...onda C mo configurar el horno para hornear O coloque cuatro cacerolas en una repisa usando la posici n central C Coloque las cacerolas de modo que cada una posea un espacio de aire de por lo menos 1 1...

Страница 105: ...r n en la pantalla LO baja o HI alta NOTA Siempre ase con la puerta cerrada Si la puerta se deja abierta en la pantalla aparecer CLOSE door cerrar la puerta y los elementos no se encender n hasta que...

Страница 106: ...aja 5 Minutos Filetes de 1 libra 1 4 a 1 2 ancho Kabobs 5 pinchos D LO baja 5 Minutos Vegetales en rodajas D LO baja 5 Minutos Las posiciones de estantes sugeridas deben utilizarse como una gu a gener...

Страница 107: ...usarse en CONV BAKE horneado por convecci n Ver la secci n Consejos de horneado Al hornear galletas los mejores resultados se logran con una bandeja para galletas plana en lugar de una bandeja con lad...

Страница 108: ...i n haya finalizado gire el selector de modo del horno y la perilla de temperatura a OFF apagado NOTA Se encender un ventilador de refrigeraci n para enfriar las piezas internas Esto es normal y el ve...

Страница 109: ...la mostrar LO baja La temperatura interna de los alimentos puede configurarse desde un m nimo de 100 F hasta un m ximo de 200 F Cuando los alimentos alcanzan la temperatura interna configurada la pant...

Страница 110: ...o La caracter stica de leudado brinda autom ticamente la temperatura ptima para el proceso de leudado por lo tanto la perilla de temperatura no afecta la temperatura de leudado Las luces internas del...

Страница 111: ...grasa excesiva y otros derrames de alimentos con un pa o h medo La suciedad excesiva de alimentos puede prenderse fuego lo que provoca humo y da os por calor No limpie las juntas del horno porque pued...

Страница 112: ...ER temporizador 2 Gire la mini perilla a 00 y presione para seleccionar Para ajustar el temporizador despu s del inicio 1 Presione el bot n TIMER temporizador 2 Gire la mini perilla hasta alcanzar un...

Страница 113: ...e los controles del horno grande para ingresar el modo y para seleccionar el ajuste Para ajustar el termostato del horno 1 Presione y sostenga el bot n TIMER temporizador y la mini perilla al mismo ti...

Страница 114: ...y parrilla de rostizado son todas aptas para lavaplatos Sin embargo los elementos pegados durante el horneado pueden necesitar limpieza a mano con un limpiador de horno comercial o un detergente abra...

Страница 115: ...pielas con una toalla de papel NOTA Todo el lubricante de grafito que se haya eliminado durante la limpieza debe volver a colocarse 4 Agite el lubricante de grafito antes de abrirlo Comenzando con el...

Страница 116: ...a dentro del extremo inferior de la ranura de la bisagra La ranura del brazo de la bisagra debe estar bien colocada en la parte inferior de la ranura 3 Abra la puerta por completo Si la puerta no se a...

Страница 117: ...s de repuesto llamando al 800 626 2002 Solicite el n mero de pieza WB25T10064 NOTA El uso de focos de un vataje mayor puede da ar su horno Retire el foco de su envoltorio utilizando guantes o un trapo...

Страница 118: ...ados de horneado Si la junta se desgasta rompe o da a o cambia de lugar un t cnico calificado debe cambiarla de inmediato Cuidado y limpieza Cocina profesional de combustible dual No utilice almohadil...

Страница 119: ...ieza Quite todas las piezas del quemador s lo cuando est n fr as L velas en agua caliente jabonosa Puede utilizarse una almohadilla pl stica para quitar las part culas de comida quemada y pegada Para...

Страница 120: ...uidado y limpieza Cocina profesional de combustible dual Rejillas del quemador Las rejillas del quemador de hierro fundido esmaltado deben limpiarse regularmente Las rejillas pueden limpiarse dentro d...

Страница 121: ...e del taz n de la canaleta con un pa o suave Para lograr estabilidad las canaletas cuentan con almohadillas de goma en la parte frontal Tenga cuidado de no da ar las almohadillas cuando las quite para...

Страница 122: ...a y la tela met lica El marco de la bandeja y la tela met lica no pueden quitarse L mpielos en su lugar Utilice un pa o suave h medo para limpiar el marco de la bandeja Con cuidado barra las part cula...

Страница 123: ...est usando una posici n de bandeja inadecuada Los recipientes no son adecuados para asar Use la bandeja para asar y rejilla que vinieron con su cocina El papel met lico usado en la asadera y la rejil...

Страница 124: ...e haber saltado Cambie el fusible o reconfigure el interruptor de circuito LA PANTALLA Los botones TIMER temporizador y MINI KNOB mini perilla deben NO MUESTRA SF presionarse al mismo tiempo y sostene...

Страница 125: ...les de los quemadores deben ser como B o C dependiendo del tipo de gas LAS LLAMAS DE La cocina puede estar conectada a un tipo de combustible incorrecto LOS QUEMADORES Comun quese con la persona que i...

Страница 126: ...24 Usted puede estar tranquilo de que el Servicio T cnico de GE estar all para ayudarlo cuando finalice su garant a Adquiera un contrato GE mientras su garant a sigue vigente y recibir un descuento su...

Страница 127: ...127 Notas Cocina profesional de combustible dual...

Страница 128: ...ci n puede no aplicarse en su caso Esta garant a le otorga derechos legales espec ficos y usted puede contar con otros derechos que pueden variar de estado a estado Para conocer sus derechos legales e...

Отзывы: