background image


61 


13.  COMPONENT ENGINNERING TA-10  
  

SETUP 

The Component Engineering TA-10 can be used for theater automation with the SX-3000.  It 
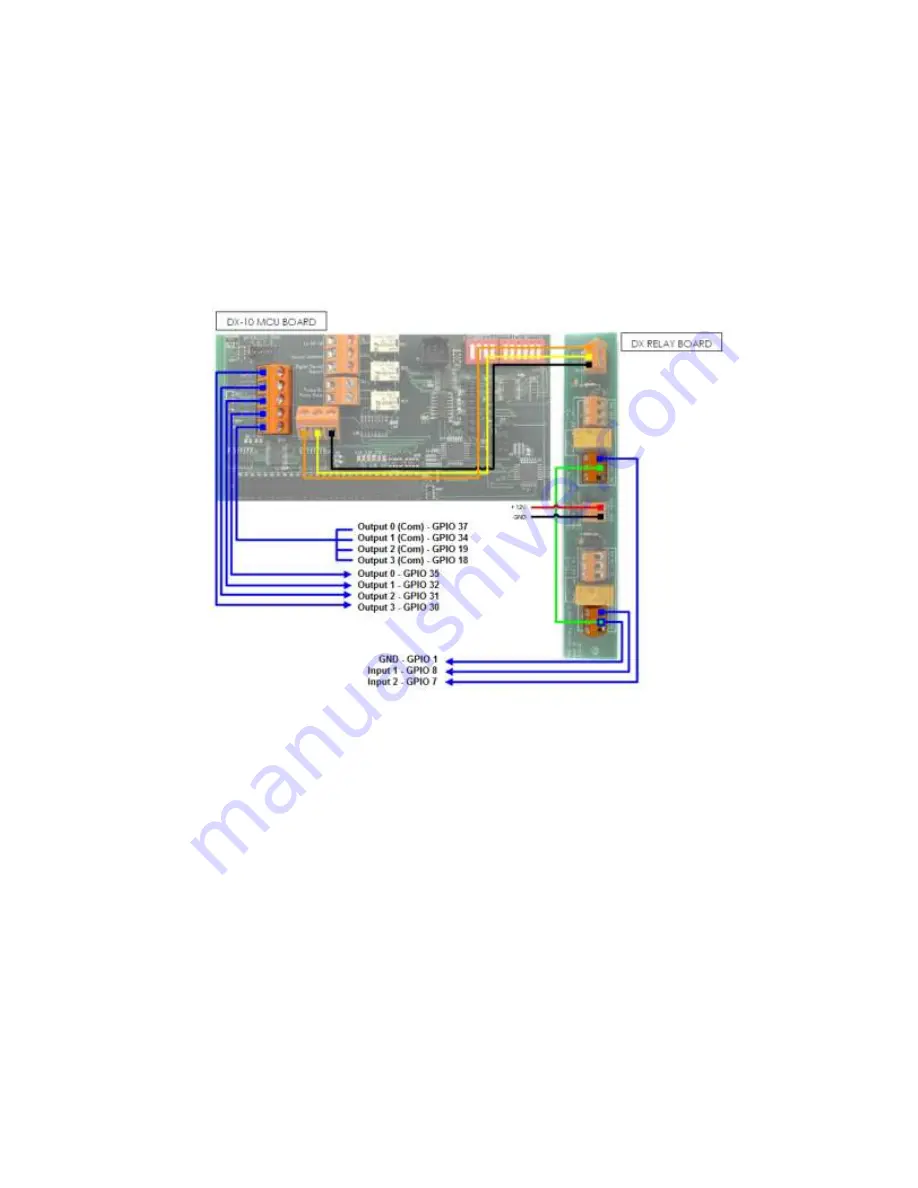
requires that the TA-10 be wired in a particular configuration. A wiring diagram can be seen in 
Figure 77. 
 
The TA-10 is connected to the SX-3000 

using the server’s GPIO input/output port. Configure 

event labels with the GPIO device to trigger the TA-10. 


Figure 77 Component Engineering TA-10 wiring diagram. 


14.  TESTING PROCEDURES FOR QC AFTER 
  

 INSTALLATION 

After the installation has been completed, it is necessary to test the following to ensure that the 
SX-3000 has been properly installed: 

1.  Test the video playback capabilities of the server using the following file formats: MPEG2, 

JPEG2000, Scope, Flat, 3D. 

2.  Test the audio playback capabilities of the server and verify that all the channels are 

working. Also check for any static noises. 

3.  Test t

he server’s ability to activate automation cues using test cues for lights, curtains, 

sound and fire alarm. 

4.  Test the remote access capabilities of the server, including: Theater Management 

System (TMS) access, network connectivity and VNC. 

Содержание SX-3000

Страница 1: ...INSTALLATION MANUAL FOR SX 3000 STANDALONE INTEGRATED MEDIA BLOCK WITH PSD 3000 P PORTABLE STORAGE DEVICE SMS version 9 0 July 29 2013...

Страница 2: ...tions 13 4 2 HDD Lock 13 4 3 Front Panel 14 4 4 Back Panel 14 4 5 Bracket Installation 14 4 5 1 Installation Sequence 14 4 5 2 Installing the Bracket on a Barco S2K projector 15 4 5 3 Installing the B...

Страница 3: ...Series 2 Projector Setup 33 7 1 1 Barco Touch Panel Setup 34 7 2 NEC Series 2 Projector 35 7 3 Christie Series 2 Projector 36 7 4 3D settings for Series 2 projectors 38 7 5 IMB 3D macro settings chan...

Страница 4: ...ices 51 12 8 Automation setup for Christie ACT devices 53 12 9 Automation setup for Dolby devices 55 12 10 Automation setup for USL DAX devices 57 12 11 Automation setup for USL JSD devices 59 13 COMP...

Страница 5: ...development and improvements In no other event shall GDC Technology Limited be liable for any loss of profit or any other commercial damages including but not limited to special consequential or othe...

Страница 6: ...odak House II 39 Healthy Street East North Point Hong Kong Tel 852 2523 6851 3F Kyobashi Chuo Bldg 1 14 7 Kyobashi Chuo ku Tokyo 104 0031 Japan Tel 81 3 5524 3607 10 Ubi Crescent Ubi Tech Park Lobby B...

Страница 7: ...nema theatres Note The currently supported software version for SX 3000 server is 9 0 or higher In this manual there will be many instructions starting from the SMS screen see Figure 1 This is the mai...

Страница 8: ...ibes the equipment shipped with the GDC SX 3000 and PSD 3000 P The SX 3000 Packaging Includes Item Qty Photo SX 3000 Unit with projector coverplate 1 RJ45 AES Audio Cable 2 RJ45 GPIO Cables 4 Network...

Страница 9: ...PSD 3000 P Packaging Includes Item Qty Photo PSD 3000 P Portable Storage Device 1 PSD 3000 P Bracket for specific projector model 1 2 5 SATA HDD 3 Power Cord 1 Power Adapter 1 HDD Tray Key 2 eSATA Ca...

Страница 10: ...O THE PROJECTOR Note If the projector comes with the GDC IMB pre installed the instructions in Section 2 can be skipped This section of the manual describes the physical installation of the SX 3000 in...

Страница 11: ...es below to ensure proper placement 2 1 1 Barco Projector Placement Figure 3 shows an interface board with SMPTE 292 inputs connected to a Barco projector This board must be removed in order to instal...

Страница 12: ...X 3000 Figure 5 SX 3000 Placement on Christie projector 2 1 3 NEC Projector Placement Figure 6 shows the location where SX 3000 should be installed on a NEC projector Remove any existing interface boa...

Страница 13: ...it is recommended to install it into the top slot of the projector If the SX 3000 is installed into the bottom slot the board runs the risk of coming in contact with the below racks 2 3 Projector Netw...

Страница 14: ...Storage Device Product Specifications Suitable for 2 5 SATA HDD Support Hot Swap Dimension 220 L X 165 6 W X 55 2 H mm Important note To connect 1 eSATA cable to PSD 3000 P the SMS version MUST be on...

Страница 15: ...on the PSD 3000 P external hard drive bay before powering up the projector 4 5 Bracket Installation 4 5 1 Installation Sequence Step 1a Install PSD 3000 P Bracket on Barco S2K Projector Step 1b Insta...

Страница 16: ...racket on a Barco S2K projector Step 1a Install PSD 3000 P Bracket on Barco S2K Projector 1 Loosen the screws on the projector Figure 9 Loosen the screws on projector 2 Remove the metal rings from the...

Страница 17: ...n to the projector and tighten the screws 5 Mount PSD 3000 P onto the bracket Figure 12 PSD 3000 P mounted on Barco projector 6 At last use the cable tie to fix the DC power cord on the left hand side...

Страница 18: ...projector Insert and tighten the screws Figure 14 Align the screw holes with the projector 3 Mount the PSD 3000 P onto the bracket Figure 15 Mount PSD 3000 P onto the NEC projector 4 At last use the c...

Страница 19: ...ector Figure 16 Loose the screws on the projector 2 Put the bracket on the projector Align the screw hole with the projector and tight the screws Figure 17 Put the bracket on the projector 3 Insert th...

Страница 20: ...on of the projector Figure 19 Find the location of the projector 2 Install the two parts of the bracket first Align the screw hole and tight the screws Figure 20 Install the two parts of the bracket 3...

Страница 21: ...t use the cable tie to fix the DC power cord on the left hand side of bracket 4 5 6 Installing the Bracket on a Christie CP2220 or CP2230 projector Step 1e Install PSD 3000 P Bracket on Christie CP222...

Страница 22: ...with the projector and tight the screws Figure 24 Put the bracket on the projector 3 Insert the PSD 3000 P onto the bracket Figure 25 Insert the PSD 3000 P onto the bracket 4 At last use the cable tie...

Страница 23: ...eSATA cable to the back panel for data transfer Figure 26 Connect eSATA cable to PSD 3000 P Step 2 Making the connections to the SX 3000 1 Insert the eSATA cable into the SX 3000 eSATA port 1 Figure...

Страница 24: ...Insert 2 5 HDD close the front door 3 Lock the HDD Tray by using the key Rotate 90 degrees Counterclockwise Open Door Instruction 1 After releasing the HDD tray lock use your thumb and forefinger to p...

Страница 25: ...door to close will damage the machine Procedure to Uninstall the HDD I Release the triangle lock by using the key Rotate 90 degrees Clockwise and open the HDD tray door II Take out the HDD from HDD t...

Страница 26: ...lights have 2 colors blue and red The LED lights can change from steady to flashing depending on the status of the hard drive Please see the chart below for LED indications HDD Status for each numbere...

Страница 27: ...will remain silent if any other hard disk fails Please remember to toggle the switch on after replacing any failed hard disks Figure 29 Buzzer On Off Toggle Switch 4 8 3 Hard Drive Failure When a hard...

Страница 28: ...der the IMB Storage tab in the Configuration menu select Use PSD 3000 P 1x Cable 2 Select OK to complete this option Figure 30 IMB Storage Tab Configuration 3 Go to Control Panel click Shutdown and th...

Страница 29: ...5 3 RAID Status When the RAID is rebuilding the Monitor RAID Status section displays the rebuilding progress as normal function to the previous RAID setup 5 4 Creating a new RAID Array When creating a...

Страница 30: ...et RAID array to rebuild at highest speed Figure 32 Increase Rebuild Speed Storage System Management 5 6 Disabled options when using the 1x eSATA Connection The following options are disabled when usi...

Страница 31: ...drop down menu Enter the number password and select OK 4 Select the IMB Network tab 5 Enter the Subnet Mask As well as the desired IMB IP and SOM IP addresses please refer to Figure 33 Figure 33 IMB N...

Страница 32: ...ctor will be inactive as shown in Figure 35 Figure 35 Cinecanvas Tab Configuration 6 3 IMB Marriage and Clearing Door Tampers from the SX 3000 Please use the following steps below to perform the marri...

Страница 33: ...onfiguration 6 The following box will appear Figure 37 IMB Status 7 Click Marry to perform the marriage of the projector and SX 3000 8 Click Close to clear the door tamper errors with the projector 9...

Страница 34: ...e screen resolution that the projector is capable of For example a 2K screen file should be used for a 2K projector 7 1 Barco Series 2 Projector Setup No system configuration is required for Barco Ser...

Страница 35: ...rties will appear as shown in Figure 39 Figure 39 Barco touch panel settings Connection Properties 2 Enter the SOM IP address of the SX 3000 into the Host Name field The remaining fields should be fil...

Страница 36: ...he Service password to activate service mode operation as shown in Figure 41 Figure 41 Service Mode on NEC Digital Cinema Communicator 4 Select Setup Option Slot on the Digital Cinema Communicator and...

Страница 37: ...etup Marriage to start the Marriage wizard see Figure 43 b Click the Next button to proceed to the Marriage Checklist window Figure 43 Projector marriage wizard on Christie projector TPC c Read and pe...

Страница 38: ...is count down You MUST press the Marriage button on the PI Board within this 30 second window in order for the marriage to take effect When the Marriage button is pressed the LED button will change to...

Страница 39: ...4 3D settings for Series 2 projectors The 3D macros for Series 2 projectors should be configured with the following settings for 3D Input Control 3D Sync Input Mode Use Line Interleave first line Left...

Страница 40: ...7 5 IMB 3D macro settings changes Server software version 9 0 makes changes to the IMB 3D output format The following projector macro changes are required to support these changes Note These are requ...

Страница 41: ...right of the keyboard then click the cursor in the Password text box to enter the password 4 Click Diagnostics Maintenance Configure Time Zone to access the Time zone Selection Page A new window will...

Страница 42: ...ources that are used with the SX 3000 9 1 1 Content ingest from USB disk The following steps describe the setup of a source for ingesting content from an external USB hard drive 1 From the SMS click o...

Страница 43: ...this case we will use the source name FTP Select FTP as the Source Type Figure 52 FTP ingest source setup 3 Enter the respective parameters for Source IP Source Path Username and Password 4 Click Sav...

Страница 44: ...with most audio processors on the market a standard RJ45 to DB25 connector is included in the packaging please refer to Figure 54 Figure 54 RJ45 DB25 Audio Connector Figure 55 RJ45 DB25 pinout Optiona...

Страница 45: ...onverts the digital audio signal to an analog audio signal The DAC is then connected to a sound processor that processes the analog audio signal and outputs it to the amplifier and subsequently the ci...

Страница 46: ...k the power button once to access the Control Panel 2 Click the following buttons to access the Automation interface SMS Configuration Maintenance Access enter password General Automation Automation e...

Страница 47: ...ow the table to add a new action associated with this event label 3 A new action is added to the table The Device and Action settings of this new action can be changed Notice that when the Device sett...

Страница 48: ...Schedule button on the Actions tab on the automation interface This will bring you the automation schedule configuration screen as shown in Figure 61 Figure 61 Schedule automation events To add a sche...

Страница 49: ...supports automation for Barco Christie and NEC projectors Follow the steps below to configure a projector device in the server automation interface 1 Click the Add button on the Devices tab and enter...

Страница 50: ...49 6 Click the Save button to save configured settings Figure 63 Automation settings for projector device Figure 64 Projector automation device setup 1 2 3 4 4 5 6...

Страница 51: ...the device In this case it is eCNA Set the device type to eCNA_IO 2 Click OK and set up the device parameters for the eCNA device Figure 65 eCNA automation device setup 3 Enter the IP address of the e...

Страница 52: ...tion setup for JNIOR devices The SX 3000 supports the JNIOR Model 310 automation device Follow the steps below to configure a JNIOR device in the server automation interface 1 Click the Add button on...

Страница 53: ...evice Figure 67 JNIOR automation device setup 3 Enter the IP address of the JNIOR device see Figure 68 4 The settings for Port Login and Password are set to the default values for JNIOR devices if lef...

Страница 54: ...es The SX 3000 supports Christie ACT automation device Follow the steps below to configure a Christie ACT device in the server automation interface 1 Click the Add button on the Devices tab and enter...

Страница 55: ...3 Enter the IP address of the Christie ACT device 4 The default setting for the Port is displayed on the settings for the Christie ACT device Change this value if required 5 Default control cues will...

Страница 56: ...3000 supports automation for the Dolby sound processors Follow the steps below to configure a Dolby device in the server automation interface For this example the device refers to the Dolby CP650 Sou...

Страница 57: ...he Dolby CP650 device Figure 71 Dolby CP650 automation device setup 3 Enter the IP address of the Dolby CP650 device 4 Default Control cues are set up for a new Dolby CP650 automation device Control c...

Страница 58: ...omation setup for USL DAX devices The SX 3000 supports automation for USL DAX sound processor Follow the steps below to configure a USL DAX device in the server automation interface 1 Click the Add bu...

Страница 59: ...for the USL DAX device see Figure 73 Figure 73 USL DAX automation device setup 3 Enter the IP address of the USL DAX device see Figure 74 4 Click the Save button to save configured settings Figure 74...

Страница 60: ...face 1 Click the Add button on the Devices tab and enter the name of the device In this case it is JSD Set the device type to USL JSD see Figure 75 2 Click OK and set up the device parameters for the...

Страница 61: ...60 5 Click the Save button to save configured settings Figure 76 Automation settings for USL JSD device 3 4 5...

Страница 62: ...S FOR QC AFTER INSTALLATION After the installation has been completed it is necessary to test the following to ensure that the SX 3000 has been properly installed 1 Test the video playback capabilitie...

Страница 63: ...t flows this is a voltage sensing device The GPI inputs have a 5 62K Ohm resistor pull up to an isolated 5 Volts Shorting the pins would send an input high dry contact GPIO Output Details Outputs use...

Страница 64: ...eri Kurla Road Marol Andheri East Mumbai 400059 India Tel 91 22 4044 0500 Spain Barcelona Centro de Negocios Josep Tarradellas Office 72 and 73 Av Josep Tarradellas n 38 08029 Barcelona Spain Tel 34 9...

Отзывы: