Certain wireless sensors can be calibrated for more accurate readings (ex. temperature
sensors). If calibration is possible for a sensor, the “Calibrate” tab will be visible in the detail
view. To calibrate a sensor, replace the last reading with the more accurate reading and click
“Calibrate”. All future readings from the sensor will be based off the new calibration setting.
7. Manage Sensor Networks
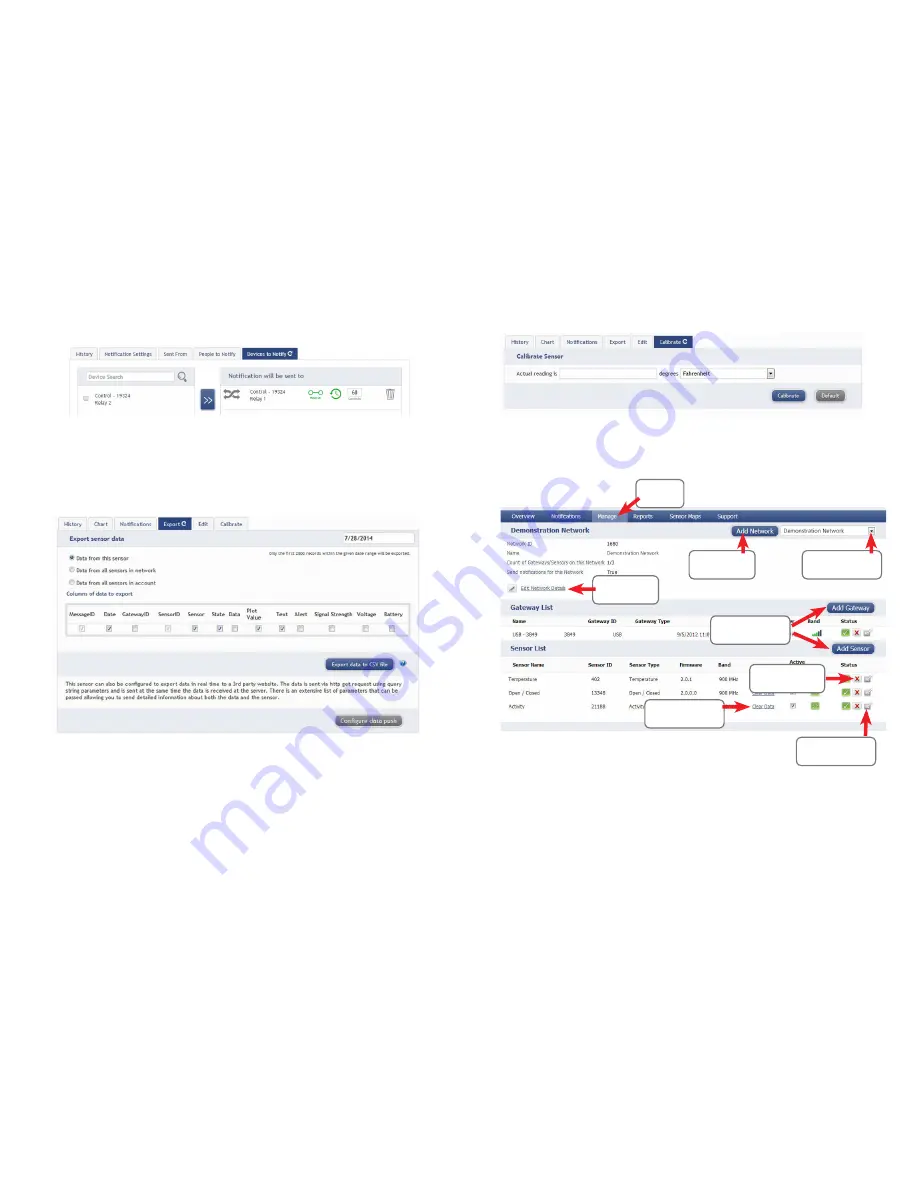
To view or edit information about your wireless sensor network(s), click on “Manage” in the
main navigation. This area allows you to edit network details, create new sensor networks,
and manage wireless gateways and sensors for your network(s).
PAGE 11
Move device to
another network
Add a device
to the network
Create a
new network
Remove device
from network
Edit network
information
Clear sensor
history and data
Click to
Manage
Select which
network to view
Note: Some buttons and features are only visible if there is more than one sensor network setup on the
account, such as the network selection box in the upper right corner.
If more than one sensor network is setup on the account, you can easily move gateways and sensors from
one network to another by clicking on the “Move Device” button at the far right of the device’s “Status”
section.
If you clear a sensor’s data, the data history is deleted from the entire system and can not be recovered. We
recommend exporting a sensor’s data history using the export function in the sensor details view
(“Overview” page) before clearing the sensor’s data if you want to have a record of the data.
PAGE 10
PAGE 11
Devices to Notify
If you have a G-HUB Control or Notifier A/V device on your network, you will also see
a “Devices to Notify” tab. This will allow the notification to interact with these types of
devices. Select a device from the list on the left and click the arrow button to add it to the
recipient list. Clicking the control icon toggles their setting.
Note: Control devices have two relays per device that are controlled separately. You can turn a relay on,
off or toggle the state. You can also set a duration by clicking on the timer icon. This will perform the
selected toggle (on/off/toggle) for a set duration, then change back.
5. Exporting Sensor Data
Clicking on the “Export” tab within the sensor data window allows you to export sensor data
to a comma separated value (.csv) file or send the sensor data to an external web source.
To export sensor data you must first select the date range for the data you want to export.
Once the date range is selected, determine whether you want sensor data from the
selected sensor only, from all sensors in the network or all sensors assigned to the account.
When you are finished, click on “Export Data” at the bottom of this window. The data will be
exported to a comma separated value (.csv) file format.
Note: Only the first 2,500 records within the
selected date range will be exported.
You can alternately send your sensors’ incoming data to a 3rd party by clicking on the “Con-
figure data push” button at the bottom of the window. From this area you can pass data from
your wireless sensor network devices to another service in real time. This is done by coding
the data into a url query then sending the data via http get request at the time data is received.
There is an extensive list of parameters that can be passed, as listed in the viewed window,
that allow you to send detailed information about both the data and the sensor.
6. Calibrating Sensor Data


