3. Configuring The Ethernet Gateway
The Ethernet Gateway collects data from all sensors within range and is preconfigured to
batch deliver the sensor messages to the online system every 5 minutes.
The Ethernet Gateway uses DHCP (Dynamic Host Configuration Protocol) to
automatically acquire a network address from the LAN (Local Area Network). In the
event that it needs to have an address manually assigned to it, you can assign an IP
address as well as a gateway mask and default DNS through the online interface. For
more information on configuring the G-HUB Ethernet Gateway please view the support
documentation at http://www.G-HUB.com/pdf/Ethernet_Gateway_Configuration.pdf.
Note: This advanced configuration is NOT required in most instances. In the event that it is required,
you can initialize the gateway on a network that uses the default DHCP settings, or you can follow
the instructions for changing the configuration settings on a PC, which are included later in this User’s
Guide.
Upon logging into the online system as an administrator, select “My Account” then
choose the edit icon next to your sensor network. From there you can alter the heart-
beat of the Ethernet Gateway as well as edit any other configurations available. There is
also a quick link to reset all gateway settings to factory defaults.
3. Using Your G-HUB Wireless Sensors
Insert Batteries Into Wireless Sensors
Important: Make sure your sensors are at least 3ft. away from Ethernet Gateway.
Peel back the black sticker cover of the battery slot and slide the coin cell battery into the
sensor as shown in fig.1. It will power on within 10-20 seconds. Once online, your sensor is
ready to be deployed. If you wish to change a sensor configuration, change the parameter in
the software. The new parameters will be transmitted to the sensor on the next heartbeat. If
you need a more immediate response from the sensor, power cycle the sensor by removing,
then re-inserting the battery.
Notes:
- If the sensor status indicator does not change, reset
the sensor by removing the battery.
- Wait 60 seconds then re-insert the battery.
- When inserting the battery, make sure to push the
battery all the way back using a paper clip.
- Note the proper orientation of battery in fig.1
Warning: Your sensors ship with a 2 hour heartbeat.
It is recommended that unless you are using the AA battery
solution, you should set the heartbeat to no faster than one hour to preserve battery life. When changing
a sensor’s heartbeat, the new configuration information will be sent to the sensor on it’s next heartbeat. If
you want to update the sensors immediately you can reset them manually.
Manual Sensor Reset Process:
1 - Using the end of a paper clip, push the batteries out of the sensors through the small hole
in the top of the sensor
2 - Change the sensor heartbeat through the online system
3 - Re-insert the batteries into the sensors
PAGE 4
4. Using The iG-HUB
™
Online Wireless Sensor System
1. Understanding The Online Interface
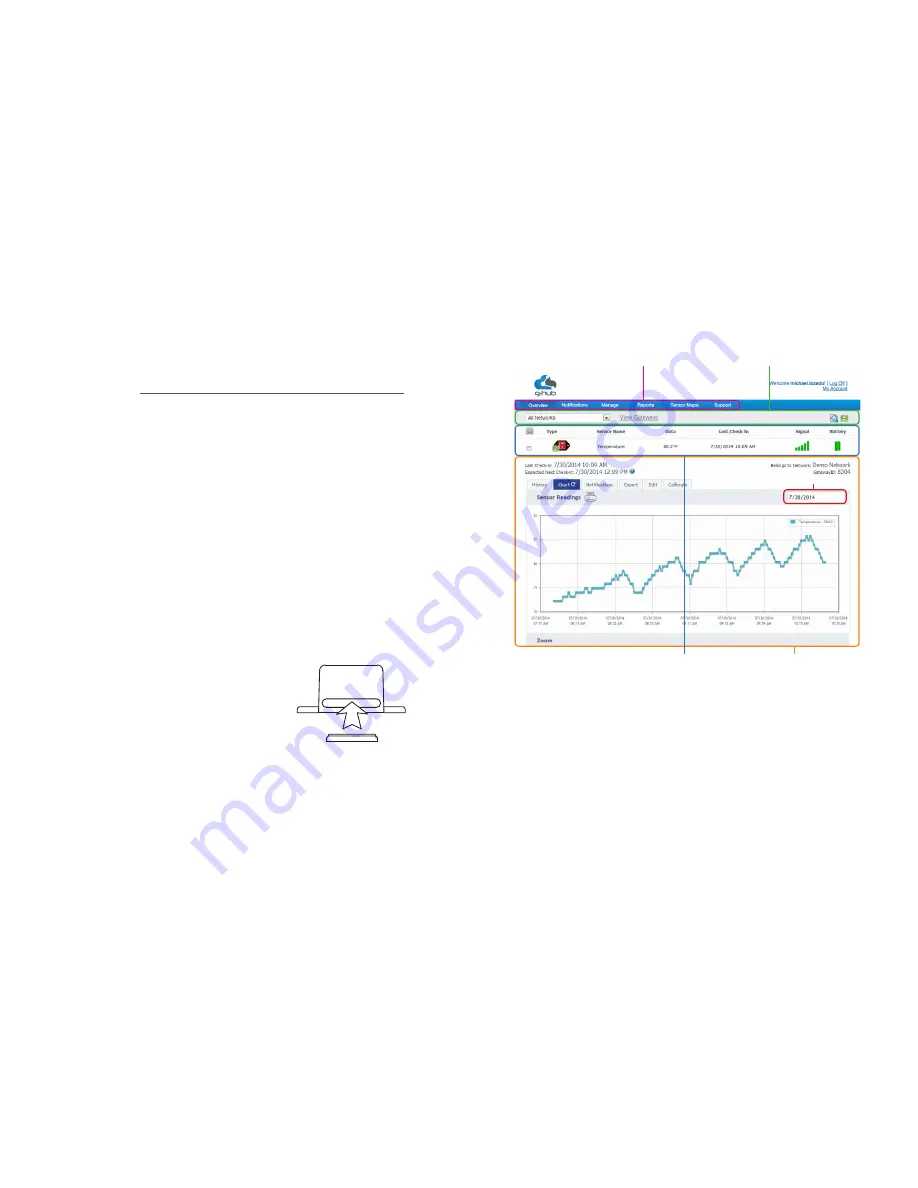
When you log into the online system, the default view shows all of your sensors last
recorded data.
View / Sort Features
Menu System
Sensor Details View
Sensors Overview
Date Range Selector
Menu System
Overview
- Shows all sensors in the account and their last readings.
Notifications
- Manage sensor notifications and show all sent notifications.
Manage
- Manage networks, sensors and gateways.
Reports
- Printable account and sensor network reports.
Sensor Maps
- Visual maps to help you track sensor placement.
Support
- Support information for using sensors and software.
View / Sort Features
This section allows you to sort the sensors being viewed and search for sensors on
your account.
Sensor Overview
Displays sensors on your account with their last reading and status information. Clicking
on a sensor row expands the “Sensor Detail View” allowing you to view detailed infor-
mation for the selected sensor.
+
_
Battery
Insertion
fig.1
PAGE 5


