


232002430G(03)
98
Paper Size (Paper Page)
The paper size represents your total work area. Ensure that the paper size is never set greater than the
FMC280 work table area of 28" x 14.5" (732 mm x 356 mm). The X value represents the length and the Y
value represents the width.
Unit (Paper Page)
Here you can set your preferred measurement standard in which you would like to use with the
LaserPro FMC280 print driver. You can choose between metric or imperial standards.
Image Tuning
(Paper Page)
In the event that you are processing extremely fine and detailed designs requiring near- microscopic
edge-to-edge precision, you will need to adjust the image tuning setting. To adjust this setting, we
recommend that you engrave a small black square design as a sample and use a magnifying glass to
view the engraved results.
When you look at your engraved test square under a magnifying glass, you may notice the edges of your
square may be slightly offset, with every consecutive engraved even or odd line protruding past the
square’s ideal edge. This occurrence may occur on the left or right side of the square and can be
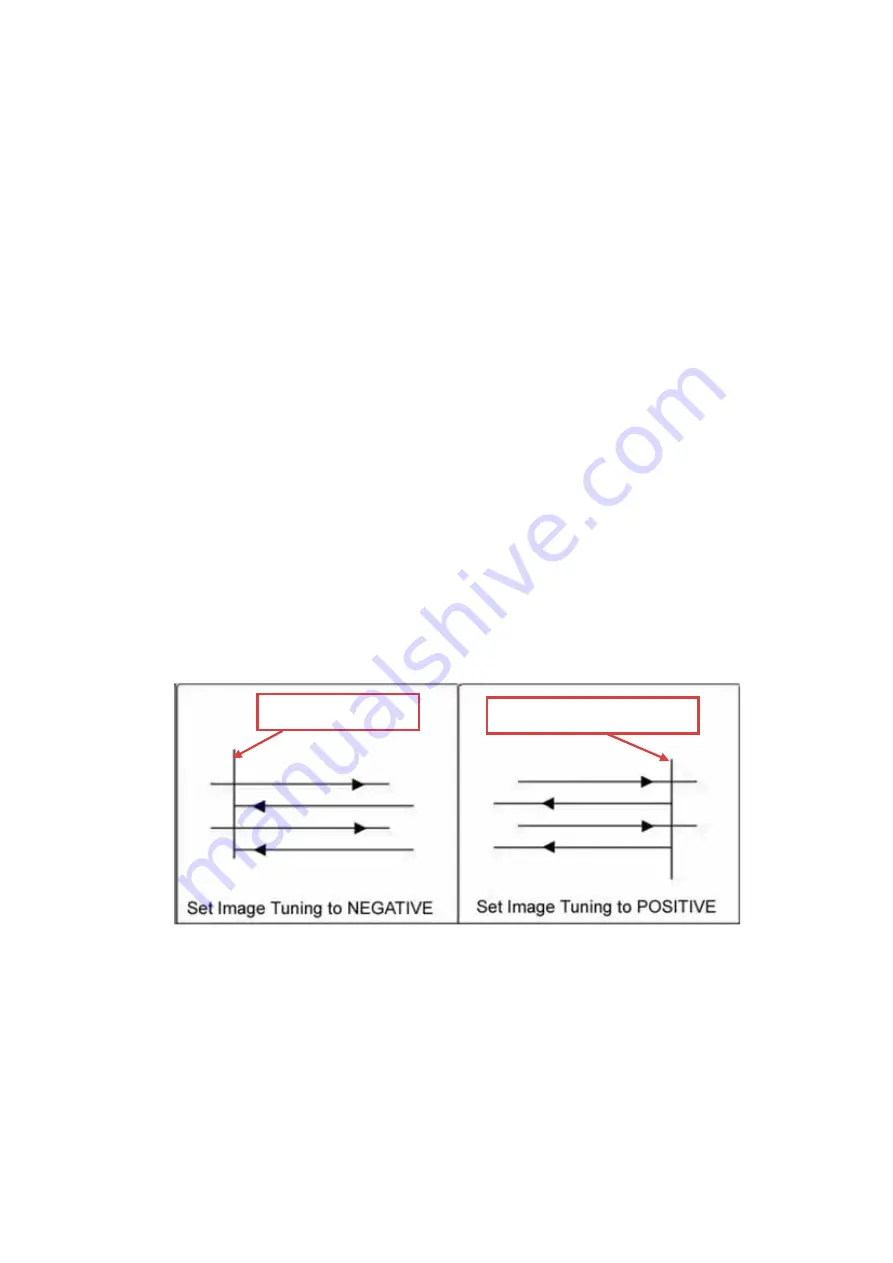
compensated for by the image tuning setting. In the diagram below, the arrows refer to the direction the
laser head is moving to generate that engraved line. If the first and every other line protrude to the left of
the square’s ideal edge, you will want to set the image tuning to a negative value. If the first and every
other consecutive line protrude to the right of the square’s ideal edge, you will want to set the image
tuning to a positive value. The further the protruding lines are from the square’s ideal edge, the larger you
will need to set the Image Tuning value to compensate.
The following is an example that has the proper image tuning, and demonstrates this significance when
engraving fine, small, intricate text. The following two pictures show engraved text magnified with no
image tuning (left picture) and image tuning enabled (right picture).
Square’s Left Edge
Square’s Right Edge
Содержание LaserPro FMC280
Страница 1: ...www delinit by...
Страница 20: ...16 232002430G 03 Step 3 Loosen the lock Step 4 Remove the top board and each sideboard...
Страница 27: ...232002430G 03 23 3 2 Right Profile View Ethernet Port USB Port Power Socket Main Power Swiych...
Страница 28: ...232002430G 03 24 3 3 Left Profile View Water Outlet Water Inlet Assist Air Inlet...
Страница 29: ...232002430G 03 25 3 4 Rear View...
Страница 33: ...232002430G 03 29...
Страница 34: ...232002430G 03 30...
Страница 38: ...232002430G 03 34...
Страница 39: ...232002430G 03 35...
Страница 40: ...232002430G 03 36...
Страница 44: ...232002430G 03 40 4 Enter your Mac OS X User Name and Password then press OK 5 Press Active...
Страница 45: ...232002430G 03 41 6 Press OK when activation is complete 7 Register Parallels Desktop...
Страница 101: ...232002430G 03 97 5 3 4 4 LaserPro FMC280 Print Driver Paper Page...
Страница 113: ...232002430G 03 109 8 Now you are ready to output the modified image by clicking File Print...
Страница 115: ...232002430G 02 111 Chapter 7 Optional Items Air Extraction System Option Rotary Chuck Option www delinit by...
Страница 128: ...124 232002430G 03 Chapter 9 Appendix LaserPro FMC280 Specification Sheet www delinit by...


