9
9
5.
Operating Instructions
Introduction
The VOLKSLOGGER does not have an ON/OFF switch. The operation starts by
connecting the power cable.
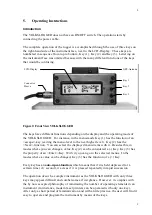
The complete operation of the logger is accomplished through the use of three keys on
the right-hand side of the instrument face, next to the LCD-Display. These keys are
numbered in sequence from top to bottom, Key (1), Key (2) and Key (3).
Lettering on
the instrument face was omitted because with the many different functions of the keys
that would be confusing.
Key 1
Connector
Sleeve
LCD-Display
Key 2
Key 3
GPS-Antenna
Figure 2: Front View VOLKSLOGGER
The keys have different functions depending on the display and the operating mode of
the VOLKSLOGGER. For instance, in the menu-mode Key (1) has the function of an
<escape>-key (exiting the menu-level to the next higher level). Key (2) has the
<Next>-function. You can select the displayed menu-items with it. Besides this, in
modes where you can change a value, Key (2) can be considered a (-) Key. Key (3) has
the property of an <Enter>-Key. With it you can go to the selected menus. In the
modes where a value can be changed, Key (3) has the function of a (+) Key.
Every key has an
auto-repeat-function
, which means that if it is held depressed for a
certain time (
≥
½ second), it acts as if it is pressed repeatedly in rapid succession.
The operation of such a complex instrument as the VOLKSLOGGER with only three
keys may appear difficult and cumbersome at first glance. However, it complies with
the by now accepted philosophy of minimizing the number of operating elements in an
instrument (for instance, modern laser printers can be operated with only one key).
After only a short period of familiarization and with a little practice, the user will find it
easy to operate and program the instrument by means of the keys.


