


G1000 Supplemental Maintenance Manual
Page 7-32
Textron Nav III Series
Revision 3
190-02128-04
7.9 GMU 44 Magnetometer
Original GMU 44 is Reinstalled
If the original GMU 44 is reinstalled, then no software loading is required. This does not include
units that were returned for repair as their software and configuration files are deleted during the
repair testing process. Continue to the GRS/GMU Test Section 7.10.5.
New, Repaired or Exchange GMU 44 is Installed
If a new, repaired or exchange GMU 44 is installed, then software must be loaded.
LRU Replacement Procedure GMU
1. Open the MFD, PFD (ESS BUS), and PFD (AVN BUS 1) circuit breakers.
2. Remove Garmin SD/MMC/FS 510 cards from bottom slots of the MFD and PFD if
present.
3. Apply power to the G1000 system by connecting external power to the aircraft to
energize the aircraft and avionics electrical busses.
4. Turn on Avionics electrical busses.
5. Power on the MFD and PFD in configuration mode.
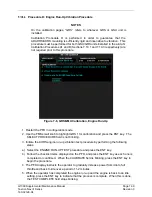
6. Using the PFD, scroll to the LRU replacement page.
7. Activate the cursor and select GMU1 in the LRU dropdown box.
8. Verify all boxes are checked. If they are not checked, press the
CHK All
softkey.
9. Press the
Load
softkey
.
10. Press
ENT
to acknowledge the process was complete.
11. Deactivate the cursor.
12. Scroll to the Configuration Manager page.
13. Press the
CNFM CFG
softkey.
14.
Select ok when prompted to “Confirm configuration as expected configuration”
15. Power cycle the system verify there are no red-Xs or system alerts.
16. If red-Xs or system alerts are present, troubleshoot as necessary using Section 5 or re-
load the system using the legacy method in Section 7.9.2.
17. If there are no red-Xs or system alerts, continue to Section 7.10.
Legacy Replacement Procedure GMU1 (Alternate Method)
1. Insert the software loader card in the top slot of the PFD.
2. Power on the MFD and PF1 in configuration mode.
3.
Select no when “Do you want to update system files” is displayed on the screen of the
PFD.
4.
Select the “SYSTEM UPLOAD” page using the small FMS knob on the PFD.
5. Activate cursor and rotate the small FMS knob to display the drop down menu. Rotate
the large FMS knob to highlight
“0X – XXX”
(where 0X is the menu position and XXX is
the airframe type) and press ENT key on the PFD.
Содержание G1000 NXi
Страница 61: ......