background image

5

Getting  Started

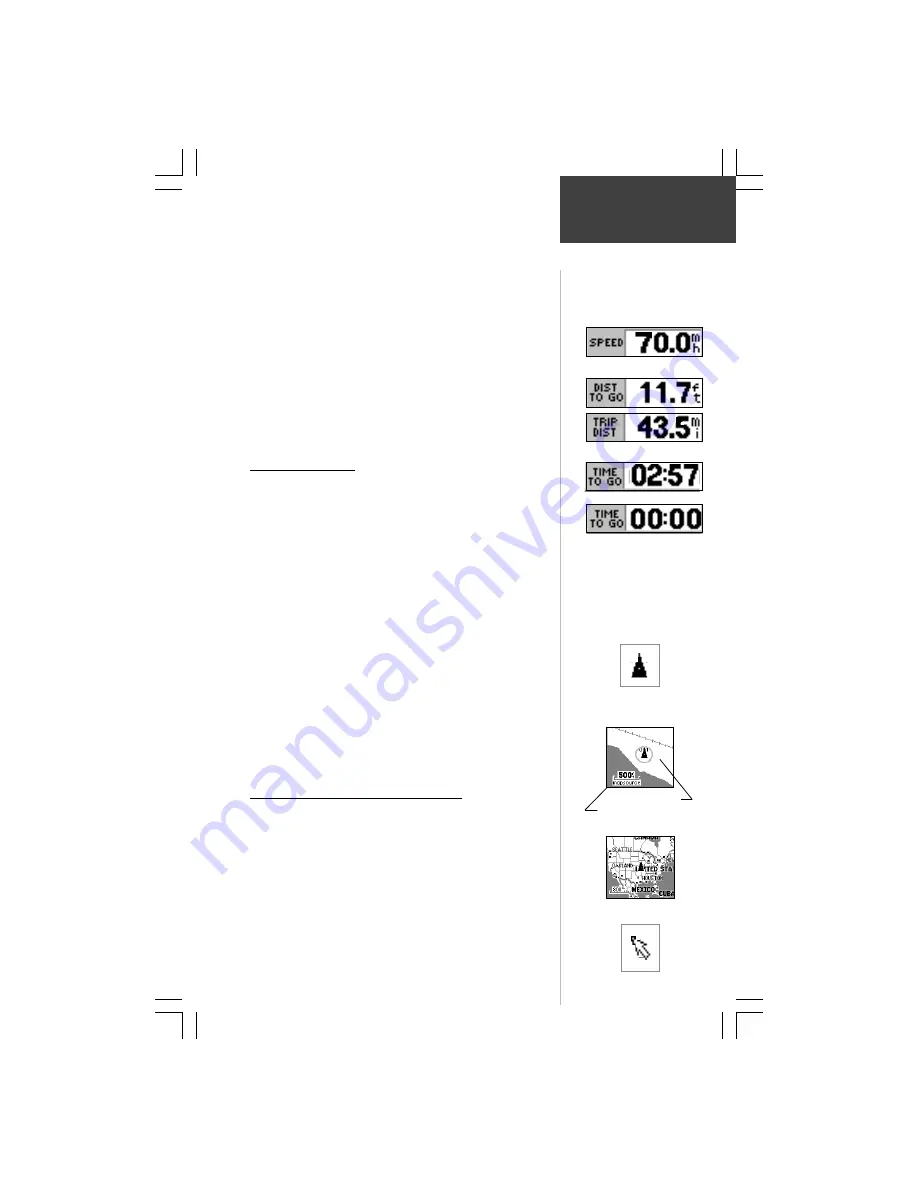
Speed, Distance and Time Fields

Speed -

 Your rate of travel can be displayed in miles

per hour, kilometers per hour, or nautical miles per hour.

Distance - 

When traveling on a Goto, Track or Route

the distance remaining to go to a destination will be
displayed. When not on a Goto, Track or Route, the
accumulated Trip Distance will be displayed.

Time - 

When on a Goto, Track or Route, the time to go

before reaching a destination is displayed. When not on
a Goto, Track or Route, the time for the current time
zone is displayed in either 12 or 24 hour format.

The Map Display

The map display shows your present position and

direction of movement as a triangular ‘Position Icon’ in the
center of the map. As you travel, the map display leaves a
“trail” (track log) of where you’ve been. The map display also
shows the map scale and geographic details such as lakes,
rivers, highways, and towns.

Use the 

IN 

and 

OUT

 keys to change the map scale to

show more map area with less detail, or less map area with
more detail. Press and hold to zoom the map scale rapidly.

In many instances the map will display an ‘Accuracy

Circle’ surrounding the ‘Position Icon’. The eMap uses both
map resolution and GPS accuracy in defining your location to
a point within the circle. The smaller the circle, the more
accurate your location.

More detailed map features as well as information about

those features can be displayed using a data card containing
map data transferred from a GARMIN MapSource


CD-ROM.

When using MapSource data, the word “MapSource” will appear
below the map scale whenever you zoom in to view map details.

The Panning Arrow (Map Pointer)

The Panning Arrow is controlled by the 

ROCKER

keypad and is used to identify map objects and move the map
in order to view areas of the map not currently within the
display. The Panning Arrow can be used to establish a ‘Point of
Reference’ when measuring distance between map items. It can
be used to create a waypoint or to move a waypoint to a new
location. Refer to pages 14, 16, 18, and 19 for detailed
information about these applications.

Press the 

ROCKER

 keypad at an angle to move diagonally.

Press and hold the

 ROCKER

 keypad to move to new areas of

the map. Press the 

ESCAPE

 key to cancel the panning arrow.

When counting down to

minutes and seconds the ‘Time

To Go’ Data Field will move

minutes to the former hour

position and display smaller

digits to indicate seconds.

Position Icon

Using the

Map Page

Speed Data Field

‘Distance’ Data Fields

Zoom IN

Zoom OUT

Zooming Map Scales


         Accuracy Circle

     MapSource Indicator

‘Time To Go’ Data Field

Hours  Minutes

Minutes  Seconds

Panning Arrow

Содержание eMap

Страница 1: ...owner s manual and reference guide electronic map eMap...

Страница 2: ...fthismanualontoaharddriveorother electronicstoragemediumtobeviewedforpersonaluse providedthatsuchelectronicor printedcopyofthismanualcontainsthecompletetextofthiscopyrightnoticeandprovided furtherthat...

Страница 3: ...ion provides FCC and safety information and the Table of Contents The Getting Started section introduces you to basic features and methods for operating the eMap The Reference section provides details...

Страница 4: ...rwarranty andyourauthoritytooperatethisdeviceunderPart15 regulations CAUTION The Global Positioning System GPS is operated by the government of the United States which is solely responsible for its ac...

Страница 5: ...oyment AIr bags expand with a rapid force that can propel objects in their path toward the driver or passengers causing possible injury Refer to air bag safety precautions contained in the vehicle own...

Страница 6: ...s 11 On Screen Buttons 11 Entering Data 12 Check Boxes 12 The Map Page 13 14 Map Page Options 15 17 Waypoints 18 Creating a Waypoint 18 19 Editing a Waypoint 20 Location Averaging 20 Saving as a Waypo...

Страница 7: ...ess and release to return to the previous page restore a previous value cancel data entry or return from the panning arrow to map scrolling Press and hold at any time to return to the Map Page C A 4 3...

Страница 8: ...pSource CD ROM and a Data Card for use with the eMap refer to page 10 for Data Card installation and map data transfer instruc tions For more information about MapSource refer to Appendix G Battery In...

Страница 9: ...hen press the ENTER key to activate it If the time displayed in the time field on the Map Page is not correct you will need to set the time zone for your current location Detailed instructions for set...

Страница 10: ...Fields Several Data Fields support the Map Page and consist of the following elements Direction Fields There are three types of direction fields each providing direction information dependent on whet...

Страница 11: ...PS accuracy in defining your location to a point within the circle The smaller the circle the more accurate your location More detailed map features as well as information about those features can be...

Страница 12: ...ill the entire screen Show Data Fields Displays data fields on the Map Page Show Next Street Displays the names of upcoming streets Hide Next Street Removes the display of upcoming streets Stop Naviga...

Страница 13: ...with information aboutspeed location elevationandthesatellitesthatthe GPSreceiveristracking Sun and Moon Page Provides sun and moon informationaccordingtodate time andlocation MapSource Information Pa...

Страница 14: ...tegorizedby AllTypes Services RestAreas and Other weighstations etc Points of Interest A list of restaurants museums hospitals lodging etc Addresses A page with data entry fields for address number st...

Страница 15: ...end battery life To selectfromshut offtimeoptions refertothesectiononSetup Options To turn the backlighting On and Off 1 Press and release the BACKLIGHT CONTRAST key to toggle the backlight ON and OFF...

Страница 16: ...the label facing you Be certain the connector end is inserted into the slot and not the end with the extractor handle Press the card completely in place until the handle is flush with the side of the...

Страница 17: ...e pages contain on screen buttons like those shown on the Mark Waypoint Page in the lower right picture Some of the common buttons found on many pages are OK Closes the page saving any changes you hav...

Страница 18: ...ess the ROCKER keypad Left or Right to move to the next or previous character on the line 4 To clear the data field highlight the left character and press the left side of the ROCKER keypad When highl...

Страница 19: ...just below the map scale When using a map data cartridge the word MapSource will appear below the map scale when you zoom in to see more detailed map features When driving on city streets within a Met...

Страница 20: ...object will be highlighted This feature applies to waypoints roads lakes rivers almost everything that is displayed To find details about a map item 1 Move the panning arrow to the map item that you w...

Страница 21: ...ver press the MENU key highlight Use Outdoors and press the ENTER key WARNING Remember that the Use Indoors option stops GPS receiver operation and should never be used for actual navigation Full Scre...

Страница 22: ...map Stop Navigation The Stop Navigation option stops any active Route Goto or Track navigation The option will appear gray and cannot be selected if there is no active navigation Whenactivated the Sto...

Страница 23: ...with North at the top Selecting Track Up will automatically rotate the map to keep your current direction of travel at the top of the screen Themap displaysa North indicator when in the Track Up mode...

Страница 24: ...of the waypoint name Follow instructions titled Selecting Data from Lists on page 12 to select a symbol The selected symbol will appear along with the name on the Map Page 4 To save the waypoint high...

Страница 25: ...on the map 1 Use the Find Feature to display the Waypoint Page as described on page 21 2 Highlight the Map button and press ENTER to display the waypoint on the map 3 With the waypoint highlighted by...

Страница 26: ...he effects of GPS location errors Remember that when you average a waypoint from the Waypoint List or create a new waypoint without actually being at the site of the waypoint the location for that way...

Страница 27: ...ght Find Nearest or Find By Name and press the ENTER key Finding an item by name 1 The first character in the name field at the top of the page will be highlighted 2 Begin entering the name of the ite...

Страница 28: ...edure explained on the previous page to display the Waypoint Information Page The Waypoint Information Page displays the waypoint name a map symbol the location in lat lon elevation and four on screen...

Страница 29: ...5 Scroll through the list to highlight the desired exit 6 Press the ENTER key to display the Exit Page for that exit This page contains the exit description at the top of the page and a list of servic...

Страница 30: ...f there is more than one map on the cartridge that has the information you are trying to find Press the MENU key to access the Select Map option and then press the ENTER key to display the map choices...

Страница 31: ...page 6 Highlight the Find button and press the ENTER key to view the Select Address page with a list of possible address matches A window at the bottom of the list displays the quality of each addres...

Страница 32: ...the ENTER key Once a Goto destination is selected use the Map Page to navigate as you head toward your destination A Direction To Go field tells what direction to start traveling then changes to a Dir...

Страница 33: ...ndicate remaining capacity The more gray the more capacity When powered by an external source the icon changes to a power cord plug Trip Computer The Trip Computer page provides you with readings for...

Страница 34: ...the list to select the time frame you want to save Press the ENTER key to save the track 3 This will display a Track page for the track A date and number for the track are displayed in the name field...

Страница 35: ...eps 3 and 4 to continue adding waypoints to your route until completed To navigate the route 1 When you have finished adding waypoints to the Route press the MENU key to pop up the route options menu...

Страница 36: ...turn the unit on the page title will be Acquiring Satellites After it has determined your location the title will be 2D GPS Location or 3D GPS Location Options North Up Track Up You can set the GPS In...

Страница 37: ...andmoon relative to your current location The center represents directly overhead and the outer ring represents the horizon Using the ROCKER keypad to highlight the Date Time or Location fields you ma...

Страница 38: ...ammed to sound whenever a key is pressed or an on screen message appears only when a message appears or Off altogether Units Units of measure can be set to Statute Metric or Nautical miles and miles p...

Страница 39: ...fies a datum use the list to find datums applicable to the region of the map select one that provides the best positioning at a known point Choose the User datum for custom designed grids North Refere...

Страница 40: ...ng NMEA supportstheinputandoutputofstandard NMEA0183version2 3data Text Out allows simple ASCII text output of location and velocity information without any input capabilities RTCM In allows DGPS inpu...

Страница 41: ...rchangeable with power adapters for VHF 720 725 and 725e or GPS 170 175 190 and 195 GA 27C Remote GPS Antenna Magnetic or windshield mount for enhanced satellite acquisition PC Interface Cable Allows...

Страница 42: ...IN data formats Antenna Built In Patch POWER Input Two 1 5 volt AA batteries 3 PowerConsumption 340 mW Battery Life Up to 12 hours with 2 AA Alkaline batteries in Power Saver Mode 4 Voltage Range 3 15...

Страница 43: ...ace setup page of the unit to view the Status field None Found There is no such address intersection point of interest or city in the map information database Check spelling or number entry and try ag...

Страница 44: ...hand to ground without major damage However if frequently used in an outdoor environment the Impact Resistant Cover is recommended Shown at left Troubleshooting Guide Symptom Probable Cause Remedy Po...

Страница 45: ...Sentences PGRME estimated error PGRMZ altitude PSLIB beacon receiver control DGPS DifferentialGPS correctionsareacceptedin RTCMSC 104version2 0formatthroughthe DataIn line TheGARMINGBR21istherecommend...

Страница 46: ...propriate offset value from the chart below To determine your longitudinal zone press and hold the ENTER key and observe the longitude value in the Mark Waypoint Location field It should fall between...

Страница 47: ...n at the same time one will draw over the other When you leave a MetroGuide area for example and enter the area of a topographic map the display will change to contour lines The same is true when movi...

Страница 48: ...IFIC LEGAL RIGHTS WHICH MAY VARY FROM STATE TO STATE IN NO EVENT SHALL GARMIN BE LIABLE FOR ANY INCIDENTAL SPECIAL INDIRECT OR CONSEQUENTIAL DAMAGES WHETHER RESULTING FROM THE USE MISUSE OR INABILITY...

Страница 49: ...nce Measuring 16 E Elevation 30 Enter Key 1 Escape ESC Key 1 Exits Finding 23 F Features 1 3 8 Find Key 1 Find Menu 8 21 25 G Goto Function 4 26 GPS Info Page 30 Grids Map 33 H Highlighting 11 12 I In...

Страница 50: ...etup Options Map Page 6 17 Setup Options System 32 34 Show Next Street 16 Signal Strength Bars 30 Sky View Display 30 Specifications 36 Speed 17 27 Starting Up 2 3 Stop Navigation 16 Submenus 12 13 Su...

Страница 51: ...Home Page WhyshouldyouregisteryoureMapunit NotificationofProductUpdates NotificationofNewProducts LostorStolenunittracking Serial Number Use this area to record the serial number 8 digit number locat...

Страница 52: ...al Inc 1200 E 151st Street Olathe KS66062U S A GARMIN Europe Ltd Unit5 TheQuadrangle AbbeyParkIndustrialEstate Romsey SO51 9AQU K GARMIN Asia Corporation No 68 Jangshu2nd Road Shijr TaipeiCounty Taiwa...

Отзывы: