1-7-7
E3TFGDC
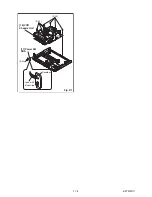
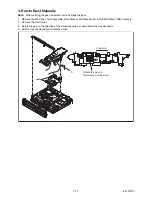
3. How to Eject Manually
Note:
When rotating the gear, be careful not to damage the gear.
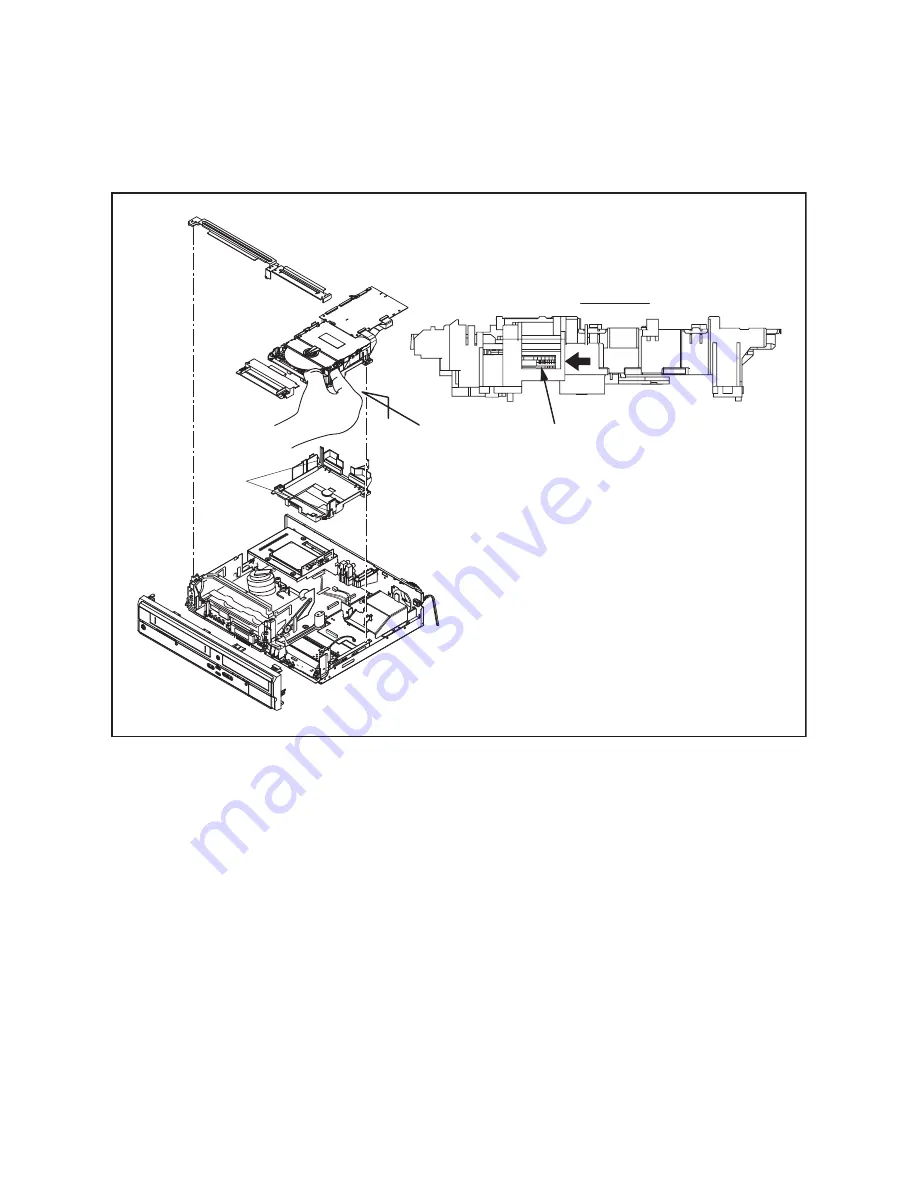
1. Remove the Top Cover, Front Assembly, Front Bracket, DVD Mechanism & DVD/HDD Main CBA Assembly.
2. Remove the Dust Cover.
3. Rotate the gear in the direction of the arrow manually as shown below the tray descends.
4. Pull the tray out manually and remove a disc.
View for A
A
Hook
Rotate this gear in
the direction of the arrow
Содержание TD6D-M101
Страница 16: ...1 7 4 E3TFGDC S 24 S 23 S 25 18 VCR Chassis Unit 17 Power SW CBA Desolder Lead with blue stripe Fig D7...
Страница 61: ...1 15 3 E3TFGSCAV1 AV 1 10 Schematic Diagram VCR Section...
Страница 63: ...1 15 5 E3TFGSCAV3 AV 3 10 Schematic Diagram VCR Section...
Страница 64: ...1 15 6 E3TFGSCAV4 AV 4 10 Schematic Diagram VCR Section...
Страница 65: ...1 15 7 E3TFGSCAV5 AV 5 10 Schematic Diagram VCR Section...
Страница 66: ...1 15 8 E3TFGSCAV6 AV 6 10 Schematic Diagram VCR Section...
Страница 67: ...1 15 9 E3TFGSCAV7 AV 7 10 Schematic Diagram VCR Section...
Страница 68: ...1 15 10 E3TFGSCAV8 AV 8 10 Schematic Diagram VCR Section...
Страница 69: ...1 15 11 E3TFGSCAV9 AV 9 10 Schematic Diagram VCR Section...
Страница 70: ...1 15 12 E3TFGSCAV10 AV 10 10 Schematic Diagram VCR Section...
Страница 73: ...1 15 15 Rear Jack Schematic Diagram VCR Section E3TFGSCRJ...
Страница 79: ...1 15 21 E3TFGSCD6 DVD HDD Main 6 7 Schematic Diagram DVD HDD Section...
Страница 81: ...1 15 23 E3TFGSCDTV DTV Module Schematic Diagram DVD HDD Section...
Страница 82: ...1 15 24 E3TFGSCSATA SATA Schematic Diagram...
Страница 107: ...TD6D M101 E3TFGEH 2013 04 22...

