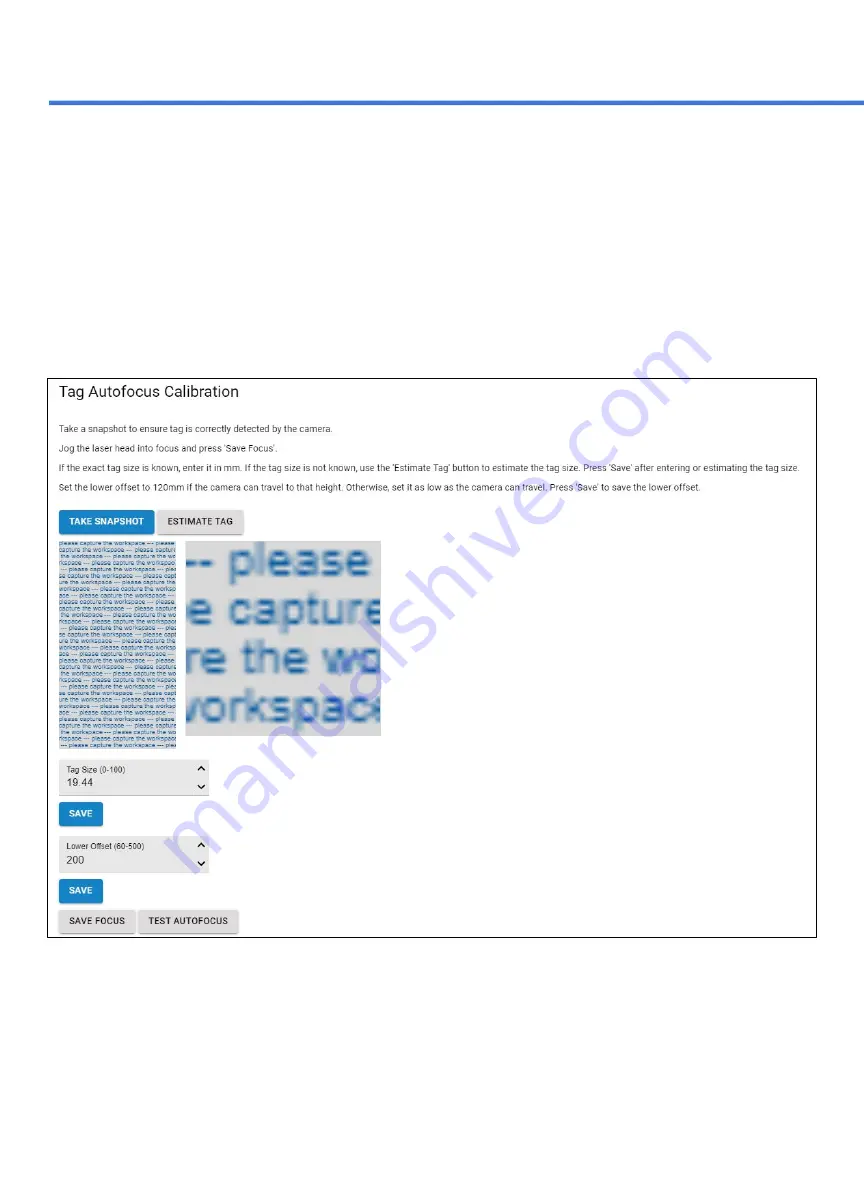
Full Spectrum Laser MUSE MOPA Скачать руководство пользователя страница 47

4.

The tag size should always be saved as 19.44. Having the incorrect number would result in focusing issues.

5.

Set the lower offset for your stage. We recommend starting at 120 and adjusting from there.

6.

By saving the focus the machine will move to the lower offset. If the lower offset is set too low it will hit zero 
and return to the previous location. The lower offset should be set as close to the bottom as possible for the 
most accuracy.

7.

Once the focus is saved move the stage from it’s position and test the autofocus. If done correctly the stage 
will return to it’s previous focus location.

If you’re having issues with the tag calibration please contact technical support for assistance (Refer to pg 54).

46

Section IX. Camera Functions

Содержание MUSE MOPA

Страница 1: ......

Страница 2: ...uchscreen Interface 17 Machine Indicators 18 Speed Indicators 19 Section Review 20 Section IV Internet Connection 21 Connect to Internet 21 Connect to Software 22 Section Review 23 Section V Focusing...

Страница 3: ...t 42 Section Review 43 Section IX Camera Functions 44 Camera 44 Camera Capture 44 Camera Calibration 45 Focus Tag Calibration 45 Section Review 47 Section X Color Engraving 48 Overview 48 Color Engrav...

Страница 4: ...s and recommendations before using your machine These instructions should be followed closely at all times Always keep a properly maintained and inspected 5lbs or larger fire extinguisher on hand We r...

Страница 5: ...machine We recommend that you familiarize yourself with this manual before using your laser engraver Remember to be safe and have fun For more information and product selection please visit www fslase...

Страница 6: ...ve covers Always have a first aid kit designed for the initial treatment of burns and smoke inhalation Never operate the machine with any of the panels removed Never place hands or fingers into moving...

Страница 7: ...the designation of a laser safety officer may be mandatory under local regulations It is the operator s responsibility to ensure that the installation and operation of the Full Spectrum Desktop Laser...

Страница 8: ...rams will help you locate all of the machines components Section I Safety Power Switch Power Outlet Wifi Plug Rotary Plug Ethernet Port Laser head Assembly Work Space Touchscreen Lens Camera Fig 1 Fig...

Страница 9: ...aid kit designed for the initial treatment of burns and smoke inhalation Don ts Do not stack items on or near your work area Do not leave your machine unattended Never operate the machine with any of...

Страница 10: ...Prepare Work Space You will need an open level work space to place your laser cutter A sturdy table with room for the machine 25 5 x 13 x 23 5 for the machine 18 5 x 8 x 16 5 for the workspace is reco...

Страница 11: ...3 Remove the Top Layer of Foam 4 Remove the stage base power cord and accessories from the packaging Section II Unboxing Assembly 10 Fig 6 Fig 7...

Страница 12: ...Section II Unboxing Assembly 5 Remove the Second Layer of Foam 6 Remove the Foam under the main unit 11 Fig 8 Fig 9...

Страница 13: ...Section II Unboxing Assembly 7 Remove the Main Unit Z stage and Isolator from the Foam 12 Fig 10...

Страница 14: ...5 Hex Key 2 Use the M6 screws to fasten the base to the stage See Fig 11 3 Locate the Isolator and slide it into the laser mount 4 Once the isolator is in place secure it with a M4 hex key using the M...

Страница 15: ...connect the VGA cable onto the port on the back of the scan head see Fig 4 2 Find the Type C cable in the loom and run it through the opening before connecting to the camera Note If you have trouble r...

Страница 16: ...rrectly 4 Plug the remaining 4 pin cable connector and plug it into the motor 5 Lastly install the Coverhead using four M4x8 screws that screw into the inner plate Make sure you run all the cables com...

Страница 17: ...least two people Remove all items from the box before starting the assembly process Make sure all your connections are secure before starting your machine Don ts Do not lift your machine by yourself...

Страница 18: ...access previous projects Selecting the File allows the user to view and re run it No internet is needed to run the file saved here Tools The tools icon allows the user to check and adjust the machine...

Страница 19: ...the Wi Fi Connected Not Connected AutoFocus Icon The Autofocus icon automatically moves your machines Z stage to the height needed to perform an engraving Needs QR card to work Camera Capture Icon The...

Страница 20: ...ogging Icon The second speed also known as the intermediate speed Used for normal adjustments before running a job Walking Icon The final and slowest speed Used for small adjustments Your machine has...

Страница 21: ...ave your QR card on your material for autofocusing Remember to adjust the jog speed by selecting the diamond icon Make sure your machine is connected to the internet before starting any jobs Don ts Do...

Страница 22: ...t it and enter your password The MOPA Galvo software is browser based meaning no download is required RetinaEngrave v3 0 RE3 is locally hosted on the machine s internal computer so it will function ev...

Страница 23: ...Into Browser Google Chrome is preferred This will link you to the RetinaEngrave v3 0 RE3 interface You now have full access to the software There is no need to install or download anything You must h...

Страница 24: ...ttempt your first project Remember to let your machine fully boot up before attempting to enter RE3 Don ts Do not take off the Wi Fi Dongle Do not connect the machine to your computer s ethernet port...

Страница 25: ...the laser head see Fig 22 Fig 22 Note Make sure the QR code is visible on the camera during focusing 2 In RE3 go to the top right section of your browser and locate the jog Controls See Fig 23 Fig 23...

Страница 26: ...u can run the focusing test to make sure it is within range Laser Focus Test Once your machine is in the appropriate height we need to run the focus test 1 Place an anodized card above the selected ma...

Страница 27: ...ertically and numbers 1 6 horizontally See Fig 27 Note The marking in the focus test are in millimeters and may require some means of magnification 5 Choose the 2 most visibly similar blocks and input...

Страница 28: ...ready for manual focusing Make sure your QR card is visible on the camera when auto focusing Perform a focus test before each job to ensure a high quality engraving Don ts Do not run a job without foc...

Страница 29: ...ture you want to make one When creating a design in design software we recommend using a software you are familiar with RE3 can work with a variety of file types but we recommend saving your files as...

Страница 30: ...ed you can freely move the design within the workspace Importing Images 2 Resize Rotate Clicking on the object with your mouse will highlight the border in blue The adjusters for size and orientation...

Страница 31: ...r the grid size the easier it is to narrow down your selection The parameters you can test are Power Speed Frequency DPI and Pulse Width PulseWidth is a Parameter only use in MOPA machines Enter the S...

Страница 32: ...ker lines Remember that previews are seen in 200 DPI but are imported as 500 DPI Remember that importing files larger than 30MB can slow down your machine Don ts Do not use thin lines when making a de...

Страница 33: ...ect to Software Create or Import Design Place Material Focus Lens Align Material to Engraving Areas Adjust Object Properties Run Job Section VII Retina Engrave V3 Starting on RE3 Before starting your...

Страница 34: ...ing The size can be adjusted individually by using the Width Height bars or together by selecting the white oval When the white oval is on see left then the width and height will change proportional t...

Страница 35: ...an object that will not interfere with the engraving such as jig fixture putty or tape 7 Once the picture is aligned run the job You can start the job by selecting the play button While the job is ru...

Страница 36: ...Intersection Difference Split Selection Shift Ctrl G Split up a previously created compound shape s or object s that has been combined with other shapes Select the compound shape and choose Split Sele...

Страница 37: ...ses you add then the longer it will take the job to be completed This job has 4 passes programmed therefore the time was 4 time longer than doing 1 pass Note Different materials may not need to perfor...

Страница 38: ...e using the Grouping section Remember to adjust your object properties before running your project Remember that infills are used to fill in vector objects for engraving The laser can be stopped or pa...

Страница 39: ...mage 4 Carefully twist counter clockwise to loosen the lens Try to avoid damaging the camera or camera shutter located on the side of the scanhead Avoid touching the glass surface of the lens to preve...

Страница 40: ...sing accuracy has degraded and the laser is not marking Warning Calibration cannot be done in Rotary Mode Preparation Before performing a lens calibration the focusing card must be within the view of...

Страница 41: ...selecting Galvo Calibration 40 1 Once the Laser Tools page is loaded locate the Laser Focus and Lens Calibration section Make sure that the correct lens size is saved in the lens section If the wrong...

Страница 42: ...te piece of paper under the laser diode to improve visibility 3 When the machine is successfully calibrated to the lens we need to perform mark and preview adjustments so that the laser properly engra...

Страница 43: ...that the top left corner of the square is cut off intentionally 6 Select Save Mark Adjustment 1 Once the mark adjustment is correct Mark a new square using the Mark Square button 2 Without moving the...

Страница 44: ...ollar can be easily removed and replaced Make sure the QR card is within the cameras view before performing the lens calibration Have test material prepared for the mark and preview adjustment Don ts...

Страница 45: ...ce can be cleared on RE3 using the arrow 4 Align design to material Run perimeter to double check your position 5 You can now adjust your settings to run your job Camera Calibration Your camera is cal...

Страница 46: ...Verify Camera Calibration and select the verify camera calibration option 45 Section IX Camera Functions Focus Tag Calibration There may be times when the Focus Tag is damaged or is not read properly...

Страница 47: ...e lower offset is set too low it will hit zero and return to the previous location The lower offset should be set as close to the bottom as possible for the most accuracy 7 Once the focus is saved mov...

Страница 48: ...n IX Camera Functions 47 Section Review Do s Make sure the QR card is within the cameras view before performing the camera calibration Don ts Do not start your Camera Calibration without the QR Card p...

Страница 49: ...reates the color in the material 2 Machine Properties The coloring process can be affected by many factors such as the laser source the lens used and the focus distance This is important to keep in mi...

Страница 50: ...ers work by emitting two beams of light that will burn the material when they converge For that reason these laser systems must be in focus to engrave The focus distance is within a few millimeters me...

Страница 51: ...nge to a new material I m having trouble focusing my laser If auto focusing with the QR tag then make sure that the QR tag is visible in the camera throughout the process If the QR tag get cut off fro...

Страница 52: ...erial grade This is a general list to give an idea of how one can go about getting the engraving desired Marking Types Methods Used Deeper Engraving on steel High Power Medium Speed 25 50 passes Multi...

Страница 53: ...e limit All you need to worry about is your own imagination In order to help spark it we picked some projects others made to help show you the potential of your MOPA Painted Metal Purple Anodized Card...

Страница 54: ...arranty and include a 1 year extended warranty The 1 year extended warranty excludes shipping and consumable items All electronic items control cards power supplies motors and most mechanical items ar...

Страница 55: ...ser engraving check out our Blog Financing We work to provide a perfect option for any budget For more information contact sales Technical Support Are you having an issue not found in the Help Center...

Страница 56: ......

Страница 57: ......

Отзывы: