


226
Upgrade and Maintenance Manual
TX140
S2
Processors
V
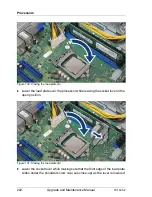
CAUTION!
– Ensure that the screws on the heat sink are properly seated on the
threaded holes.
– Ensure that the heat sink cooling fins match the direction of the
airflow!
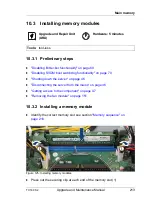
Figure 136: Installing the heat sink (B)
Ê
Fasten the four captive screws on the heat sink in a crossover pattern (screw
torque: 0.6 Nm, not applicable for the Japanese market) (1-4).
Содержание PRIMERGY TX140 S2
Страница 30: ...30 Upgrade and Maintenance Manual TX140 S2 Before you start ...
Страница 98: ...98 Upgrade and Maintenance Manual TX140 S2 Basic software procedures ...
Страница 120: ...120 Upgrade and Maintenance Manual TX140 S2 Power supply ...
Страница 148: ...148 Upgrade and Maintenance Manual TX140 S2 Hard disk drives solid state drives ...
Страница 158: ...158 Upgrade and Maintenance Manual TX140 S2 System fan and air duct ...
Страница 208: ...208 Upgrade and Maintenance Manual TX140 S2 Expansion cards and backup units ...
Страница 216: ...216 Upgrade and Maintenance Manual TX140 S2 Main memory ...
Страница 314: ...314 Upgrade and Maintenance Manual TX140 S2 Cabling ...
Страница 332: ...332 Upgrade and Maintenance Manual TX140 S2 Appendix ...