


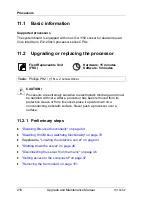


TX140 S2
Upgrade and Maintenance Manual
219
Processors
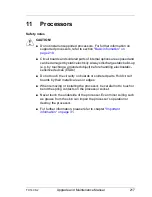
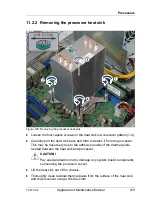
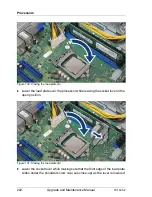
11.2.2 Removing the processor heat sink
Figure 126: Removing the processor heat sink
Ê
Loosen the four captive screws on the heat sink in a crossover pattern (1-4).
Ê
Carefully turn the heat sink back and forth to detach it from the processor.
This may be necessary due to the adhesive quality of the thermal paste
located between the heat sink and processor.
V
CAUTION!
Pay special attention not to damage any system board components
surrounding the processor socket.
Ê
Lift the heat sink out of the chassis.
Ê
Thoroughly clean residual thermal paste from the surface of the heat sink
and the processor using a lint-free cloth.
Содержание PRIMERGY TX140 S2
Страница 30: ...30 Upgrade and Maintenance Manual TX140 S2 Before you start ...
Страница 98: ...98 Upgrade and Maintenance Manual TX140 S2 Basic software procedures ...
Страница 120: ...120 Upgrade and Maintenance Manual TX140 S2 Power supply ...
Страница 148: ...148 Upgrade and Maintenance Manual TX140 S2 Hard disk drives solid state drives ...
Страница 158: ...158 Upgrade and Maintenance Manual TX140 S2 System fan and air duct ...
Страница 208: ...208 Upgrade and Maintenance Manual TX140 S2 Expansion cards and backup units ...
Страница 216: ...216 Upgrade and Maintenance Manual TX140 S2 Main memory ...
Страница 314: ...314 Upgrade and Maintenance Manual TX140 S2 Cabling ...
Страница 332: ...332 Upgrade and Maintenance Manual TX140 S2 Appendix ...