background image

33

G e t t i n g   S t a r t e d

HIBERNATION (SAVE-TO-DISK) FEATURE

The Hibernation feature saves the contents of your
LifeBook notebook’s system memory to the hard drive as 
a part of the Suspend/Resume mode. You can enable or 
disable this feature. 

Enable or Disable the Hibernation Feature

The default setting is not enabled. To enable or disable 
the Hibernation feature follow these easy steps:

1. From the 

Start

 menu, select 

Settings

, and then select 

Control Panel

.

2. From the 

Control Panel

 select 

Power Options

.

3. Select the 

Hibernation

 tab. Select the box to enable 

or disable this feature.

Using the Hibernation Feature

1. From the 

Start

 menu, select 

Settings

, and then select 

Control Panel

.

2. From the 

Control Panel

 select 

Power Options

.

3. Select the 

Advanced

 tab. Select 

Hibernate 

from the 

pull down menus for 

Power buttons

.

DISPLAY TIMEOUT 

The Video Timeout is one of the power management 
parameters. This feature saves power by turning off the 
display if there is no keyboard or pointer activity for the 
user selected timeout period. Any keyboard or pointer 
activity will cause the display to restart automatically. 
This feature is independent of the Power/Suspend/
Resume button and can be enabled and disabled in 
Windows and BIOS setup utility. 

(See BIOS Setup Utility 

on page 29 for more information)

HARD DISK TIMEOUT

The Hard Disk Timeout is another one of the power 
management parameters. This feature saves power by 
turning off the hard drive if there is no hard drive 
activity for the user selected timeout period. Any 
attempt to access the hard drive will cause it to restart 
automatically. This feature is independent of the Power/
Suspend/Resume button and can be enabled and 
disabled in Windows and BIOS setup utility. 

(See BIOS 

Setup Utility on page 29 for more information)

WINDOWS POWER MANAGEMENT 

Power Management

The Power Management icon located in the Windows 
Control Panel allows you to configure some power 
management settings. For example, you can use Power 
Management to set the timeout values for turning off the 
display and hard disks whether you are running the 
notebook on battery power or one of the adapters. The 
settings may also be changed in the BIOS. 

(See BIOS 

Setup Utility on page 29 for more information)

RESTARTING THE SYSTEM

If your system is on and you need to restart it, be sure 
that you use the following procedure. 

1. Click the 

Start

 button, and then click 

Shut Down

.

2. Select the 

Restart

 option from within the Windows 

Shut Down dialog box.

3. Click 

OK

 to restart your notebook. Your notebook 

will shut down and then reboot

.

POWER OFF

Before turning off the power, check that the Hard Drive, 
DVD, CD-ROM, CD-RW, PC Card and Floppy Disk 
indicators are all Off. 

(See figure 2-4 on page 6)

 If you 

power-off while accessing a disk or PC Card there is a 
risk of data loss. To ensure that the notebook shuts down 

without error, use the Windows shutdown procedure.

Using the correct procedure to shut down from Windows 
allows your notebook to complete its operations and turn 
off power in the proper sequence to avoid errors. The 
proper sequence is:

1. Click the 

Start

 button, and then click 

Shut Down 

or 

Turn Off Computer

.

2. Select the 

Shut Down

 option from within the 

Windows Shut Down dialog box.

3. Click 

OK

 to shut down your notebook.

If you are going to store your notebook for a month or 
more see Care and Maintenance Section. 

Turning off your notebook without exiting 
Windows, or turning it on within 10 
seconds of being shut off may cause an 
error when you start the next time. 

Be sure to close all files, exit all 
applications, and shut down your 
operating system prior to turning off the 
power. If files are open when you turn the 
power off, you will lose any changes that 
have not been saved, and may cause disk 
errors.

S Series.book  Page 33  Thursday, June 2, 2005  3:28 PM

Содержание Lifebook S2110

Страница 1: ...cted by method claims of certain U S patents and other intellectual property rights owned by Macrovision Corporation and other rights owners Use of this copyright protection technology must be autho rized by Macrovision Corporation and is intended for home and other limited viewing uses only unless other wise authorized by Macrovision Corporation Reverse engineering or disassembly is prohibited Al...

Страница 2: ...e leak Use only the power cord and batteries indicated in this manual Do not dispose of batteries in a fire They may explode Check with local codes for possible special disposal instructions To reduce the risk of fire use only No 26 AWG or larger UL Listed or CSA Certified Telecommunication Line Cord SAVE THESE INSTRUCTIONS For Authorized Repair Technicians Only System Disposal The modem to teleph...

Страница 3: ...r 14 Keyboard Using the Keyboard 15 Numeric Keypad 15 Windows Keys 15 Cursor Keys 15 Function Keys 16 Touchpad Pointing Device Clicking 17 Double Clicking 17 Dragging 18 Touchpad Control Adjustment 18 Scrolling 18 Volume Control Controlling the Volume 19 Flexible Bay Devices Removing and Installing Modular Devices 20 Application Media Player Panel Mode Button 21 Application Launch Media Player But...

Страница 4: ...y Modules 46 Checking the Memory Capacity 47 Device Ports Modem RJ 11 Telephone Jack 48 Internal LAN RJ 45 Jack 48 Universal Serial Bus Ports 48 IEEE 1394 Port 48 Headphone Jack 49 Microphone Jack 49 External Monitor Port 49 Mini S Video Out Jack TV Out 49 5 TROUBLESHOOTING YOUR LIFEBOOK NOTEBOOK Troubleshooting Identifying the Problem 53 Troubleshooting Table 54 Power On Self Test Messages 61 Eme...

Страница 5: ...ess Network Considerations 91 Deactivating the WLAN Device 91 Activating the WLAN Device 92 Configuration of the WLAN Device Flow of Operations 93 Configuration Using Atheros Client Utility 93 Connection to the network 94 Troubleshooting the WLAN Troubleshooting Table 98 Wireless LAN Glossary Glossary 99 IP address information About IP Addresses 101 Specifications Specifications 102 INDEX Index 10...

Страница 6: ...L i f e B o o k S 2 0 0 0 N o t e b o o k ...

Страница 7: ...1 Preface ...

Страница 8: ...L i f e B o o k S 2 0 0 0 N o t e b o o k ...

Страница 9: ...ollowing information ready so that the customer support representative can provide you with the fastest possible solution Product name Product configuration number Product serial number Purchase date Conditions under which the problem occurred Any error messages that have occurred Type of device connected if any Fujitsu Online You can go directly to the online Fujitsu Product catalog for your Life...

Страница 10: ...2 L i f e B o o k S 2 0 0 0 N o t e b o o k ...

Страница 11: ...3 2 Getting to Know Your LifeBook Notebook ...

Страница 12: ...4 L i f e B o o k S 2 0 0 0 N o t e b o o k ...

Страница 13: ...er and Application Restore DAR CD Restore DVD Microsoft Associated Product Materials Getting Started Guide User s Guide this document International Limited Warranty Brochure Depending on your system configuration you will receive one of the following devices pre installed in the Flexible Bay Weight Saver Modular DVD CD RW combo drive Modular Dual Layer Multi Format DVD Writer Depending on your sys...

Страница 14: ...k Application Media Player Panel on page 21 for more information Power Suspend Resume Button The Power Suspend Resume button allows you to suspend notebook activity without powering off resume your LifeBook notebook from suspend mode and power on your notebook when it has been shut down from Windows See Power Suspend Resume Button on page 32 for more information Stereo Speakers The built in dual s...

Страница 15: ...ure Digital Slot on page 45 for more information Air Flow Vents The air flow vents assist in proper cooling of the system To protect your notebook from damage and to optimize system performance be sure to keep all air all vents unobstructed clean and clear of debris This may require periodic cleaning depending upon the environment in which the system is used Do not operate the notebook in areas wh...

Страница 16: ...ow Vents The air flow vents assist in proper cooling of the system Microphone Jack The microphone jack allows you to connect an external mono microphone See Microphone Jack on page 49 for more information PC Card Eject Button PC Card Slot Air Vents Headphone Jack Microphone Jack Air Vents To protect your notebook from damage and to optimize system performance be sure to keep all air all vents unob...

Страница 17: ...te one of the following devices See Flexible Bay Devices on page 20 for more information Modular DVD CD RW combo drive Modular Dual Layer Multi Format DVD Writer Modular Lithium ion bay battery Weight Saver Flexible Bay Eject Lever The Flexible Bay eject lever releases the Flexible Bay device Anti theft Lock Slot The anti theft lock slot allows you to attach an optional physical lock down device F...

Страница 18: ...ireless LAN On Off Switch turns the optional wireless LAN on and off IEEE 1394 4 pin Jack The 4 pin 1394 jack is used to connect between your LifeBook and an IEEE 1394 peripheral such as a digital video camera See IEEE 1394 Port on page 48 for more information External Monitor Port The external monitor port allows you to connect an external monitor See External Monitor Port on page 49 for more inf...

Страница 19: ...m damage and to optimize system performance be sure to keep all air all vents unobstructed clean and clear of debris This may require periodic cleaning depending upon the environment in which the system is used Do not operate the notebook in areas where the air vents can be obstructed such as in tight enclosures or on soft surfaces like a bed or cushion ...

Страница 20: ...hium ion Battery Bay The battery bay contains the internal Lithium ion battery It can be opened for the removal of the battery when stored over a long period of time or for swapping a discharged battery with a charged Lithium ion battery See Lithium ion Battery on page 37 for more information Main Unit and Configuration Label The configuration label shows the model number and other information abo...

Страница 21: ...ok is operating from the AC adapter the Auto Airline adapter or the batteries This icon has two different states that can tell you what power source your LifeBook notebook is using On This means that either of the adapters are currently in use Off Power is only coming from the batteries and you do not have an adapter connected BATTERY INDICATORS The two Battery Level indicators state whether or no...

Страница 22: ... ACCESS INDICATOR The PC Card Access indicator states whether or not your notebook is accessing a PC Card The indicator will flash if your software tries to access a PC Card even if there is no card installed See PC Cards on page 43 for more information NUMLK INDICATOR The NumLk indicator states that the integral keyboard is set in ten key numeric keypad mode CAPSLOCK INDICATOR The CapsLock indica...

Страница 23: ...D Certain keys on the keyboard perform dual functions as both standard character keys and numeric keypad keys NumLk can be activated by pressing the NumLk keys Turning off the NumLk feature is done the same way Once this feature is activated you can enter numerals 0 through 9 perform addition subtraction multiplication or division and enter decimal points using the keys designated as ten key funct...

Страница 24: ...n only works if Manual Setting is selected in the BIOS See BIOS Setup Utility on page 29 Fn F6 Pressing F6 repeatedly while holding Fn will lower the brightness of your display Fn F7 Pressing F7 repeatedly while holding Fn will increase the brightness of the display Fn F8 Pressing F8 repeatedly while holding Fn will decrease the volume of your LifeBook notebook Fn F9 Pressing F9 repeatedly while h...

Страница 25: ...ton once and then immediately release it To right click move the mouse cursor to the item you wish to select press the right button once and then immediately release it You also have the option to perform the clicking operation by tapping lightly on the Touchpad once Figure 2 13 Figure 2 13 Clicking DOUBLE CLICKING Double clicking means pushing and releasing the left button twice in rapid successi...

Страница 26: ...igure 2 15 Dragging TOUCHPAD CONTROL ADJUSTMENT The Windows Control Panel allows you to customize your Touchpad with selections made from within the Mouse Properties dialog box SCROLLING Using the Scrolling button allows you to navigate through a document quickly without using the window s scroll bars This is particularly useful when you are navi gating through on line pages To use the Scrolling b...

Страница 27: ... are set within individual applications Certain external audio devices you might connect to your system may have hardware volume controls Each source discussed above puts an upper limit on the volume level that must then be followed by the other sources We recommend that you experiment with the various volume controls to discover the optimal sound level Software that contains audio files will also...

Страница 28: ... in your Flexible Bay follow these easy steps Figure 2 18 1 Close any open files 2 Shut down your LifeBook notebook 3 Pull out the Flexible Bay eject lever This will push your device out slightly allowing you to remove it 4 Slide your device out until it is clear of the bay This may require light force Figure 2 18 Removing Installing a device in the Flexible Bay 5 Slide the device you are installi...

Страница 29: ...ifeBook Application Panel is automatically activated As an application launcher the LifeBook Application Panel is very flexible giving you a variety of options To set up the panel to best suit your needs the Application Panel Setup utility will quickly and easily help you make the most of this valuable feature To configure your LifeBook Application Panel with the Application Panel Setup utility 1 ...

Страница 30: ...edia player allows you to use your LifeBook note book s optical drive as an audio media player There is no configuration required for media player operation The buttons are pre configured to work like a normal media player When the selector switch is in the bottom position the buttons will operate as follows Stop Eject This is the first button to the right of the Mode button Press it once to stop ...

Страница 31: ...like release the mouse button Deactivating and Activating the LifeBook Application Panel To deactivate the LifeBook Application Panel follow these easy steps 1 Click on Start 2 Click on Programs 3 Click on LifeBook Application Panel 4 Click on Stop Application Panel To reactivate follow the same procedure except for step 4 Click on Start Application Panel instead Application Panel Setup If you ins...

Страница 32: ...24 L i f e B o o k S 2 0 0 0 N o t e b o o k ...

Страница 33: ...25 3 Getting Started ...

Страница 34: ...26 L i f e B o o k S 2 0 0 0 N o t e b o o k ...

Страница 35: ...gure 3 1 Connecting the Optional Auto Airline Adapter 1 Plug the DC output cable into the DC power jack on your notebook 2 Plug the Auto Airline adapter into the cigarette lighter of an automobile with the ignition key in the On or Accessories position OR 3 Plug the Auto Airline adapter into the DC power jack on an airplane seat Switching from AC Adapter Power or the Auto Airline Adapter to Batter...

Страница 36: ...tness by using the keyboard or the power management utility Using the Keyboard Adjusting the brightness using the keyboard changes the setting only temporarily Fn F6 Pressing repeatedly will lower the brightness of your display Fn F7 Pressing repeatedly will increase the brightness of the display CLOSING THE DISPLAY PANEL 1 Holding the edge of your display panel pull it forward until it is flush w...

Страница 37: ...t sequence which displays a Fujitsu logo until your operating system is loaded During booting your notebook is performing a standard boot sequence including a Power On Self Test POST If the sequence is completed without a failure and without a request for the BIOS Setup Utility the system displays the operating system s opening screen The boot sequence is executed when You turn on the power to you...

Страница 38: ...infor mation as directed You will then be automatically connected to the Internet if you have an appropriate connection available If an automatic connection is not possible you will be asked about how you dial out from where you will be using your LifeBook notebook If you are not connected to a phone line and plan to register at a later time you may click the Skip button Once you are connected to ...

Страница 39: ...boot up your system you will see an icon called Click Me The icon is located in the Start menu for Windows XP systems When you click the Click Me icon your system will automatically build the icon tray in the bottom right of the screen These icons provide links to utilities that you will frequently access Click Me will install additional system utilities to maxi mize the performance of your system...

Страница 40: ...s mode will turn off the CPU the display the hard drive and all of the other internal components except those necessary to maintain system memory and allow for restarting Your notebook can be put in Suspend mode by Pressing the Power Suspend Resume button when your system is turned on Selecting Standby from the Windows Shut Down menu Timing out from lack of activity Allowing the battery to reach t...

Страница 41: ... information WINDOWS POWER MANAGEMENT Power Management The Power Management icon located in the Windows Control Panel allows you to configure some power management settings For example you can use Power Management to set the timeout values for turning off the display and hard disks whether you are running the notebook on battery power or one of the adapters The settings may also be changed in the ...

Страница 42: ...34 L i f e B o o k S 2 0 0 0 N o t e b o o k ...

Страница 43: ...35 4 User Installable Features ...

Страница 44: ...36 L i f e B o o k S 2 0 0 0 N o t e b o o k ...

Страница 45: ...w a low battery notifica tion message will appear If you do not respond to the low battery message the batteries will continue to discharge until they are too low to operate When this happens your notebook will go into Suspend mode There is no guarantee that your data will be saved once the notebook reaches this point Do not leave a faulty battery in your LifeBook notebook It may damage your AC ad...

Страница 46: ...to swap with one that is not charged There are two ways to swap batteries cold swapping and hot swapping Cold swapping Batteries To cold swap batteries in your battery bay follow these easy steps Figure 4 1 1 Have a charged battery ready to install 2 Shut down your notebook and disconnect the AC adapter 3 Unlock the battery bay using the lock button 4 Slide the battery bay release button to open t...

Страница 47: ... a disk You will need to format new disks unless they are preformatted Please refer to your operating system manual for step by step instructions on formatting a disk To prevent accidental erasure of the data stored on a disk slide the write protect tab until a small hole is exposed This sets the disk into a protected state where nothing can be added or removed If you want to add or remove data on...

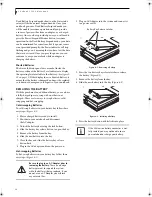
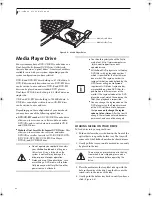
Страница 48: ...e 2 Gently pull the tray out until a media disc can easily be placed in the tray 3 Place the media into the tray label side up with the hole in the center of the disc Snap the disc onto the raised circle in the center of the tray 4 Gently push the holder tray back in until you hear a click Figure 4 6 Media Holder Tray Media Eject Button Do not operate your optical drive unless your LifeBook notebo...

Страница 49: ... the option to pause rewind fast forward and stop the movie at any point 1 To Pause the movie click the on screen button 2 To Rewind the movie click the button to rewind to a specific portion of the movie or the button to return to the opening screen 3 To Fast forward the movie click the button to forward to a specific portion of the movie or the button to jump to the ending credits 4 To Stop the ...

Страница 50: ...movie and exit the media player 4 Power down your LifeBook notebook and replace the discharged battery with an additional fully charged battery If you do not have an additional battery you should attach AC power as soon as you see the low battery warning 5 Resume your notebook operation by pressing the Suspend button again This is not required if you attached AC power without entering suspend mode...

Страница 51: ... these easy steps 1 See your PC Card manual for specific instructions on removing your card Some PC Cards may require your notebook to be in Suspend Mode or Off while removing them 2 Flip the Eject button towards the front of your note book until it is fully extended and then push it in until it is flush with the notebook This will push the PC Card slightly out of the slot allowing you to remove t...

Страница 52: ...r chip The chip can hold a variety of different information and provides you with many possible options such as allowing you to make secure purchases pay for phone calls store security information and provide personal identification and information In order to use the embedded Smart Card Reader you must purchase an optional Smart Card adapter and third party software for installation into an avail...

Страница 53: ... Card slot Figure 4 9 To install a Memory Stick or SD Card follow these steps 1 See your Memory Stick or SD Card manual for instructions on the installation of your card Some cards may require that your notebook is off while installing them 2 Make sure there is no card currently in the slot If there is see Removing a Memory Stick SD Card 3 Insert your card into the slot with the product label faci...

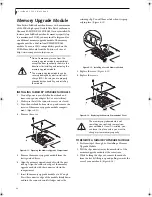
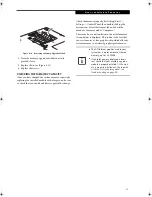
Страница 54: ...ade module with the connector slot in the compartment 7 Insert the memory upgrade module at a 45 angle Press the connector edge of the module firmly down and into the connector until it lodges under the retaining clip You will hear a click when it is prop erly in place Figure 4 12 Figure 4 12 Installing a Second Memory Module 8 Replace the cover Figure 4 13 9 Replace the screws Figure 4 13 Replaci...

Страница 55: ...s Control Panel then double clicking the System icon Select the General tab and check the amount of memory under Computer There may be a variation between the actual memory size and what is displayed This is due to the fact that your system uses a video graphics chip which allocates system memory to accelerate graphics performance The ATI internal graphics used in your system has a preset amount o...

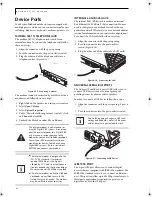
Страница 56: ...nto a LAN outlet Figure 4 16 Connecting the LAN UNIVERSAL SERIAL BUS PORTS The Universal Serial Bus 2 0 ports USB allow you to connect USB devices such as external game pads pointing devices keyboards and or speakers In order to connect a USB device follow these steps 1 Align the connector with the port opening Figure 4 17 2 Push the connector into the port until it is seated Figure 4 17 Connectin...

Страница 57: ...20 Connecting a Microphone EXTERNAL MONITOR PORT The external monitor port allows you to connect an external monitor In order to connect an external monitor follow these easy steps Figure 4 21 1 Open the flexible cover over the external monitor port 2 Align the connector with the port opening 3 Push the connector into the port until it is seated 4 Tighten the two hold down screws located on each s...

Страница 58: ...cable adapter Figure 2 3 included with your system accessories to the S Video cable from the device 2 Align the connector with the jack opening 3 Push the connector into the jack until it is seated When S Video is connected you can toggle the S Video device on and off by pressing the F11 key while holding down the Fn key Figure 4 22 Connecting an S Video Device ...

Страница 59: ...51 5 Troubleshooting ...

Страница 60: ...52 L i f e B o o k S 2 0 0 0 N o t e b o o k ...

Страница 61: ...Table that follows for more detailed troubleshooting information 8 If you have tried the solutions suggested in the Trou bleshooting Table without success contact your support representative Toll free 1 800 8Fujitsu 1 800 838 5487 Fax 1 901 259 5700 E mail 8fujitsu us fujitsu com Web site http www computers us fujitsu com support Before you place the call you should have the following information ...

Страница 62: ...Volume icon in the system tray Click on the Volume icon in the tool tray on the bottom right of the screen It looks like a speaker If the Mute box is checked click on it to uncheck it DVD CD RW CD ROM Drive Problems LifeBook notebook fails to recognize DVD CD RW CD ROM s Protective sheet is still in the DVD CD RW CD ROM drive tray Remove the protective sheet from the tray DVD CD RW CD ROM is not p...

Страница 63: ...gs Hard Drive Problems You cannot access your hard drive The setup utility is incorrectly set for your internal Primary Master or optional second hard drive Primary Slave Revise BIOS settings to set both Primary Master and Primary Slave correctly See BIOS Setup Utility on page 29 for more information The wrong drive designator was used by an application when a bootable CD ROM was used to start the...

Страница 64: ...ware of its installation Close the application and restart your notebook Your device may not have the correct software driver active See your software documentation and activate the correct driver PC Card Problems A card inserted in the PC Card slot does not work or is locking up the system The card is not properly installed Remove and re install the card See PC Cards on page 43 for more informati...

Страница 65: ...nt parameters are set for auto timeouts which are too short for your operating needs Press any button on the keyboard or move the mouse to restore operation If that fails push the Power Suspend Resume button Check your power management settings or close your applications and go to the Power Savings menu of the setup utility to adjust the timeout values to better suit your needs You are operating o...

Страница 66: ...ld the button longer This may need to be a few seconds if your application is preventing the CPU from checking for button pushes There may be a conflict with the application software Close all applications and try the button again The system powers up and displays power on informa tion but fails to load the operating system The boot sequence settings of the setup utility are not compatible with yo...

Страница 67: ... notice the display come on and go off again Press any button the keyboard or move the mouse to restore operation If that fails push the Power Suspend Resume button The display may be shut off by Standby mode Auto Suspend or Video Timeout The notebook turned on with a series of beeps and built in display is blank Power On Self Test POST has detected a failure which does not allow the display to op...

Страница 68: ...ase brightness or double click on the battery gauge and adjust Power Control under battery settings You have connected an external monitor and it does not display any information Your BIOS setup is not set to enable your external monitor Try toggling the video destination by pressing Fn and F10 together or check your BIOS setup and enable your external monitor See the Video Features submenu locate...

Страница 69: ...age appears when you restart the system there may be a serious fault which might cause you to lose data if you continue Contact your support representative Incorrect Drive A type run SETUP Type of floppy drive A not correctly identified in Setup This means that the floppy disk drive type identified in your setup utility does not agree with the type detected by the Power On Self Test Run the setup ...

Страница 70: ...orrectly perhaps by an application program that changes data stored in BIOS memory Run Setup and reconfigure the system System RAM Failed at offset nnnn System memory failed at offset nnnn of in the 64k block at which the error was detected This means that there is a fault in your built in memory If you continue to operate you risk corrupting your data Contact your support representative for repai...

Страница 71: ...rity rather than booting up from the hard drive or an external floppy disk drive perform the following steps 1 Start your system and press the F2 key when the Fujitsu logo appears You will enter the BIOS Setup Utility 2 Using the arrow keys go to the Boot menu 3 Arrow down to the Boot Device Priority submenu Press Enter 4 If Optical Media Drive or CD ROM Drive is not at the top of the list arrow d...

Страница 72: ... for your system The FDU icon should appear in the system tray at the bottom right of your screen roll the cursor over the icons to find the correct one If the FDU icon does not appear in the system tray it can be started by going to Start All Programs and clicking on Fujitsu Driver Update this will create the icon automatically To invoke the FDU menu you can either right click on the FDU icon or ...

Страница 73: ...65 6 Care and Maintenance ...

Страница 74: ...66 L i f e B o o k S 2 0 0 0 N o t e b o o k ...

Страница 75: ... to sand dust and other environmental hazards Do not expose your notebook to direct sunlight for long periods of time as temperatures above 140 F 60 C may damage your notebook Keep the covers closed on the connectors and slots when they are not in use Do not put heavy or sharp objects on the computer If you are carrying your LifeBook notebook in a brief case or any other carrying case make sure th...

Страница 76: ...tal object Do not carry lose batteries in a pocket or purse where they may mix with coins keys or other metal objects Doing so may cause an explosion or fire Do not drop puncture disassemble mutilate or incin erate the battery Recharge batteries only as described in this manual and only in ventilated areas Do not leave batteries in hot locations for more than a day or two Intense heat can shorten ...

Страница 77: ...ee cloth starting from the inner edge and wiping to the outer edge Caring for your Media Player Drive Your media player drive is durable but you must treat it with care Please pay attention to the following points The drive rotates the compact disc at a very high speed Do not carry it around or subject it to shock or vibration with the power on Avoid using or storing the drive where it will be exp...

Страница 78: ...70 L i f e B o o k S 2 0 0 0 N o t e b o o k ...

Страница 79: ...71 7 Specifications ...

Страница 80: ...72 L i f e B o o k S 2 0 0 0 N o t e b o o k ...

Страница 81: ...n Crystal View color TFT LCD delivering crisp and extra bright graphics Active matrix LCD display with simultaneous display capability The memory size and processor speed can be found in the BIOS Info section To view the BIOS refer to BIOS Setup Utility on page 29 Video Color and Resolution 13 3 TFT XGA Internal Up to 1024 x 768 pixel resolution 16M colors External Up to 1600 x 1200 pixel resoluti...

Страница 82: ...evices One IEEE 1394 4 pin type jack One modular modem RJ 11 connector One LAN RJ 45 connector One stereo headphone jack See Audio specifications One mono microphone jack See Audio specifications Port replicator connector S Video jack Wireless LAN antenna with on off switch KEYBOARD Built in keyboard with all functions of 101 key PS 2 compatible keyboards Total number of keys 84 Function keys F1 t...

Страница 83: ... applications Adobe Acrobat Reader The Adobe Acrobat Reader allows you to view navigate and print PDF files from across all of the major computing platforms Fujitsu HotKey Fujitsu HotKey allows you to control the display bright ness of your notebook in order to maximize battery life Quicken 2005 New User Edition Quicken 2005 New User Edition is a personal money management program It has features s...

Страница 84: ...76 L i f e B o o k S 2 0 0 0 N o t e b o o k ...

Страница 85: ...77 8 Glossary ...

Страница 86: ...78 L i f e B o o k S 2 0 0 0 N o t e b o o k ...

Страница 87: ...tion for bits per second Used to describe data transfer rates Boot To start up a computer and load its operating system from disk ROM or other storage media into RAM Bus An electrical circuit which passes data between the CPU and the sub assemblies inside your LifeBook notebook Byte 8 bits of parallel binary information Cache Memory A block of memory built into the micro processor which is much fa...

Страница 88: ...g PC computer systems hardware and software compo nents and peripherals DNS Domain Name System A function to control the association between the IP address and the name assigned to the computer If you do not know the IP address but if you know the computer name you can still communicate to that computer DOS Disk Operating System MS DOS is a Microsoft Disk Operating System Driver A computer program...

Страница 89: ...es standards for communication using infrared as the carrier IRQ Interrupt Request An acronym for the hardware signal to the CPU that an external event has occurred which needs to be processed KB Kilobyte LAN Local Area Network An interconnection of computers and peripherals within a single limited geographic location which can pass programs and data amongst themselves LCD Liquid Crystal Display A...

Страница 90: ...ceptance as a standard bus design PCMCIA PCMCIA is a trademark of the Personal Computer Memory Card International Association The Personal Computer Memory Card International Association is an organization that sets standards for add in cards for personal computers Peripheral Device A piece of equipment which performs a specific function associated with but not integral to a computer Examples a pri...

Страница 91: ...us data can be saved SRAM Static random access memory A specific technology of making RAM which does not require periodic data refreshing SSID Service Set Identifier Specifies which network you are joining Some systems allow you to specify any SSID as an option so you can join any network Standby To make inoperative for a period of time Your LifeBook notebook uses various suspension states to redu...

Страница 92: ...N products For more information on the Wi Fi standard go to the WECA Web site at www wirelessethernet com WLAN Wireless Local Area Network A wireless interconnection of computers and peripherals within a single limited geographic location which can pass programs and data amongst themselves Write Protect Prevent alteration of the binary state of all bits in a storage media Example all information o...

Страница 93: ...nger equivalent number REN of this equipment is 0 6B as shown on the label The REN is used to deter mine the number of devices that may be connected to a telephone line Excessive RENs on a telephone may result in the devices not ringing in response to an incoming call In most but not all areas the sum of RENs should not exceed five 5 0 To be certain of the number of devices that may be connected t...

Страница 94: ...est confirmée par le numéro d enregistrement Le sigle IC placé devant le numéro d enregistrement signifie que l enregistrement s est effectué conformément à une déclaration de conformité et indique que les spécifications techniques d Industrie Canada ont été respectées Il n implique pas qu Industrie Canada a approuvé le matériel Avant de connecter cet équipement à une ligne télépho nique l utilisa...

Страница 95: ...87 Appendix Integrated Wireless LAN User s Guide Optional Device ...

Страница 96: ...88 L i f e B o o k S 2 0 0 0 N o t e b o o k ...

Страница 97: ... of the FCC Rules These limits are designed to provide reasonable protection against harmful interference in a residential installa tion This equipment generates uses and can radiate radio frequency energy If not installed and used in accordance with the instructions it may cause harmful interference to radio communications However there is no guarantee that interfer ence will not occur in a parti...

Страница 98: ...r IEEE802 11g mode The WLAN device is Wi Fi certified and operates at the maximum data transfer rate of 54 Mbps in IEEE802 11a or IEEE802 11g mode and 11 Mbps in IEEE802 11b mode The maximum communication range indoors is approximately 80 feet 25 meters However that range will increase or decrease depending on factors such as number of walls reflective material or inter ference from external RF so...

Страница 99: ...IEEE802 11b g devices operate in Interference by microwaves does not occur with IEEE802 11a radio which operates in the 5 GHz RF band Wireless devices that transmit in the 2 4GHz fre quency range may interfere with the operation of WLAN devices in IEEE802 11b g modes Symptoms of interference include reduced throughput intermittent disconnects and large amounts of frame errors It is HIGHLY recommen...

Страница 100: ...Client Utility software 1 Click Start Program Files Atheros Atheros Client Utility 2 Choose Action and click Disable Radio ACTIVATING THE WLAN DEVICE Activation of the WLAN device can be accomplished using the same methods as the deactivation process Using the Wireless On Off Switch In Windows using the Atheros software ...

Страница 101: ...l Panel 3 If the Control Panel is in Category view switch to Classic view by clicking Switch to Classic View which can be found in the left frame of the Control Panel window 4 Double click the icon Atheros Client Utility to execute the Atheros Client Utility 5 From the Current Status page click the Profile Management tab 6 If this is your first time using this utility highlight the profile Default...

Страница 102: ... then enter data for IP address and Subnet mask See page 101 for IP address setting For access point infrastructure connection If your network uses DHCP select Obtain an IP address automatically and Obtain DNS server address automatically If your network uses static IP addresses consult with your network adminis trator for the correct IP address settings 8 Click the OK button Processing will retur...

Страница 103: ... Control Panel 2 If the Control Panel is in Category view switch to Classic view by clicking Switch to Classic View under Control Panel the left frame If you are already in Classic view Switch to Category View will be displayed 3 Double click Network Connections A list of cur rently installed networks will be displayed 4 Right click Wireless Network Connection in the list and then click Properties...

Страница 104: ...connected The folder that was specified in Setting the file sharing func tion on page 95 will be displayed 5 Double click the folder to be accessed Confirming the status of the radio 1 Right click the Atheros icon in the lower right cor ner of the screen 2 Click Open Atheros Client Utility The Atheros Client Utility window opens 3 Contained within the Current Status and Profile Management tabs you...

Страница 105: ...cryption used WEP WEP encryption algorithm used CKIP WEP encryption algorithm used TKIP WEP encryption algorithm used Signal Strength Displays the current strength of the signal being received by the radio Current Channel Displays the current transmit and receive channel being used Radio Status Displays the current status of the radio ...

Страница 106: ...better sight To check the wave condition refer to the following page Confirming the status of the radio on page 96 The WLAN device has been deactivated or disabled Check if the wireless switch is turned ON Also verify Disable Radio is not checked in Network setting window The computer to be connected is turned off Check if the computer to be connected is turned ON RF interference from Access Point...

Страница 107: ...s also called an Ethernet address or IEEE MAC address is the 48 bit address typically written as twelve hexadecimal digits 0 through 9 and A through F or as six hexadecimal numbers separated by periods or colons e g 0080002012ef 0 80 0 2 20 ef which uniquely identifies a computer that has an Ethernet interface MTU Maximum Transmission Unit The maximum size of data which can be transmitted at one t...

Страница 108: ...es one WLAN from another so all access points and all devices attempting to connect to a specific WLAN must use the same SSID A device will not be permitted to join the BSS unless it can provide the unique SSID Because the SSID is broadcast in plain text it does not supply any security to the network Subnet mask TCP IP network is controlled by being divided into multiple smaller networks subnets I...

Страница 109: ...twork An IP address is expressed with four values in the range between 1 and 255 Set the each computer as follows The value in paren theses is a subnet mask Example Computer A 192 168 100 2 255 255 255 0 Computer B 192 168 100 3 255 255 255 0 Computer C 192 168 100 4 255 255 255 0 Computer X 192 168 100 254 255 255 255 0 IP addressing is much more complicated than can be briefly explained in this ...

Страница 110: ...fication Type of network Atheros SuperAG 802 11a b g WLAN device conforms to IEEE 802 11a and 802 11b g Wi Fi based Transfer rate Automatic switching IEEE 802 11a g 54 Mbps maximum data rate IEEE 802 11b 11 Mbps maximum data rate Active frequency 802 11b g 2400 2473 MHz 802 11a 4900 5850 MHz Number of channels 802 11a 8 independent channels 802 11b g 11 channels 3 non overlapping channels Security...

Страница 111: ...2 73 Controls and Connectors 6 Conventions Used in the Guide 1 Cursor 17 Cursor Keys 15 D DC Power Jack 10 27 Device Ports 48 74 DIMM 46 Disk care 68 Display Panel 6 28 adjusting 28 brightness 28 closing 28 latch 6 opening 28 problems 59 Display Timeout 33 Dolby Headphone 41 Double Clicking 17 Dragging 18 Drivers and Application Restore CD 63 DVD CD RW CD ROM drive access indicator 14 problems 54 ...

Страница 112: ... panel 23 LifeBook Application Media Player Panel 21 LifeBook Application Media Player Panel 6 M Media Player care 69 Control Panel 41 loading 40 removing 41 Software 41 using 42 Media Player Drive 40 Memory capacity 47 compartment 12 46 installing 46 problems 56 removing 46 47 upgrade module 46 Memory Stick installing 45 Microphone Jack 8 49 Modem 10 problems 56 Modem Jack 48 Modem Result Codes 6...

Страница 113: ...s 73 Audio 73 Chipset 73 Dimensions and Weight 74 Environmental Requirements 75 Keyboard 74 Memory 73 Microprocessor 73 Power 74 Video 73 Status Indicator Panel 6 13 Stereo Speakers 6 Suspend Mode 32 T Touchpad 17 buttons 17 controls 18 Touchpad Pointing Device 8 Troubleshooting 53 U Universal Serial Bus Ports 48 Unpacking 5 USB 2 0 Ports 10 48 V Volume control 19 W Warranty 1 Windows Windows XP H...

Страница 114: ...106 L i f e B o o k S 2 0 0 0 N o t e b o o k ...

Страница 115: ......

Страница 116: ......

Страница 117: ......

Страница 118: ......

Страница 119: ......

Страница 120: ......

Отзывы: