background image

10

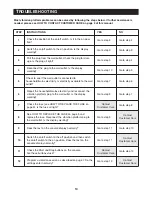
T

ROUBLESHOOTING

STEP

INSTRUCTIONS

YES

NO

1

Check the position of the on/off switch. Is it in the on posi-
tion?

Go to step 3

Go to step 2

2

Switch the on/off switch to the on position. Is the display
working?

Go to step 9

Go to step 3

3

Pull the plug from the wall outlet. Check the plug for dam-
age. Is the plug all right?

Go to step 5

Go to step 4

4

Reconnect the plug to the wall outlet. Is the display 
working?

Go to step 10

Go to step 5

5

Check to see if the wall outlet is connected to
household/mains electricity. Is electricity available to the wall
outlet?

Go to step 7

Go to step 6

6

Repair the household/mains electricity and reconnect the 
vibration platform plug to the wall outlet. Is the display 
working?

Go to step 9

Go to step 7

7

Check the fuse (see HOW TO REPLACE THE FUSE on
page 9). Is the fuse all right?

Contact

Customer Care

Go to step 8

8

See HOW TO REPLACE THE FUSE on page 9 and 
replace the fuse. Reconnect the vibration platform plug to
the wall outlet. Is the display working?

Go to step 9

Contact

Customer Care

9

Does the text on the console display normally?

Go to step 11

Go to step 10

10

Switch the on/off switch to the off position and then switch
the on/off switch to the on position. Does the text on the
console display normally?

Go to step 11

Contact

Customer Care

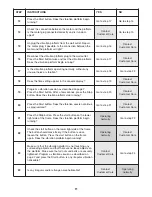
11

Check the Start and Stop buttons on the console. 
Are these buttons stuck?

Contact

Customer Care

Go to step 12

12

Program a vibration session as described on page 7. Do the
settings enter normally? 

Go to step 13

Contact

Customer Care

Most vibration platform problems can be solved by following the steps below. If further assistance is
needed, please see HOW TO CONTACT CUSTOMER CARE on page 2 of this manual.

Содержание i Tonic

Страница 1: ... Model No _ Serial No The model number and serial num ber are found in the location shown below Write the model number and serial number in the space above QUESTIONS At FreeMotion Fitness we re committed to providing complete customer satisfaction If you have questions see HOW TO CONTACT CUSTOMER CARE on page 2 Model and Serial Number Decal ...

Страница 2: ......

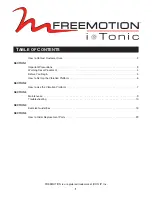
Страница 3: ...efore You Begin 5 How to Set Up the Vibration Platform 6 SECTION 2 How to Use the Vibration Platform 7 SECTION 3 Maintenance 9 Troubleshooting 10 SECTION 4 Exercise Guidelines 13 SECTION 5 How to Order Replacement Parts 29 TABLE OF CONTENTS 1 FREEMOTION is a registered trademark of ICON IP Inc ...

Страница 4: ...on the MODEL NUMBER OF THE PRODUCT see the front cover of this manual for the location the NAME OF THE PRODUCT FREEMOTION ITONIC vibration platform the SERIAL NUMBER OF THE PRODUCT see the front cover of this manual for the location HOW TO CONTACT CUSTOMER CARE Customer Care 1 800 201 2109 Monday Friday 8 a m 5 p m Mountain Time FreeMotion Fitness Inc 1096 Elkton Drive Suite 600 Colorado Springs C...

Страница 5: ...m at a time 10 Always wear appropriate exercise clothes and athletic shoes when operating the vibration platform Do not wear loose clothes that could become caught on the vibration plat form 11 Keep your back straight when using the vibra tion platform do not arch your back When standing on the vibration platform bend your knees slightly and balance your weight on the balls of your feet 12 If you ...

Страница 6: ...ribed in this manual Servicing other than the procedures in this manual should be performed by an au thorized service representative only WARNING DECAL PLACEMENT WARNING Before beginning this or any exercise program consult your physician This is especially important for persons over the age of 35 or persons with pre existing health problems Read all instructions before using FreeMotion Fitness as...

Страница 7: ...l carefully before using the FREEMOTION ITONIC vibration platform If you have questions after reading this manual please see HOW TO CONTACT CUSTOMER CARE on page 2 To help us assist you note your product model num ber and serial number before contacting us The model number and serial number can be found on a decal at tached to the vibration platform see the front cover of this manual for the locat...

Страница 8: ...nual and order a 3 6 m 12 foot power cord The receptacle must be grounded HOW TO CONNECT THE POWER CORD IN THE UK This product must be earthed If it should malfunc tion or break down earthing provides a path of least resistance for electric current to reduce the risk of elec tric shock This product is for use on a dedicated 10 amp 240 volt circuit No other appliance should be on the same circuit T...

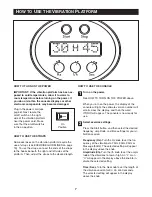
Страница 9: ... desired length HOW TO USE THE CONSOLE Turn on the power See HOW TO TURN ON THE POWER above When you turn on the power the display of the console will light the software version number will scroll across the display and then the word ITONIC will appear The console is now ready for use Select exercise settings Press the Start button and then select the desired frequency amplitude and time settings ...

Страница 10: ...onds remaining in the session When there is no time remaining the vibration platform will stop automatically To stop the vibration session at any time press the Stop button on the console Continue programming vibration sessions as desired When a vibration session is completed you can continue to program additional vibration sessions as desired Note If you do not program or start a new vibration se...

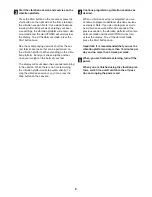
Страница 11: ... platform to the floor CAUTION To reduce the risk of injury bend your knees and keep your back straight Make sure to use your legs rather than your back to lift the vibration platform HOW TO REPLACE THE FUSE If the vibration platform does not function and the con sole does not light even when the power cord is plugged in and the on off switch is in the on position the fuse may need to be replaced ...

Страница 12: ...the fuse see HOW TO REPLACE THE FUSE on page 9 Is the fuse all right Contact Customer Care Go to step 8 8 See HOW TO REPLACE THE FUSE on page 9 and replace the fuse Reconnect the vibration platform plug to the wall outlet Is the display working Go to step 9 Contact Customer Care 9 Does the text on the console display normally Go to step 11 Go to step 10 10 Switch the on off switch to the off posit...

Страница 13: ...n page 7 Press the Start button After a few seconds press the Stop button Does the vibration platform stop running Go to step 20 Contact Customer Care 20 Press the Start button Does the vibration session continue as programmed Go to step 21 Contact Customer Care 21 Press the Stop button Press the start button on the lower right side of the frame Does the vibration platform begin running Operating ...

Страница 14: ...12 NOTES ...

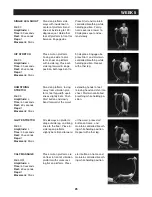
Страница 15: ...tform hands on platform shoul der width apart Extend to plank position on toes chest over hands arms extended maintaining a straight spine and engag ing abs Press start button on frame and maintain controlled breathing while holding position For dy namic exercise slowly lower body and return to start position Place mat on platform Sit on platform facing side ways engage abs and lift feet off floor...

Страница 16: ...and lower until elbows are bent 90 degrees Maintain con trolled breathing while holding position For dy namic exercise slowly lower body and return to start position Stand on platform facing away from vibration plat form feet hip width apart knees slightly bent Push Start button and slowly bend forward at the waist extending hands to feet relaxing head and chin into chest Maintain controlled breat...

Страница 17: ...tform hands on platform shoul der width apart Extend to plank position on toes chest over hands arms extended maintaining a straight spine and engag ing abs Press start button on frame and maintain controlled breathing while holding position For dy namic exercise slowly lower body and return to start position Place mat on platform Sit on platform facing side ways engage abs and lift feet off floor...

Страница 18: ...and lower until elbows are bent 90 degrees Maintain con trolled breathing while holding position For dy namic exercise slowly lower body and return to start position Stand on platform facing away from vibration plat form feet hip width apart knees slightly bent Push Start button and slowly bend forward at the waist extending hands to feet relaxing head and chin into chest Maintain controlled breat...

Страница 19: ...tform hands on platform shoul der width apart Extend to plank position on toes chest over hands arms extended maintaining a straight spine and engag ing abs Press start button on frame and maintain controlled breathing while holding position For dy namic exercise slowly lower body and return to start position Place mat on platform Sit on platform facing side ways engage abs and lift feet off floor...

Страница 20: ...c exercise slowly lower body and return to start position BICEPS CURL Hz 30 Amplitude L Time 45 seconds Rest 45 seconds Reps 1 Movement Static UPRIGHT ROW Hz 30 Amplitude L Time 45 seconds Rest 45 seconds Reps 1 Movement Static Place mat on platform Face platform Place fore arms on platform elbows shoulder width apart Maintain contact with plat form and grip lower portion of frame With feet on flo...

Страница 21: ...rame and maintain controlled breath ing while holding position HAMSTRING STRETCH Hz 35 Amplitude L Time 45 seconds Rest 45 seconds Reps 1 Movement Static Place mat on platform Facing one side to plat form kneel on platform with inside leg Place out side leg forward in lunge position both legs bent to 90 degrees Engage abs press Start and maintain controlled breathing while holding position Repeat ...

Страница 22: ...n platform hands on platform shoul der width apart Extend to plank position on toes chest over hands arms extended maintaining a straight spine and engag ing abs Press start button on frame and maintain controlled breathing while holding position For dy namic exercise slowly lower body and return to start position Place mat on platform Sit on platform facing side ways engage abs and lift feet off ...

Страница 23: ... and return to start position BICEPS CURL Hz 30 Amplitude L Time 60 seconds Rest 60 seconds Reps 1 Movement Static UPRIGHT ROW Hz 30 Amplitude L Time 60 seconds Rest 60 seconds Reps 1 Movement Static Place mat on platform and place core board length wise in front of platform Face platform Place fore arms on platform elbows shoulder width apart Maintain contact with plat form and grip lower portion...

Страница 24: ...rame and maintain controlled breath ing while holding position HAMSTRING STRETCH Hz 35 Amplitude L Time 60 seconds Rest 60 seconds Reps 1 Movement Static Place mat on platform Facing one side to plat form kneel on platform with inside leg Place out side leg forward in lunge position both legs bent to 90 degrees Engage abs press Start and maintain controlled breathing while holding position Repeat ...

Страница 25: ...n platform hands on platform shoul der width apart Extend to plank position on toes chest over hands arms extended maintaining a straight spine and engag ing abs Press start button on frame and maintain controlled breathing while holding position For dy namic exercise slowly lower body and return to start position Place mat on platform Sit on platform facing side ways engage abs and lift feet off ...

Страница 26: ...ic exercise slowly lower body and return to start position BICEPS CURL Hz 30 Amplitude H Time 60 seconds Rest 60 seconds Reps 1 Movement Static UPRIGHT ROW Hz 30 Amplitude H Time 60 seconds Rest 60 seconds Reps 1 Movement Static Place mat on platform Face platform Place fore arms on platform elbows shoulder width apart Maintain contact with plat form and grip lower portion of frame With feet on fl...

Страница 27: ...rees Engage abs press Start and maintain controlled breathing while holding position Repeat with other leg HIP STRETCH Hz 35 Amplitude L Time 45 seconds Rest 45 seconds Reps 1 Movement Static Stand on platform side ways with inside foot in center of platform Bend knee of inside leg to 130 degree squat Hold other foot off platform in front for balance Engage abs Press Start and maintain controlled ...

Страница 28: ...n platform hands on platform shoul der width apart Extend to plank position on toes chest over hands arms extended maintaining a straight spine and engag ing abs Press start button on frame and maintain controlled breathing while holding position For dy namic exercise slowly lower body and return to start position Place mat on platform Sit on platform facing side ways engage abs and lift feet off ...

Страница 29: ... exercise slowly lower body and return to start position BICEPS CURL Hz 30 Amplitude L Time 60 seconds Rest 60 seconds Reps 1 Movement Static UPRIGHT ROW Hz 30 Amplitude L Time 60 seconds Rest 60 seconds Reps 1 Movement Static Place mat on platform Face platform Place fore arms on platform elbows shoulder width apart Maintain contact with plat form and grip lower portion of frame With feet on floo...

Страница 30: ...rees Engage abs press Start and maintain controlled breathing while holding position Repeat with other leg HIP STRETCH Hz 35 Amplitude L Time 60 seconds Rest 60 seconds Reps 1 Movement Static Stand on platform side ways with inside foot in center of platform Bend knee of inside leg to 130 degree squat Hold other foot off platform in front for balance Engage abs Press Start and maintain controlled ...

Страница 31: ...HOW TO ORDER REPLACEMENT PARTS 29 To order replacement parts for the vibration platform please see HOW TO CONTACT CUSTOMER CARE on page 2 of this manual ...

Страница 32: ...Part No CC7284 R0307A Printed in USA 2007 ICON IP Inc FreeMotion Fitness Inc 1096 Elkton Drive Suite 600 Colorado Springs CO 80907 ...

Отзывы: